Creating clean and precise lines is an essential skill for any designer using Adobe InDesign. This article walks you through how to use the line tool effectively, from basic line creation to customizing its appearance. Follow these steps to master the basics of the line tool and add professional flair to your designs.
Step 1: Accessing the Line Tool
- Open an InDesign document.
- Locate the Line Tool in the toolbar. It’s represented by a small line icon.
- Click on the Line Tool to select it.
Step 2: Drawing a Line
- Navigate to your artboard.
- Click and drag while holding the left mouse button to create a line.
- To ensure the line is perfectly straight, hold the Shift key while dragging.
- Release the mouse button to finalize the line. You’ll notice anchor points at both ends, indicating the line’s start and end.
Step 3: Making the Line Visible
Newly created lines might not be visible because they lack stroke weight or color. Here’s how to fix that:
Add Color
- Select the line by clicking on it.
- Go to the toolbar at the top and locate the stroke color option.
- If the color appears in the fill instead of the stroke, use the Swap Fill and Stroke button (two arrows) to move the color to the stroke.
Adjust Stroke Weight
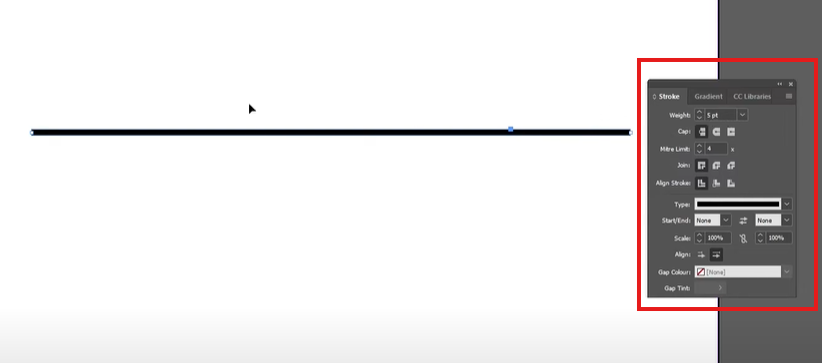
- Open the Stroke Panel. To do this:
- Navigate to the top menu: Window > Stroke.
- Or use the keyboard shortcut
Ctrl + F10(Windows) orCmd + F10(Mac).
- Adjust the Weight slider to increase or decrease the thickness of the line. A value like 5 points is a good starting point.
Step 4: Customizing the Line
Once you’ve added color and weight, you can further customize the line:
Dashed or Dotted Lines
- With the line selected, go to the Type dropdown in the Stroke Panel.
- Choose options such as Dashed, Dotted, or Wavy lines to change the line style.
Changing Line Caps
- Zoom in on the line to see its endpoints.
- In the Stroke Panel, find the Cap options. You can make the ends of the line:
- Square
- Rounded
- Flat
- Select a cap style that suits your design.
Finalizing the Design
After you’ve made the desired adjustments, click outside the artboard to view your finished line. You now have a fully styled line in your InDesign project!
Summary
Using the Line Tool in Adobe InDesign is simple and versatile. From drawing basic straight lines to adding unique styles and customizing stroke properties, mastering this tool will enhance your designs.
