If you’re looking to install FFmpeg on your Windows system, you’ve come to the right place. FFmpeg is a powerful open-source command-line tool used for processing audio and video files. Whether you want to convert videos, extract audio, or trim clips, FFmpeg is an essential utility for video editors, developers, and media professionals.
In this article, we’ll walk you through the complete FFmpeg installation process on Windows, including downloading it from the official website, configuring your system environment variables, and testing it via Command Prompt.
🧰 What is FFmpeg?
FFmpeg is a free software project that produces libraries and programs for handling multimedia data. It’s highly versatile and can be used to:
- Convert multimedia files between formats
- Extract audio from video
- Trim and merge video files
- Stream live video and audio
- Encode and decode multimedia content
🔗 Official Website: https://ffmpeg.org
✅ Step-by-Step Guide to Install FFmpeg on Windows
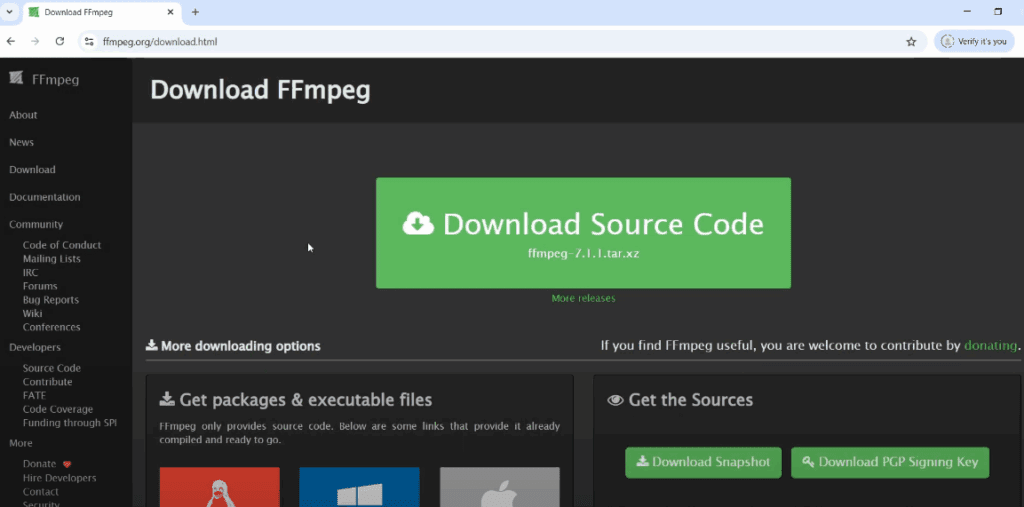
Step 1: Download FFmpeg
- Open your browser and go to https://ffmpeg.org.
- Click on the “Download” option from the menu.
- Under the Windows section, click on the link that says:
“Windows builds by gyan.dev”. - On the new page, click “ffmpeg-release-full.7z” or similar latest version under “Get full” to download the ZIP file.
Step 2: Extract the ZIP File
- Once downloaded, right-click the ZIP file and choose “Extract Here” or “Extract to ffmpeg…” using any archive tool like WinRAR or 7-Zip.
- You will get a folder, which by default will have a long name like
ffmpeg-6.0-full_build. - Rename this folder to just
ffmpegfor convenience.
Step 3: Move FFmpeg Folder to Root Drive
- Cut the renamed
ffmpegfolder. - Paste it into the Local Disk (C:) or any other desired location.
Step 4: Add FFmpeg to System Environment Variables
- Press
Win + Sand search for “Environment Variables”. - Click on “Edit the system environment variables” and then on “Environment Variables…”.
- In the System Variables section, find and select the variable named Path.
- Click Edit, then New, and paste the path to the
binfolder inside yourffmpegdirectory.
For example:C:\ffmpeg\bin - Click OK on all windows to apply the changes.
Step 5: Verify the Installation
- Press
Win + R, typecmd, and hit Enter to open Command Prompt. - Type the following command and press Enter:
ffmpeg -version - If everything is set up correctly, you’ll see FFmpeg version information displayed.
🎉 Congratulations!
You’ve successfully installed FFmpeg on your Windows system. Now you can start using this powerful tool for all kinds of multimedia operations directly from the command line.
📝 Disclaimer:
FFmpeg is a command-line utility. There’s no graphical user interface, so you’ll need to be comfortable typing commands. Make sure to download FFmpeg only from its official website or trusted sources to avoid security risks.
🔖 Tags:
ffmpeg, install ffmpeg, ffmpeg windows, command line video tool, multimedia processing, ffmpeg tutorial, video converter, audio extractor
🔗 Hashtags:
#FFmpeg #VideoConverter #AudioExtractor #WindowsTools #TechGuide #FFmpegInstallation #CommandLineTools #MultimediaTools #OpenSourceSoftware
If you found this article helpful, consider bookmarking it for future reference or sharing it with someone who might need to install FFmpeg.