One of the most frustrating issues you may encounter when starting your laptop is the dreaded error message:
“Boot Device Not Found. Please install an operating system on your hard disk.”
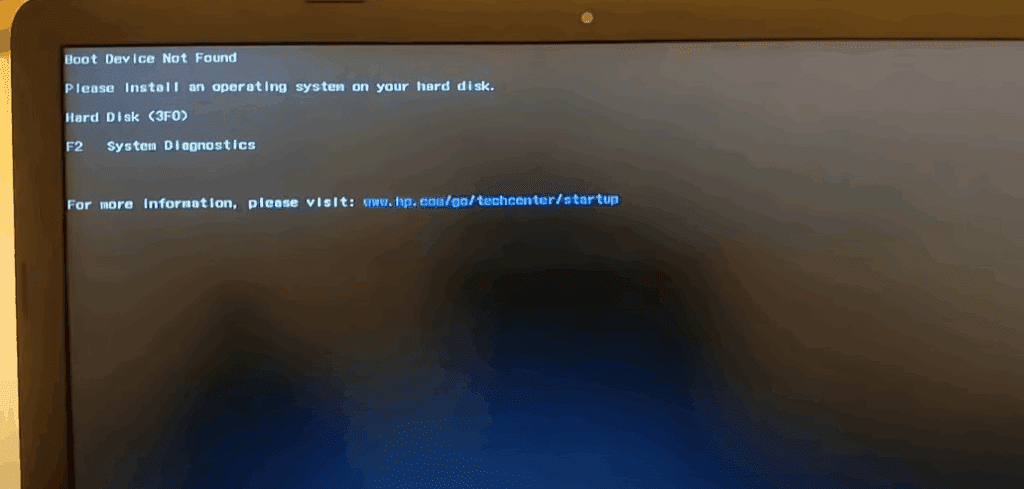
This usually means your system is not recognizing the hard disk that holds the operating system, and therefore cannot boot into Windows. Don’t worry—this issue can often be resolved from the BIOS settings without needing to reinstall the OS.
In this article, we’ll walk you step-by-step through how to fix the “Boot Device Not Found” error and get your system running again.
Step-by-Step Guide to Fix the Boot Device Error
Step 1: Turn On Your Laptop and Enter BIOS
- Press the Power button to turn on your laptop.
- Immediately start pressing the F10 key repeatedly until you enter the BIOS Setup Utility. Note: On some laptops, the BIOS key may be F2, DEL, or ESC depending on the manufacturer. You can refer to the on-screen prompt at startup or your laptop’s manual.
Step 2: Navigate to System Configuration
- Once you’re in the BIOS setup screen, use the arrow keys on your keyboard to move through the options.
- Navigate to the “System Configuration” tab.
- Under this tab, select “Boot Options” and press Enter.
Step 3: Enable Legacy Support
- Within Boot Options, look for a setting called “Legacy Support”.
- If Legacy Support is Disabled, you need to Enable it:
- Use the arrow keys to navigate to “Legacy Support”.
- Press Enter to open the toggle menu.
- Select “Enable” using the arrow keys and confirm by pressing Enter.
Step 4: Save and Exit BIOS
- After enabling Legacy Support, it’s time to save your changes.
- Look at the bottom of the BIOS screen—you’ll likely see an option that says:
- F10 – Save and Exit
- Press the F10 key.
- A confirmation prompt will appear: “Exit Saving Changes?”
- Use the arrow keys to highlight Yes, then press Enter.
Step 5: Enter the Security Code (if prompted)
Some systems require a security confirmation after BIOS changes:
- You might see a set of random numbers on the screen with a prompt asking you to “Enter the code and press Enter”.
- Carefully type the exact numbers using your keyboard (you may not see the characters appear on the screen).
- Press Enter to confirm.
Step 6: Wait for Windows to Boot
After completing the above steps, your system will restart. If the hard disk is properly connected and functional, Windows should now start booting normally.
You’ll likely see a message saying “Please wait…” followed by the Windows loading screen. Within moments, your desktop will appear, and your laptop will be back to normal operation.
Why This Works
The “Boot Device Not Found” error usually occurs when:
- Legacy Support is disabled in BIOS (especially if the drive is formatted in a legacy-compatible mode).
- BIOS is set to boot from an incorrect device.
- The hard disk is slightly loose or not properly connected (in that case, you may need to reseat it).
By enabling Legacy Support, you allow the system to detect older boot configurations and devices that might otherwise be ignored in UEFI mode.
How to Access BIOS on Different Laptops
| Laptop Brand | BIOS Key |
|---|---|
| HP | F10 or ESC |
| Dell | F2 or F12 |
| Lenovo | F1 or F2 |
| Acer | F2 or DEL |
| ASUS | F2 or ESC |
| Toshiba | F2 |
Press the BIOS key immediately after turning on your laptop. If you miss it, simply restart and try again.
Conclusion
Fixing a “Boot Device Not Found” error doesn’t have to be difficult. By enabling Legacy Support in BIOS and ensuring your hard disk is properly detected, you can quickly restore your system’s functionality.


If this method works for you, be sure to bookmark this article for future reference. And remember—if your hard drive isn’t detected even after BIOS changes, you may need to physically check its connection or replace it if faulty.
Tags:
boot device not found, how to fix boot error, legacy support bios, bios setup boot device, laptop not detecting hard drive, fix bios boot issue, operating system not found, hard disk boot error
Hashtags:
#booterror #biossettings #fixbootissue #legacybios #laptoptips #techsupport #windowsboot #operatingsystemerror


Thank you so much for this… It worked… You’re life savers…
Is it sustainable though? Should the issue keep reoccurring? Is there a way to avoid this situation once and for all?
Thank you for your kind words — we’re really glad the solution worked for you!
To answer your question:
The fix is usually sustainable if the root cause was a misconfigured boot order, temporary glitch, or corrupted boot files that were repaired. However, if the issue keeps reoccurring, it could indicate a deeper problem like:
A failing hard drive or SSD
A loose internal connection (especially after a physical impact)
BIOS settings resetting due to a weak CMOS battery
File system corruption due to forced shutdowns or malware
How to avoid this situation long-term:
Back up your data regularly
Run disk checks using tools like chkdsk or manufacturer diagnostics
Avoid forced shutdowns or power interruptions
Update BIOS/UEFI to the latest stable version from your laptop brand’s website
Replace the hard drive if it’s showing signs of failure (e.g., slow boot, clicking sounds, frequent crashes)
If the error appears again, it’s worth checking the health of your hard drive with tools like CrystalDiskInfo or your laptop manufacturer’s diagnostic utility.