In today’s fast-paced digital workspaces, productivity is all about multitasking efficiently. If you’re someone who works in an office, is a student, or regularly manages tasks on a desktop or laptop, then toggling between multiple windows can be overwhelming. But what if you could turn your spare laptop or desktop into a second screen—wirelessly?
That’s exactly what we’ll cover in this article. By the end, you’ll be able to extend your Windows display to another PC wirelessly without using any HDMI cables or hardware dongles. This feature is built right into Windows, but requires a few setup steps. So let’s get started.
💡 Why Use an Extended Screen?
Before diving into the technical steps, let’s understand why this is such a useful trick:
- 🚀 Boost Productivity: Keep your research open on one screen while working on another.
- 📊 Dual App Usage: Run Excel or PowerPoint on one screen and meetings on the other.
- 🎓 Perfect for Students: Take notes and attend lectures simultaneously.
- 🧠 No Extra Monitor Needed: Repurpose your old laptop as a second screen.
🖥️ What You’ll Need
Let’s name the devices for clarity:
- Computer 1 (Main PC) – The one you are actively working on.
- Computer 2 (Extended Display) – The one you want to use as a second screen.
Make sure both devices:
- Are on Windows 10 version 2004 or later (some features may not work in older versions).
- Are connected to the same Wi-Fi network.
- Have Wireless Display installed (we’ll cover how to add this).
🛠️ Step 1: Prepare the Second Computer (Computer 2)
Let’s first set up the machine that will receive the extended display.
- Press
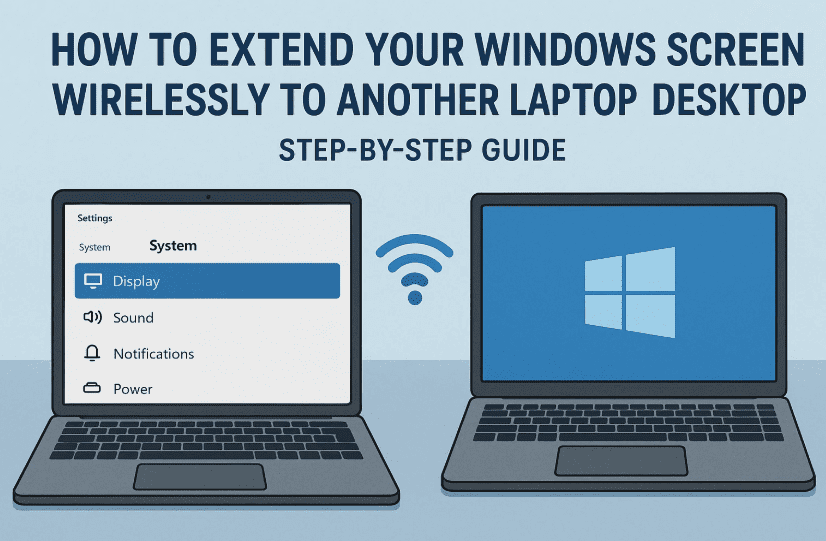
Windows + Ito open Settings - Go to System > Projecting to this PC
- You might see options grayed out or not working. That’s because the Wireless Display feature isn’t installed yet.
✅ If you see “This device doesn’t support receiving Miracast”:
Here’s how to fix that:
- Go to Settings > Apps > Optional Features
- Scroll down and click Add a feature
- Search for Wireless Display
- Click Install (It’s ~6MB; install time is 1–2 minutes)
- Once installed, go back to Projecting to this PC and configure:
- “Some Windows and Android devices can project…” → Available everywhere
- “Ask to project…” → Every time a connection is requested (optional)
- “Require PIN for pairing” → Set as you prefer
💡 Tip: Disable the “Only when plugged in” option if you want to use this feature on battery power.
🔄 Step 2: Setup on Main Computer (Computer 1)
Now it’s time to send the screen wirelessly from your main PC to the second one.
- On your main PC, press
Windows + K
This will open the Connect panel from the right-side Action Center. - Wait a few seconds; your Computer 2’s name should appear.
- Click on the name to start the connection.
- On Computer 2, you’ll get a prompt asking if you want to allow the projection.
- Click Yes or Allow to proceed.
That’s it! Your Computer 2 should now display your main PC’s screen as a wireless extended monitor.
🖱️ Step 3: Using the Dual-Screen Setup
Once connected:


- You can drag windows across both screens
- Use it as an Extended Display or Duplicate Display (adjustable in Display Settings)
- Control mouse and keyboard seamlessly between both systems
Try opening Chrome, PowerPoint, or Premiere Pro on your main system and dragging them to the second screen for demonstration. It’s super fluid and works just like a traditional second monitor setup.
🔌 Disconnecting the Wireless Screen
When you’re done:
- Click the Disconnect button from the projection toolbar (visible on top of the extended screen)
- Or simply press
Windows + Kon your main PC and select Disconnect
This will restore Computer 2 to its original state, and the connection will close.
🔄 Bonus Tip: Reversing the Connection
Want to project Computer 1’s screen to Computer 2 instead? Follow the same process from the other side:
- Open Connect (Windows + K) on Computer 2
- Select Computer 1 (ensure Wireless Display is installed on both)
- Accept the connection request
Boom—now the screen goes the other way!
❓FAQs: Answering Common Questions
Q1. Do I need an HDMI or DisplayPort cable?
Nope. This is a completely wireless method using Miracast over Wi-Fi.
Q2. What if Wireless Display is not found?
Ensure you’re running Windows 10 version 2004 or later, and check for Windows Updates if it doesn’t appear.
Q3. Can I do this between a desktop and a laptop?
Yes, as long as both support Miracast and have Wi-Fi enabled, this works between any two Windows 10/11 devices.
Q4. Is there any lag in wireless projection?
There may be minor latency, especially on lower-end devices or poor Wi-Fi networks. It’s fine for productivity, presentations, and web work—not ideal for high-FPS gaming.
🛑 Disclaimer
This tutorial is designed for educational purposes. Actual performance may vary depending on your PC’s hardware and Windows version. Some devices may not support Miracast natively or may require driver updates.
🏁 Final Thoughts
And that’s a wrap! Using your spare laptop or desktop as a second wireless screen is a game-changing hack that can enhance your multitasking, improve workflow, and save money on external monitors.
So, whether you’re working from home, managing office presentations, or studying online—this technique can help you do more in less time.
✅ Tags:
windows wireless display, mirroring screen, dual monitor setup, extend screen without cable, productivity hacks, windows screen casting, wireless screen projection, multitasking with two PCs, laptop second screen, miracast setup
✅ Hashtags:
#windows10 #windows11 #productivity #wirelessdisplay #miracast #extendmonitor #techguide #dualmonitorsetup #windowsfeatures


