Introduction
Aligning text to a baseline grid ensures uniformity and professionalism in your layouts. This feature is especially useful in long-form documents like books, magazines, or reports. In this article, we’ll walk you through the step-by-step process of aligning text to the baseline grid in Adobe InDesign, from setting up the grid to applying it to your text.

Step 1: Enable the Baseline Grid
- Open your Adobe InDesign document.
- To make the baseline grid visible:
- Go to the top menu and click on View > Grids & Guides > Show Baseline Grid.
- Alternatively, use the View Options in the toolbar to enable the baseline grid.
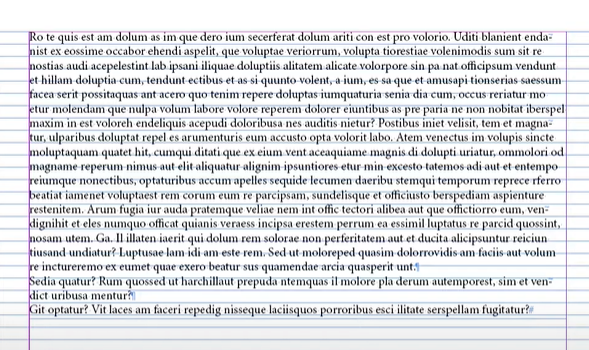
- Once activated, you’ll see horizontal lines spanning your document. These represent the baseline grid.
Step 2: Adjust Baseline Grid Preferences
By default, the baseline grid might not align with your text’s leading. To customize the grid:
- Go to Edit > Preferences > Grids (Windows) or InDesign > Preferences > Grids (Mac).
- In the Grids Preferences window, focus on the following settings:
- Start: This value determines where the baseline grid begins. For example, set it to
12.7 mmor another value based on your design needs. - Increment Every: Set this value to match the leading (line spacing) of your text. For instance, if your text uses a 14-point leading, enter
14 pt.
- Start: This value determines where the baseline grid begins. For example, set it to
- Click OK to save the changes. The baseline grid will now update to reflect your settings.
Step 3: Align Text to the Baseline Grid
To align your text:
- Select all the text in your document:
- Use the Type Tool (
T) and pressCtrl + A(Windows) /Cmd + A(Mac). - Alternatively, manually select the desired text with your mouse.
- Use the Type Tool (
- Open the Paragraph Formatting Controls in the top toolbar.
- Locate the Align to Baseline Grid button (it resembles horizontal lines with an arrow).
- Click the button. Your text will snap to the baseline grid.
Step 4: Update Paragraph Styles
If you’re using paragraph styles, aligning text to the baseline grid can cause a temporary override in the style. Here’s how to update it:
- Open the Paragraph Styles Panel.
- Select the style applied to your text.
- You’ll notice a + symbol next to the style name, indicating an override.
- Right-click on the style and choose Redefine Style. This updates the style to include the baseline grid alignment.
Step 5: Apply Styles to New Text
When you create new text frames and apply the updated paragraph style, the text will automatically align to the baseline grid. If alignment doesn’t occur:
- Select the new text.
- Apply the paragraph style from the Paragraph Styles Panel.
- Confirm the alignment by enabling Preview Mode (
W).
Conclusion
Aligning text to the baseline grid in Adobe InDesign is a simple yet powerful technique to ensure consistent and professional layouts. By customizing your grid settings and integrating them into paragraph styles, you can save time and maintain uniformity throughout your document.
Hashtags: #AdobeInDesign #InDesignTips #Typography #BaselineGrid #TextAlignment #GraphicDesign


