If you’ve ever tried to expand your C: drive after freeing up some space, only to find the “Extend Volume” option greyed out in Disk Management, you’re not alone.
This issue confuses thousands of Windows users — especially those upgrading drives or cleaning up partitions. The good news? It’s fixable.
In this article, we’ll walk you through two reliable methods to expand your drive without losing data:
- A quick and easy third-party method using a trusted free tool.
- A more advanced manual method using only Microsoft’s built-in tools and PowerShell commands.
By the end of this article, you’ll understand why this issue happens, how to safely move your recovery partition, and how to reclaim unallocated space the right way.
Let’s begin with the basics.
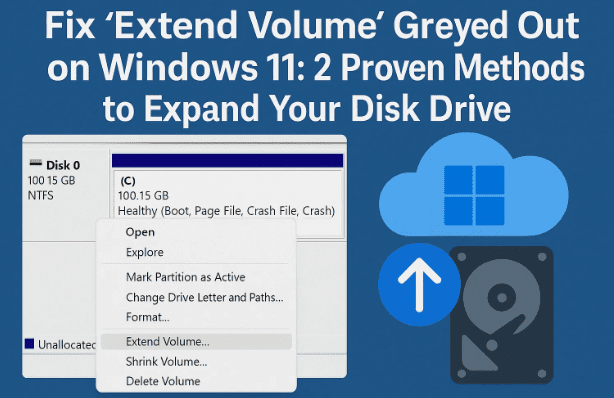
🧩 Why the “Extend Volume” Option Is Greyed Out
When you open Disk Management and notice that the Extend Volume option is unavailable (greyed out), it’s not a bug — it’s a limitation of how Windows handles disk partitions.
Here’s what’s actually happening:
Your unallocated space isn’t next to your C: drive. Instead, there’s usually a Recovery Partition sitting in between.
Windows can only extend a volume if the unallocated space is directly adjacent to the partition you’re trying to expand.
So even though there’s free space available, that small recovery partition acts like a wall preventing you from merging it with your main C: drive.
To fix this, you’ll need to either:
- Move the recovery partition to the right side of the unallocated space, or
- Delete and rebuild the recovery partition after expanding the C: drive.
We’ll cover both approaches below — one simple (with software) and one advanced (with PowerShell).
⚠️ Before You Start: Important Backup Warning
Before attempting any partition modifications, please back up your important data.


While both methods are safe if followed correctly, even a small mistake — like deleting the wrong partition — can make your system unbootable or cause data loss.
You can use:
- File History (in Control Panel → File History)
- OneDrive or Google Drive for quick online backups
- Or a full image backup using tools like Macrium Reflect
Once your backup is done, let’s proceed to the first method.
🧰 Method 1: Expanding C: Drive Using MiniTool Partition Wizard (Easiest Way)
If you want to skip the headaches of manual command-line steps, this is by far the easiest solution.
We’ll use the free version of MiniTool Partition Wizard, a trusted third-party disk manager that allows you to move, resize, and extend partitions visually.
Step 1: Download MiniTool Partition Wizard
Go to the official site: https://www.minitool.com/partition-manager/partition-wizard-home.html
Click Download Partition Wizard Free and install it.
During setup:
- Choose Free Edition (you don’t need the Pro version for this task).
- Uncheck any optional add-ons or “experience improvement” options.
- Proceed with default settings until it finishes installing.
When it launches, you may see a page encouraging you to upgrade — simply close it.
Step 2: Identify the Partitions
Inside MiniTool Partition Wizard, you’ll see a graphical list of your drives — similar to Disk Management.
Look for:
- Your C: drive (main partition).
- A small Recovery partition to its right.
- An Unallocated section further to the right.
This layout confirms that the Recovery partition is blocking you from extending your main drive.
Step 3: Move the Recovery Partition
Now it’s time to rearrange things visually.
- Select the Recovery Partition.
- From the left sidebar, click Move/Resize Partition.
- In the popup, drag the partition slider all the way to the right.
- This moves the recovery partition to the end of the disk.
- Click OK to confirm.
Now you’ll see your unallocated space directly beside your C: drive — perfect!
Step 4: Apply Changes
Once everything looks correct, click Apply (top left corner).
MiniTool will warn you that your system will temporarily restart to complete the move — confirm and proceed.
The software will handle everything automatically, moving the recovery partition and reconfiguring the disk layout.
This can take several minutes depending on drive speed.
After completion, you’ll reboot into Windows, and the partitions will be correctly aligned.
Step 5: Extend the C: Drive
Now that your unallocated space is adjacent to the C: drive, you can easily extend it.
In MiniTool:
- Select your C: drive.
- Choose Extend Partition.
- Drag the slider to use all available unallocated space.
- Click OK, then Apply.
Wait for the operation to complete, and you’re done!
You can verify it by opening This PC → Local Disk (C:) — your drive should now show the expanded capacity.
Step 6: Verify Changes
Open Disk Management again (right-click Start → Disk Management).
You should see your partitions as follows:
- C: Drive — larger capacity
- Recovery Partition — now at the far right of the disk
That’s it! You’ve successfully expanded your system drive without losing data.
This method is fast, safe, and ideal for most users. But if you prefer to use only built-in Microsoft tools, let’s move to the next section.
🧮 Method 2: Expanding C: Drive Using Only Microsoft Tools (Advanced Method)
If you don’t want to rely on third-party software, you can achieve the same result manually using PowerShell and DiskPart.
However, this method is more complex and requires extra caution — a single mistyped command can lead to data loss.
Let’s go step by step carefully.
Step 1: Disable Windows Recovery Environment
- Press Start, type PowerShell, and right-click → Run as administrator.
- In the PowerShell window, type:
reagentc /infoThis checks if the Recovery Environment (WinRE) is enabled. - Now disable it temporarily:
reagentc /disableYou should see:Operation successfulThis ensures we can safely delete or move the recovery partition.
Step 2: Launch DiskPart
DiskPart is a built-in Windows utility for disk management.
In PowerShell, type:
diskpart
Now, follow these commands carefully:
list disk
select disk 0
list partition
This shows all partitions on your main disk. Identify the small Recovery partition (usually around 500–800 MB).
Step 3: Delete the Recovery Partition
Now, select it:
select partition <number>
(Replace <number> with the partition number that matches the Recovery partition size.)
Then delete it using:
delete partition override
This removes the recovery partition completely, freeing up space.
Be cautious: deleting the wrong partition here can destroy your system. Double-check before hitting Enter.
Step 4: Create a Temporary Partition
To ensure proper space alignment, we’ll create a small placeholder volume:
- Right-click the Unallocated Space in Disk Management.
- Choose New Simple Volume → Next.
- Assign about 1.5 GB less than the total available unallocated size.
- Name it something like
TempFixand click Finish.
This will help us rebuild the recovery partition later.
Step 5: Create a New Recovery Partition
Next, create another new partition from the remaining space.
- Right-click the leftover unallocated space → New Simple Volume.
- Use all remaining space.
- Assign it a drive letter (e.g., F:).
- Label it Recovery, then click Finish.
We’ll now rebuild the Windows Recovery Environment on this new partition.
Step 6: Copy WinRE Files
Check if the file winre.wim exists in:
C:\Windows\System32\Recovery
If it does, copy it using:
copy C:\Windows\System32\Recovery\winre.wim F:\Recovery\WindowsRE
If not, you’ll need to extract it manually from a Windows 11 ISO file.
Step 7: Extract WinRE from ISO (If Missing)
If your recovery file is missing, follow these steps:
- Download the latest Windows 11 ISO from Microsoft:
https://www.microsoft.com/software-download/windows11 - Right-click the ISO → select Mount.
- Note the drive letter it assigns (e.g., G:).
- In PowerShell, run:
dism /get-wiminfo /wimfile:G:\sources\install.wimFind your Windows edition’s index number (e.g., Index: 6 for Windows 11 Pro). - Extract the recovery files:
dism /apply-image /imagefile:G:\sources\install.wim /index:6 /applydir:E:\WIMTemp /quiet - After extraction, copy:
copy "E:\WIMTemp\Windows\System32\Recovery\winre.wim" "F:\Recovery\WindowsRE"
Step 8: Re-enable the Recovery Environment
After copying the recovery file, re-register the recovery partition:
reagentc /setreimage /path F:\Recovery\WindowsRE
reagentc /enable
reagentc /info
You should see:
Windows RE Status: Enabled
Perfect! Your recovery environment is back online.
Step 9: Extend the C: Drive
Now that the recovery partition is safely rebuilt, we can delete the temporary partition:
- Right-click TempFix → Delete Volume.
- Right-click C: Drive → Extend Volume → Next → Finish.
You’ve now successfully merged the unallocated space into your C: drive.
Step 10: Hide the Recovery Drive Letter
Finally, remove the drive letter assigned to the Recovery partition:
- Right-click it → Change Drive Letter and Paths → Remove → Yes.
This hides it from File Explorer, as it should be.
Step 11: Eject the Mounted ISO
Right-click the ISO drive → Eject.
That’s it — your C: drive now includes the extra space, and your recovery environment is fully functional again.
✅ Comparison: MiniTool vs Microsoft Method
| Feature | MiniTool Partition Wizard | Microsoft Tools (DiskPart + PowerShell) |
|---|---|---|
| Difficulty | Easy | Advanced |
| Time Required | 5–10 minutes | 20–40 minutes |
| Risk Level | Low | Medium–High |
| Data Safety | Automated | Manual |
| Recovery Partition Handling | Auto-move | Delete/Rebuild manually |
| Best For | Beginners, quick fix | Advanced users, tech professionals |
💬 Frequently Asked Questions
Q1: Why can’t Windows extend the system partition automatically?
Because Windows Disk Management doesn’t support moving partitions. It only merges unallocated space that sits directly next to the volume you’re expanding.
Q2: Is MiniTool Partition Wizard safe to use?
Yes, the official version is trusted by IT professionals. Just download it from the official MiniTool site — avoid third-party mirrors.
Q3: What if I delete the wrong partition?
You’ll lose that data immediately. That’s why creating a full backup before starting is strongly recommended.
Q4: Will I lose data when extending the C: drive?
No, extending doesn’t erase data — it simply enlarges the storage allocation. However, accidental deletion or partition mismanagement can cause loss.
Q5: How can I check that my recovery partition works afterward?
Run this command in PowerShell:
reagentc /infoIf it shows Enabled and points to the correct partition, your recovery system is functional.
🧭 Final Thoughts
Expanding your drive space should never feel like rocket science, yet Windows’ partition rules make it unnecessarily complex.
If you want a fast and worry-free solution, MiniTool Partition Wizard handles everything visually and automatically.
But if you prefer to rely solely on Microsoft’s native tools, the manual method gives you total control — just be patient and follow every step precisely.
Whichever route you choose, you’ll end up with a larger, cleaner C: drive and a functional recovery partition, all without reinstalling Windows.
So far, we’ve learned how to:
- Understand why Extend Volume gets greyed out.
- Move or rebuild your Recovery partition.
- Expand the C: drive using both simple and advanced approaches.
With a bit of preparation and patience, you can reclaim wasted disk space and keep your Windows installation running efficiently again.
Disclaimer: This article is for educational purposes only. Partition editing can cause data loss if done incorrectly. Always back up your files before making system-level changes.
Tags: Windows 11, Disk Management, Extend Volume greyed out, unallocated space, MiniTool Partition Wizard, PowerShell, DiskPart, Recovery Partition, system drive expansion, storage troubleshooting
Hashtags: #Windows11 #DiskManagement #ExtendVolume #MiniTool #PowerShell #PartitionFix #StorageGuide #PCMaintenance #RecoveryPartition #WindowsTips


