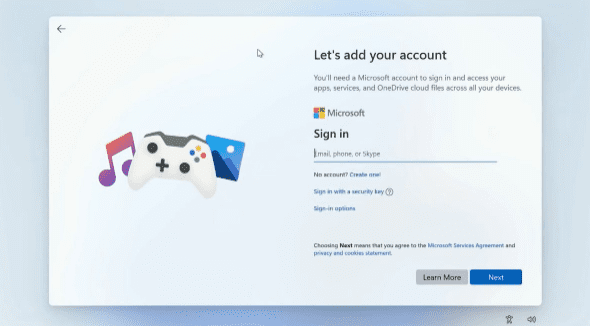
Microsoft has been steadily pushing users toward signing in with a Microsoft account when installing or setting up Windows. While this does provide certain benefits like syncing settings across devices, OneDrive integration, and access to Microsoft Store purchases, many users simply prefer a local account for privacy, simplicity, or offline use.
With the upcoming Windows 11 25H2 update, Microsoft has made it look as though bypassing this requirement is nearly impossible — especially on the Home edition. But after testing this myself, I can confirm there are still reliable methods to set up Windows 11 with a local account, even in version 25H2.
This article walks you step-by-step through two working methods to skip the Microsoft account requirement, along with detailed context, tips, and clarifications. By the end, you’ll know exactly how to create a local account on Windows 11 25H2 — without needing to reinstall the operating system or rely on third-party tools.
📌 Why Would You Want a Local Account Instead of a Microsoft Account?
Before jumping into the steps, let’s take a moment to understand why this is such an important issue for many users.
- Privacy: A local account keeps all data stored on your machine. Microsoft account logins send activity data, telemetry, and sometimes even preferences to the cloud.
- Simplicity: For users who don’t need cloud syncing, password recovery, or Store apps, a local account is cleaner and more lightweight.
- Offline Use: If you frequently set up PCs in areas without internet, a Microsoft account requirement becomes an unnecessary barrier.
- New Devices: When unboxing a new laptop, many users want to skip linking it to a Microsoft account immediately.
With those points clear, let’s explore the actual bypass methods.
🛠️ Method 1 – Registry Edit with Internet Disconnection
This is the traditional method many users have relied on. It involves using Command Prompt and Registry Editor during setup to add a special key that enables the “I don’t have internet” option.
Step 1: Open Command Prompt During Setup
- On the account setup screen, press Shift + F10.
- On some laptops, you may need Shift + Fn + F10.
- This opens the Command Prompt window.
👉 Good news: Despite rumors, this still works in Windows 11 25H2 (tested on Home edition).
Step 2: Launch Registry Editor
- In the Command Prompt, type:
regedit - Press Enter to open the Registry Editor.
Step 3: Navigate to the Correct Path
Inside Registry Editor, follow this path:
HKEY_LOCAL_MACHINE\SOFTWARE\Microsoft\Windows\CurrentVersion\OOBE
Step 4: Create the Bypass Key
- Right-click in the right-side pane.
- Select New → DWORD (32-bit) Value.
- Name it:
BypassNRO - Double-click on it and set Value Data = 1.
- Click OK.
This registry value tells Windows setup to give you the offline account option.
Step 5: Disconnect from the Internet
This is crucial. Depending on your device:
- Ethernet users: Unplug the cable.
- Wi-Fi users: Turn off Wi-Fi or use Airplane Mode.
- Virtual machine users: Disable the network adapter in VM settings.
Step 6: Restart the Computer
In Command Prompt, type:


shutdown /r /t 1
This restarts your PC in 1 second.
Step 7: Continue Setup Offline
When setup resumes:
- Skip keyboard and region screens again.
- Now you’ll see “I don’t have internet”.
- Select it → Proceed with creating a local username and password (optional).
- Finish privacy settings, and Windows will boot with a local account.
✅ At this point, if you check under Settings → Accounts, you’ll confirm you’re logged in with a local account.
⚡ Method 2 – The Easier Command (Recommended)
While the registry method works, it requires disconnecting the internet and restarting. Thankfully, there’s a much easier way that works even if you remain connected to the internet.
This is the method I recommend most users follow.
Step 1: Open Command Prompt
Again, on the Microsoft account sign-in screen, press:
Shift + F10
This brings up Command Prompt.
Step 2: Run the Magic Command
Type this exactly:
start ms-cxh://localonly
Press Enter.
Step 3: Create a Local User
A new window will appear asking for user details:
- Enter your username.
- Add a password if desired (you can leave it blank too).
- Click Next.
What just happened? You skipped the entire “Sign in with Microsoft” phase.
Step 4: Finish Setup
- You’ll still see the Privacy Settings screen (Microsoft is required to show this).
- Disable or adjust the options as per your choice.
- Once finished, you’ll boot directly into your Windows desktop with a local account already set up.
✅ If you check Settings → Accounts afterward, it will clearly show “Local Account” instead of “Microsoft Account”.
🔍 Comparison: Which Method Should You Use?
| Feature | Method 1 (Registry + Disconnect) | Method 2 (Command Prompt) |
|---|---|---|
| Internet required? | Must disconnect | Works online |
| Restart required? | Yes | No |
| Complexity | Moderate (registry editing) | Very simple (one command) |
| Works in 25H2 Home edition? | ✅ Yes | ✅ Yes |
| Best for… | Advanced users, offline installs | Everyday users, quick setup |
🎯 When Is This Most Useful?
Some people ask: Why not just use Rufus to make bootable media with “no Microsoft account requirement” pre-applied?
While Rufus is fantastic, these methods are critical in situations like:
- New laptops: When you unbox a machine and don’t want to reinstall Windows.
- Quick reinstalls: If you reset your PC and want to avoid extra tools.
- Minimal effort: You only need a single command instead of burning an ISO.
❓ Frequently Asked Questions
Q1: Does this work on Windows 11 Pro as well?
Yes. If it works on Home edition (which is stricter), it will definitely work on Pro.
Q2: Could Microsoft patch these methods in the future?
It’s possible, but as of Windows 11 25H2 Insider Preview, both methods work. Microsoft has historically tried to discourage bypassing but hasn’t completely blocked it.
Q3: Is using a local account safe?
Yes. In fact, some security experts recommend local accounts for privacy. However, you’ll miss features tied to Microsoft services like OneDrive sync.
Q4: Can I switch later from local to Microsoft account?
Absolutely. Go to Settings → Accounts → Your Info → Sign in with a Microsoft account.
Q5: Do I need admin rights for this?
No. These commands are executed during setup, before account creation, so you don’t need prior admin rights.
⚠️ Disclaimer
This guide is intended for educational purposes. While the methods described are safe and verified on Windows 11 25H2 Insider Preview, Microsoft may change or block them in future builds. Always back up your important data before making system changes.
📝 Final Thoughts
So, despite Microsoft’s efforts, you can still bypass the forced Microsoft account requirement in Windows 11 25H2.
- If you’re comfortable editing the registry and working offline, Method 1 gives you the classic approach.
- But if you want something faster and simpler, Method 2’s single command is the clear winner.
At the end of the day, Windows should give users the freedom to choose how they want to set up their PCs — whether with cloud features or with a simple local login. For now, you still have that choice.
Tags
windows 11, windows 11 25h2, microsoft account bypass, local account windows 11, windows setup tricks, registry editor windows 11, windows insider preview
Hashtags
#Windows11 #Windows11Tips #MicrosoftAccount #LocalAccount #WindowsSetup #TechGuide


