There’s something quietly fascinating about the heart of a computer. Open the case, and everything looks solid—metal, wires, fans, heat sinks, LEDs. But beneath all that hardware lies a tiny, invisible layer of logic that keeps everything alive. It’s not glamorous, it’s not loud, and most people don’t think about it until something goes wrong. That, of course, is your BIOS—the silent conductor behind every boot sequence.
For years, many of us lived by the old philosophy: “If it isn’t broken, don’t fix it.”
And for a while, that made sense. BIOS updates were rare. Hardware standards changed slowly. Systems remained stable for years.
But those days have changed dramatically.
Modern ASUS motherboards—whether they are entry-level Prime boards or high-end ROG and ProArt models—interact with rapidly evolving hardware every single year. New CPUs, new RAM standards, new NVMe controllers, new GPUs, new firmware requirements… everything moves faster now. Your BIOS isn’t just a piece of code anymore—it’s the bridge that makes modern hardware behave properly.
So today, we’re going to take a slow, comfortable walk through why BIOS updates matter, when you should update them, and how to safely flash the BIOS on any ASUS motherboard using the official method. Think of this as a calm conversation rather than a checklist—because understanding what’s happening is as important as performing the steps correctly.
Understanding What BIOS Really Does
Before we dive into the update process, it helps to pause for a moment and appreciate what this small piece of firmware is doing behind the scenes.
When you press the power button, BIOS wakes up before anything else. It’s the very first code your PC runs, responsible for identifying your CPU, initializing your memory, checking storage, verifying security settings, and handing control over to Windows or Linux. In other words, BIOS sets the stage so the rest of your computer can perform.
Modern ASUS BIOS versions also bundle microcode patches, stability improvements, security fixes, memory training optimizations, PCIe compatibility layers, and the rules that determine how your CPU and RAM negotiate performance. A small improvement at this stage can ripple across your entire computing experience—better boot times, fewer crashes, smoother hardware compatibility, even better performance in some workloads.
Now that you understand the weight a BIOS carries, updating it doesn’t feel like a risk anymore. It feels like maintenance—just like updating Windows or your GPU driver. But unlike a driver update, the BIOS requires a little more care and calm execution. That’s what we’ll cover step by step.
Why ASUS BIOS Updates Matter More Today Than Ever
Let’s step into the modern world of PC hardware for a moment. CPUs launch more frequently. Memory standards like DDR5 continue to evolve. GPUs require newer PCIe features. NVMe drives adopt new firmware controllers. And security vulnerabilities now target firmware instead of software.
All of these changes pile up, and your motherboard BIOS becomes the central point of compatibility.


Here’s where the narrative shifts from “optional update” to “necessary maintenance.”
A new ASUS BIOS often improves things you don’t even see coming—better CPU microcode, refined memory stability, updated AGESA packages on AMD boards, and improved power management for Intel. It may even prevent the exact problem you haven’t run into yet.
Think about NVMe drives disappearing mid-game, RAM refusing to post at its rated speed, USB ports misbehaving, fan speed errors, TMP flip-outs, or secure boot warnings. Many of these issues are fixed not by replacing hardware, but by simply installing the correct BIOS.
So, today, updating the BIOS isn’t a luxury. It’s a key piece of keeping your ASUS motherboard running smoothly alongside the fast-moving world of PC hardware.
Finding Your Current ASUS BIOS Version
Now that you know why updates matter, let’s gently walk into the first practical step—finding the BIOS version you currently have.
You don’t need to reboot or open your case. Windows can tell you everything.
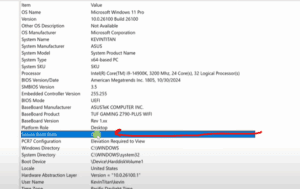
Just open System Information (type msinfo32 in the Start menu), and you’ll see a neat summary of your system. Scroll down until you find lines such as:
- BaseBoard Product – this is your ASUS motherboard model.
- BaseBoard Version or Revision – tells you which version your board is.
- BIOS Version/Date – this shows your current BIOS number and release date.
- SMBIOS Version – not critical for flashing, but good to note.
This little snapshot unlocks everything you need for the next step—getting the correct update from ASUS.
If you’ve recently bought your motherboard, you’ll probably see an early-release BIOS: a 00xx or 01xx version. Newer boards often sit in warehouses for months before they reach you, so the BIOS is outdated before you ever power the system on.
That’s why many ASUS motherboards benefit greatly from a first-day update.
Downloading the Correct BIOS From the Official ASUS Website
Every BIOS update must come directly from the manufacturer—this is non-negotiable. No third-party sources, no shortcuts, no modified files. ASUS hosts everything on its official support page, and that is exactly where we will go.
Simply type your motherboard model into Google or the ASUS search bar (for example, ASUS B650, ASUS Z790, ASUS A520, etc.). Every model has a Support or Download button—this is where the correct files live.
Once you enter that page, select:
- Driver & Tools
- BIOS & Firmware
At the top, you will always see the latest BIOS release—usually with a date stamp and version code.
Scrolling down, you will find earlier releases, and somewhere near the bottom will be the BIOS that currently matches your system. This historical list helps you understand how much your board has improved since its initial launch.
Many older BIOS releases include notes like:
- Stability improvements
- New CPU support
- Memory compatibility updates
- NVMe controller updates
- Security patches
- Bug fixes
And sometimes, the very first BIOS is listed as “initial release”, confirming that an update is overdue.
Once you identify the latest version, download the ZIP file. It usually contains:
- The BIOS .CAP file
- A renaming tool (BIOSRenamer.exe)
- A release note document
Do not extract it directly on your computer yet. First, we prepare the USB drive.
Preparing a USB Flash Drive (FAT32 Format Only)
ASUS BIOS updates rely on a simple rule:
The USB drive must be formatted as FAT32 and contain a single partition.
This ensures compatibility with ASUS Easy Flash and USB BIOS Flashback.
Let’s walk through this part calmly, because formatting is where many beginners feel nervous.
Plug in your USB pen drive. Then:
- Right-click the drive in File Explorer.
- Select Format.
- Choose FAT32 as the file system.
- Give it a simple name (like “BIOS”).
- Click Start.
In rare cases where the drive refuses to format this way, you can open Disk Management, delete all the partitions on the USB drive, and recreate one fresh partition. After that, reformat again from Explorer.
Once the drive is completely blank and set to FAT32, you’re ready to add the BIOS file.
Extracting and Renaming the ASUS BIOS File
Now go back to the ZIP file you downloaded earlier.
Extract it, and you will find two key items:
- The actual BIOS update file (ending in .CAP)
- A renaming utility called BIOSRenamer.exe
ASUS requires the BIOS file to follow a specific naming format, depending on the motherboard model. Instead of guessing the correct name, simply double-click the renamer tool. A black command window will appear briefly, and the tool will automatically rename your .CAP file to exactly what your motherboard expects.
This is one of the simplest but most essential steps—without the correct filename, the BIOS utility may not detect the file at all.
Once the renaming tool finishes, copy the newly renamed .CAP file to the root of your FAT32 USB drive. You do not need to keep the renamer tool on the USB, but you can if you want.
At this point, the USB is ready for flashing.
Entering the ASUS BIOS Interface
Restart your computer and begin tapping Del or F2 as the system boots. ASUS motherboards clearly display which key to press, so you’ll see it the moment your screen wakes up.
Inside the BIOS, you’ll first land on the familiar EZ Mode screen. This page gives you a soft overview of your system:
- CPU model
- Memory configuration
- Fan speeds
- Boot priorities
- Current BIOS version
But for the update process, we switch into Advanced Mode.
Look for the button on the bottom-right corner, or simply press F7 to switch instantly.
Now you’ll have access to all the important menus, including the tool we need.
Using ASUS EZ Flash to Update the BIOS
Inside the Advanced Mode interface, move to the Tool tab.
Here, ASUS provides:
- ASUS EZ Flash 3 Utility
- Secure Erase
- NVMe Info
- And sometimes BIOS Flashback options (depending on model)
We will use the EZ Flash Utility, which is the standard method for updating a running system without requiring onboard flashback buttons.
When you enter EZ Flash:
- The left panel shows your local drives
- The right panel shows the USB drive and .CAP file you prepared earlier
Click the file once. Immediately, ASUS will present a warning—this is normal and expected.
You will see prompts reminding you:
- Not to turn off power
- Not to remove the USB drive
- That system settings will reset after update
- That rollback to previous BIOS is not always possible
Once you confirm everything and proceed, the screen will shift into update mode.
This is the moment where patience matters.
What Happens During the BIOS Flashing Process
The update process may look simple—a progress bar, a few status lines—but behind that quiet interface, your motherboard is rewriting the firmware that defines its entire identity.
The update usually passes through several stages:
- Writing the new image
- Updating the boot block
- Refreshing the ME firmware (on Intel boards)
- Updating the AGESA package (on AMD boards)
- Validating the written data
- Rebooting the system
Your fans may change speeds. The monitor may go blank for a moment. The system may reboot twice. All of this is normal.
The only rule—
Do not touch the PC until it finishes.
When the update is complete, the system will reboot into the newly installed BIOS version.
Final Steps After the Update
Once the BIOS loads after the update, it will often reset many of your custom settings. This happens on every motherboard brand and is completely normal.
You may need to reapply:
- XMP / EXPO memory profiles
- Boot order preferences
- Fan curve settings
- Virtualization (if you use WSL2, Docker, or VM platforms)
- TPM or Secure Boot adjustments (for Windows 11)
- Any specific overclock or undervolt profile you were using
This is why many power users take pictures or write down their BIOS settings before updating. But if you’re using mostly default settings, it’s simply a matter of switching on XMP/EXPO again.
As long as you don’t skip this part, your PC will feel just like before—only more stable and compatible.
When Should You Update Your ASUS BIOS?
Let’s return to that old advice—“If it isn’t broken, don’t fix it.”
That mindset is outdated. Today’s computing landscape has changed.
You should update your BIOS when:
- You are installing a new CPU
- Your RAM is unstable or refuses to run at rated speeds
- NVMe drives disappear or misbehave
- USB devices disconnect randomly
- Windows reports firmware vulnerabilities
- ASUS releases a critical update
- Your motherboard is using its initial launch BIOS
- You experience random freezes or no-POST issues
- You want better stability or performance
In short:
If an update fixes real-world issues, improves compatibility, or enhances security — it is worth installing.
BIOS Update Safety Tips (Important to Know)
Here are a few important considerations in a natural, non-bullet-point flow:
Always make sure your PC has a stable power source. If you’re using a desktop, ensure the UPS or power backup is functioning. Never flash the BIOS during a storm or in an unstable electricity environment. If BitLocker is enabled in Windows, suspend it before flashing; otherwise, your next boot may lock you out asking for a recovery key. And most importantly, do not interrupt the flashing process once it begins. This includes turning off the PC, unplugging the USB drive, pressing the reset button, or attempting to boot Windows prematurely.
A BIOS flash is safe when done patiently. Problems arise only when the process is interrupted.
A Gentle Summary Before We Wrap Up
By now, you’ve walked through the entire journey—from discovering what BIOS really does, to understanding the importance of updates, to preparing the USB drive, flashing the ASUS firmware, and configuring the final settings. The update process itself is surprisingly straightforward. What matters is knowing why you’re doing it and following the steps slowly and confidently.
An updated ASUS BIOS doesn’t just “patch” your system.
It gives your motherboard the language it needs to talk to new generations of hardware.
It stabilizes your memory.
It secures your boot process.
It fixes issues you don’t even know are waiting ahead.
In a world of rapidly evolving PC components, the BIOS is your anchor—and keeping it updated keeps your system one step ahead.
Disclaimer
Updating a motherboard BIOS is a technical process that carries risks if the system loses power or the update is interrupted. Always ensure your device has a stable power supply and follow ASUS’ official documentation for your exact model. The instructions provided in this article are meant as a general guide and may vary slightly depending on specific ASUS motherboard versions. Perform BIOS updates responsibly and at your own discretion.
#ASUS #BIOSUpdate #MotherboardGuide #PCMaintenance #TechTips #DtpTips