If you’re a PC gamer, you know that even small tweaks can significantly boost your system’s performance. Whether you’re using a budget-friendly laptop or a high-end gaming rig, optimizing Windows settings can make a big difference in reducing input delay, increasing FPS, and creating a smoother gaming experience.

This guide walks you through a series of advanced yet safe optimizations—including disabling unnecessary features, adjusting hardware settings, updating drivers, and using recommended DNS servers. These tweaks apply to both Windows 10 and Windows 11.
⚠️ Disclaimer
These optimizations involve making system-level changes. Although they are generally safe, it’s strongly recommended that you create a restore point before proceeding, so you can revert your system in case anything goes wrong.
🔄 Step 1: Create a Restore Point
- Press
Windows Keyand type Restore. - Click on Create a Restore Point.
- Under the System Protection tab, click Create.
- Name it something like “Before Gaming Tweaks”.
- Click Create again to save the restore point.
🔐 Step 2: Disable Memory Integrity (Core Isolation)
Memory Integrity is a security feature that protects your system but may cause performance drops in games.
- Go to Settings > Privacy & Security > Windows Security > Device Security.
- Click Core Isolation Details.
- Turn Memory Integrity off.
Note: Disabling this may reduce system protection slightly but improves gaming performance.
✨ Step 3: Turn Off Visual Effects
- Navigate to Settings > Accessibility > Visual Effects.
- Disable Transparency Effects and Animation Effects.
This helps reduce resource usage and input lag.
🔔 Step 4: Disable Notifications
- Go to Settings > System > Notifications.
- Turn off all notifications, including Do Not Disturb, to avoid interruptions while gaming.
⚡ Step 5: Set Power Plan to Best Performance
- Go to Settings > System > Power.
- Under Power Mode, choose Best Performance.
Also:
- Press
Windows + R, typepowercfg.cpl, and press Enter. - Choose High Performance (may be under “Show additional plans”).
🧹 Step 6: Clean Up Junk & Temporary Files
- Go to Settings > System > Storage.
- Click on Temporary Files.
- Select items like Recycle Bin, Thumbnails, Windows Update Cleanup, etc.
- Click Remove Files.
🔒 Step 7: Disable Unwanted Permissions
Navigate to:
Settings > Privacy & Security
Disable these options:
- General Permissions
- Speech Recognition
- Inking & Typing
- Diagnostics & Feedback
Also, under App Permissions, disable access to:
- Location
- Camera
- Microphone
- Contacts
- Radios
- Background Apps (as needed)
📺 Step 8: Set High Refresh Rate
- Go to Settings > System > Display > Advanced Display.
- Set your monitor’s Refresh Rate to the highest value supported (e.g., 120Hz or 144Hz).
If any display issues occur, revert to your original refresh rate.


🎮 Step 9: Optimize Graphics Settings
- Go to Settings > System > Display > Graphics.
- Enable Hardware-accelerated GPU scheduling and Windowed Optimizations if available.
- Add your games manually by:
- Clicking Browse, finding the game’s executable (
.exe) file. - Setting them to High Performance under Options.
- Clicking Browse, finding the game’s executable (
🖱️ Step 10: Adjust Mouse Settings
- Go to Mouse Settings > Additional Mouse Settings.
- Under the Pointer Options tab, uncheck Enhance Pointer Precision.
For wireless mice, ensure the dongle is close to the mouse to avoid input lag. Adjust DPI settings using your mouse software—aim for under 2000 DPI for stability.
🖥️ Step 11: Disable Extra Animations via System Properties
- Press
Windows + R, typesysdm.cpl, and press Enter. - Go to the Advanced tab > Performance Settings.
- Select Adjust for best performance.
- Optionally enable:
- Animate windows when minimizing/maximizing
- Show thumbnails instead of icons
- Smooth edges of screen fonts
🚀 Step 12: Disable Fast Startup
- Go to Control Panel > Power Options > Choose what the power buttons do.
- Click Change settings that are currently unavailable.
- Uncheck Turn on fast startup and save changes.
🌐 Step 13: Network Adapter Optimization
- Press
Windows + R, typencpa.cpl, and press Enter. - Right-click your active adapter (e.g., Ethernet), click Properties.
- Double-click Internet Protocol Version 4 (TCP/IPv4).
- Use a custom DNS:
- Cloudflare:
1.1.1.1and1.0.0.1→ cloudflare-dns.com - Google:
8.8.8.8and8.8.4.4→ dns.google
- Cloudflare:
- Next, click Configure > Power Management.
- Uncheck all options to let Windows turn off your device.
- Under the Advanced tab:
- Disable: ARP Offload, Flow Control, Interrupt Moderation, Large Send Offload v4/v6
- Adjust: Receive Buffer to maximum (e.g., 512), Transmit Buffer (e.g., 128)
- Set Speed & Duplex to Auto Negotiation
🧰 Step 14: Keep Drivers and Windows Updated
- Go to Settings > Windows Update and check for updates.
- Go to Advanced Options > Optional Updates to find driver updates.
Or manually:
- Right-click Start > Device Manager.
- Update drivers under Display Adapters or Network Adapters.
- You can also use official tools from:
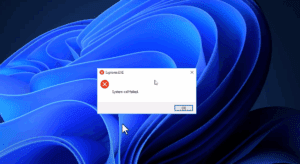
🧪 Step 15: Run System Health Checks
Run the following commands via Command Prompt (Admin):
- DISM Repair
DISM /Online /Cleanup-Image /RestoreHealth - System File Checker
sfc /scannow - Check Disk
chkdsk /f- If prompted, press Y to run on next restart.
Let these run completely to detect and repair system or disk issues.
✅ Final Thoughts
These tweaks can collectively make a major difference in how your games perform and how responsive your system feels. From frame rate improvements to reduced stuttering and lag, you’re likely to see noticeable gains—especially on older or budget devices.
Just remember: Always keep backups and restore points before making system-level changes.
🔖 Tags:
Windows Optimization, Gaming Performance, FPS Boost, Windows Tweaks, Input Lag Fix, Network Adapter Settings, Windows Tips, Graphic Settings, Mouse Lag Fix
🔍 Hashtags:
#WindowsOptimization #GamingTweaks #FPSBoost #LowInputLag #WindowsTips #NetworkSettings #GraphicsSettings #PCGaming #PerformanceBoost #Windows11


