Most of us open Microsoft Edge the same way every morning — type a URL, check a few tabs, read an article, maybe compare products — and close it without a second thought. But Edge hides an entire toolbox beneath its surface. A set of thoughtful features designed to make you faster, safer, and more organized online. Features that most users never discover simply because they don’t know they exist.
So today, let’s slow down, take a deep breath, and walk through Edge as if we’re exploring it for the very first time. Each section begins with a quick story, a small moment in your daily browsing life, and then we dive deeper into the real feature behind it.
Let’s begin our journey.
Keeping Edge Updated — Where Everything Starts
Before you start exploring new features, it helps to ensure your browser is fully updated. Edge usually updates itself quietly in the background. But there are days when you need to trigger the update manually — especially when Microsoft rolls out new tools.
To update Microsoft Edge:
- Open the three-dot menu in the upper-right corner.
- Hover over Help and Feedback.
- Select About Microsoft Edge.
Edge will check for updates automatically on this page. If an update installs, close the browser and reopen it to activate the newest version.
A simple but essential first step.
A More Flexible Workspace — Split Screen Browsing
Imagine researching something on a laptop, wishing you could compare two pages without juggling windows. Edge’s Split Screen was made for moments like this. It lets you open two websites side-by-side in the same window — almost like Snap Assist in Windows, but more compact and browser-native.
Here’s how it works:
- Click the Split Screen icon beside the address bar.
- Choose one of the three options:
- Search or enter web address
- Frequently visited sites
- Tabs you already have open
The active side of your split screen is outlined in blue, helping you stay oriented. If you want to go back to a single view, click the split screen icon again to disable it.
It’s simple, elegant, and surprisingly useful on smaller screens.


Edge Secure Network — The Built-In VPN You Forgot You Had
Edge comes with a free built-in VPN called Microsoft Edge Secure Network, powered by Cloudflare. It’s not meant to replace a full VPN service, but it gives you an additional layer of protection when browsing on public Wi-Fi — airports, malls, hotels, or coffee shops.
To activate it:
- Open the 3-dot menu → Settings
- In the left pane, go to Privacy, Search and Services
- On the right, open Security
- Scroll down to Use Secure Network and toggle it on
Once you enable it, you can choose how the VPN activates:
- Selected sites (custom list)
- Optimized (recommended — activates on unsafe networks)
- All sites (NOT recommended because 5 GB/month gets consumed quickly)
Even limited, this VPN protects your public IP address and reduces tracking — a nice safety net when you don’t have another VPN running.
Quick Search — Highlight, Right-Click, and Explore Instantly
Sometimes you’re reading something interesting, stumble upon a term, and want to know more — without breaking your flow. That’s where Quick Search comes in.
Simply highlight a word or phrase, and Edge shows a floating mini-menu. Your choices include:
- Ask Copilot (AI-generated insights)
- Copy
- Search with Bing
If you prefer reliable, factual information, “Search with Bing” opens a new tab with search results. It’s a fast way to explore the web without typing anything.
Two quick actions also launch the menu:
- Highlight a phrase
- Double-click a word
Just enough convenience added to your browsing rhythm.
Edge’s Screenshot Powerhouse — Better Than Most Browser Tools
Screenshots inside browsers are usually basic. But Edge took the idea further. Its built-in tool gives you multiple capture methods and a smooth editing experience.
There are three ways to open the screenshot tool:
- Click its icon at the top
- Right-click anywhere on a page
- Use Ctrl + Shift + S
Then choose your capture type:
- Capture area — drag to select
- Capture visible area — what you currently see
- Capture full page — scroll-through screenshot from top to bottom
After capturing, Edge opens a dedicated editor where you can:
- Draw and annotate using colored pens
- Erase any markings
- Copy the screenshot
- Save it to your device
- Share it
- Perform Visual Search (search the web using your image)
This is one of those features that quietly becomes a daily essential.
Summaries with Copilot — Helpful, but Use Carefully
Sometimes you’re short on time and just want to understand a long webpage quickly. Copilot’s built-in summarizer sits quietly in the right sidebar waiting for that moment.
To use it:
- Click Copilot’s icon at the top-right
- Select Create a summary of this page
It generates a condensed overview of the content.
But here’s the caution:
AI summarizers are not perfect. They may skip details or misinterpret context. Think of it as a preview, not a replacement for the original article. When accuracy matters, always read the full source.
Vertical Tabs — A Cleaner, More Organized Way to Browse
If you often open dozens of tabs, you know what happens — the tab bar shrinks until every tab becomes an icon. Vertical Tabs solve this problem beautifully.
To enable them:
- Click Tab Actions in the upper-left
- Select Turn on vertical tabs
Your tabs now appear on the left as a vertical list. At first, they show only icons, but hovering expands them into full titles. It instantly makes your workspace look cleaner.
And turning them off is just as easy:
Tab Actions → Turn off vertical tabs
Installing Websites as Apps — PWAs Made Easy
Some websites behave like full applications — editors, dashboards, tools, or cloud services. Edge lets you turn them into Progressive Web Apps (PWAs) that open like real apps.
Here’s how:
- Open the 3-dot menu → More Tools → Apps → Install this site as an app
- In the popup, click Install
- Choose:
- Pin to taskbar
- Pin to Start
- Create desktop shortcut
- Auto-start (optional)
Once installed, the website runs in its own window, distraction-free and often faster.
Immersive Reader — A Cleaner Way to Read the Web
Some webpages are filled with clutter — ads, banners, extra components. Immersive Reader strips away distractions, leaving only clean, readable content.
To activate it:
- Click the Immersive Reader icon beside the address bar
Inside Immersive Reader, you can:
- Use Read Aloud
- Change font size
- Increase spacing
- Switch themes
- Adjust column width
- Use translation
- Enable focus tools
It’s perfect for long articles or late-night reading.
Extensions — Not Just Edge Add-ons, but Chrome Too
Many users mistakenly think Edge lacks extensions. The truth is that you can install:
- Microsoft Edge Add-ons
- Google Chrome Web Store extensions
Because Edge is Chromium-based, Chrome extensions work perfectly.
To install:
- Click the Extensions icon
- Select Get extensions for Microsoft Edge
- Or visit the Chrome Web Store and press Get
Popular examples include:
- Dark Reader
- uBlock Origin
- Grammarly
Edge supports all of them.
Media Control Center — A Hidden Gem for Managing Audio & Video
Whenever any tab is playing media, a music-note icon appears in the top-right corner.
Click it to:
- Pause, play, or skip
- See all media across tabs
- Cast to smart devices
- Monitor what others on your network are watching (surprisingly useful — or mischievous)
It provides a unified overview of all media inside Edge.
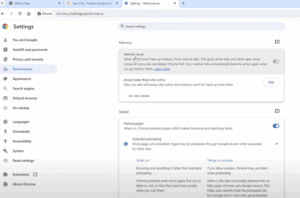
Performance Boosting — Making Edge Faster and Lighter
Edge has evolved significantly in performance. To squeeze out maximum speed:
Go to:
Settings → System & Performance
Enable:
- Efficiency Mode
- Improve PC gaming experience
- Sleeping Tabs
- Fade Sleeping Tabs
- Performance Detector
- Resource Controls (for gaming PCs — adjust RAM usage)
These optimizations reduce CPU usage, lower battery drain, and free system resources.
Shopping Made Smarter — Built-In Price Comparison
Edge can automatically:
- Compare prices across stores
- Show price history
- Suggest coupons
- Offer cashback opportunities
To use it:
Click the Shopping icon beside the address bar.
It opens a panel showing:
- Price history
- Cashback offers
- Competitor pricing
A helpful tool for frequent online shoppers.
Workspaces — Organize Your Browsing Life
Imagine creating separate containers for your browsing tasks — one for research, one for shopping, one for projects. That’s what Workspaces offer.
To create one:
- Open Tab Actions → Create New
- Or choose Save tabs to a workspace
- Name it
- Pick a color
- Click Done
You can:
- Invite others
- Edit workspace
- Delete it when done
Perfect for multi-project users.
Pinned Tabs — Keep Important Pages Always Open
If there are websites you visit constantly — email, dashboard, docs — you can pin them.
Right-click a tab → Pin tab
Pinned tabs open automatically every time you start Edge.
Startup Boost — Faster Browser Launch Times
Startup Boost keeps a small part of Edge running in the background, making it open almost instantly when clicked.
To enable:
Settings → System & Performance → System → Startup Boost
You can disable background extensions if you prefer minimal resource usage.
Dark Mode — Easier on Your Eyes
Finally, one of the simplest but nicest touches:
Edge supports a full, smooth dark theme.
To enable:
Settings → Appearance → Overall Appearance → Dark
Or choose System to match your OS settings.
Disclaimer
Features described may change based on Edge version, platform (Windows/Mac/Linux), or region. Always ensure you are using the latest version for accurate functionality.
#MicrosoftEdge #BrowserTips #EdgeFeatures #dtptips #Windows11 #ProductivityTools