If you’re using an older computer that doesn’t meet Microsoft’s official requirements for Windows 11, don’t worry—you can still install Windows 11 easily in 2024. This guide walks you through a simple and effective method that doesn’t require any bypass tools or third-party apps.
Let’s get started with installing Windows 11 on an unsupported PC without TPM 2.0 or Secure Boot.
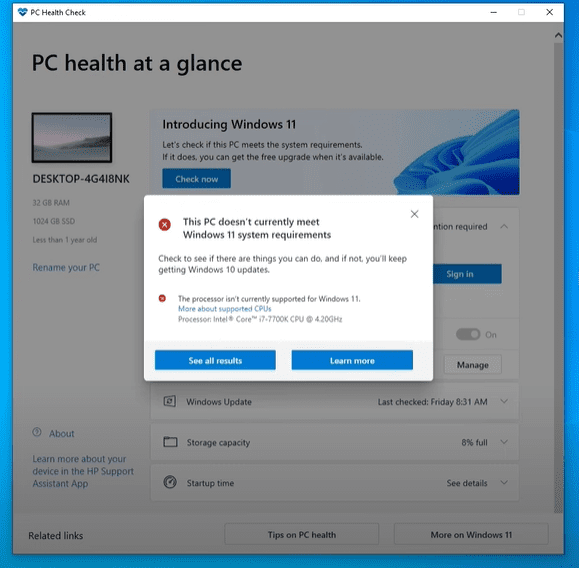
✅ Step 1: Check If Your PC is Unsupported
First, find out if your computer is unsupported for Windows 11:
- Visit the official Microsoft page and download the PC Health Check Tool.
- Run the tool to see whether your device meets the requirements.
- If it reports incompatibility (like unsupported CPU, no TPM, etc.), you can proceed with this method.
✅ Step 2: Download the Windows 11 ISO File
- On your Windows 10 machine, search “Download Windows 11” on Google.
- Go to the official Microsoft website and scroll down to the “Download Windows 11 Disk Image (ISO)” section.
- Choose Windows 11 (multi-edition ISO).
- Select your product language—make sure it matches your current Windows 10 language (e.g., English – United States).
- Click Confirm and download the 64-bit ISO (23H2) version.
✅ Step 3: Mount the ISO File
Once downloaded:
- Right-click the ISO file and select “Mount”.
- This will create a new virtual drive (e.g., Drive F:) on your system.
- Open the mounted drive and go to the “sources” folder.
- Inside, locate a file called setupprep.exe (this is different from the standard setup file).
✅ Step 4: Run the Setup Without Bypasser Tools
To install Windows 11 using this method:
- Press
Win + Sand search for Command Prompt (CMD). - Right-click it and select Run as Administrator.
- In the Command Prompt window, type the letter of your mounted drive, such as:
F:and hit Enter. - Navigate to the sources folder:
cd sources - Now type the following command to begin installation:
setupprep.exe /product server - Press Enter.
Although it may say “Install Windows Server”, don’t worry—you are still installing Windows 11. This command bypasses all compatibility checks.
✅ Step 5: Begin the Windows 11 Installation
- A setup window will appear. Accept the terms and proceed.
- Choose to keep your files and settings if you’d like to upgrade from Windows 10 without losing data.
- Click Next and continue through the setup process.
The installation will begin, and your computer will restart several times. Once complete, you’ll be running Windows 11 on your previously unsupported machine.
💡 Pro Tip: If You Face Installation Errors
If you face issues during installation:
- Extract the ISO file to your desktop using 7-Zip or WinRAR.
- After extracting, repeat the CMD process above, pointing to the “sources” folder inside the extracted directory.
- This method ensures faster and more stable performance compared to running directly from the mounted ISO.
✅ Final Step: Enjoy Windows 11 on Your Unsupported PC
Once installation is complete, you’ll have full access to Windows 11 features on your older hardware—even if your CPU or TPM doesn’t meet Microsoft’s requirements.
If you experience slow performance, you can follow additional optimization tips (covered in another guide) to speed up Windows 11 on older machines.
Summary
This method allows you to:


- Install Windows 11 without TPM 2.0 or Secure Boot
- Keep your personal files and settings
- Avoid third-party bypass tools
- Use the latest version (23H2) of Windows 11
Enjoy the new OS, and feel free to reach out in the comments if you encounter any issues.
Tags:
windows 11, unsupported pc, windows 11 install guide, no tpm, secure boot, windows iso, windows upgrade, windows 10 to 11, windows setup, tech tutorial, bypass windows 11 requirements
Hashtags:
#Windows11 #UnsupportedPC #NoTPM #SecureBootBypass #WindowsUpgrade #Windows11Install #TechTips #WindowsISO #23H2 #WindowsSetup


