If you’re experiencing issues with Windows File Explorer not starting or opening properly when you log in, this guide will walk you through the steps to resolve the issue. Follow this simple and detailed process to troubleshoot and fix the problem.
Step 1: Open Registry Editor
The first step in troubleshooting Windows Explorer issues is accessing the Registry Editor.
- Open the Search Menu:
- Press the Windows key on your keyboard or click the search icon.
- Type in
regedit.
- Run as Administrator:
- Right-click on Registry Editor (best match result).
- Select Run as administrator.
- If prompted by User Account Control, click Yes.
Step 2: Backup Your Registry
Before making any changes to the registry, it’s crucial to create a backup. This ensures that you can restore your registry if anything goes wrong.
- Create a Backup:
- Inside the Registry Editor, click on File in the top-left corner.
- Select Export.
- Name the backup file (e.g., “RegistryBackup_Date”).
- Ensure Export range is set to All.
- Save the file to a safe and easily accessible location.
- Restoring the Backup:
- In case you need to restore the registry later, go to File > Import in the Registry Editor and select the backup file.
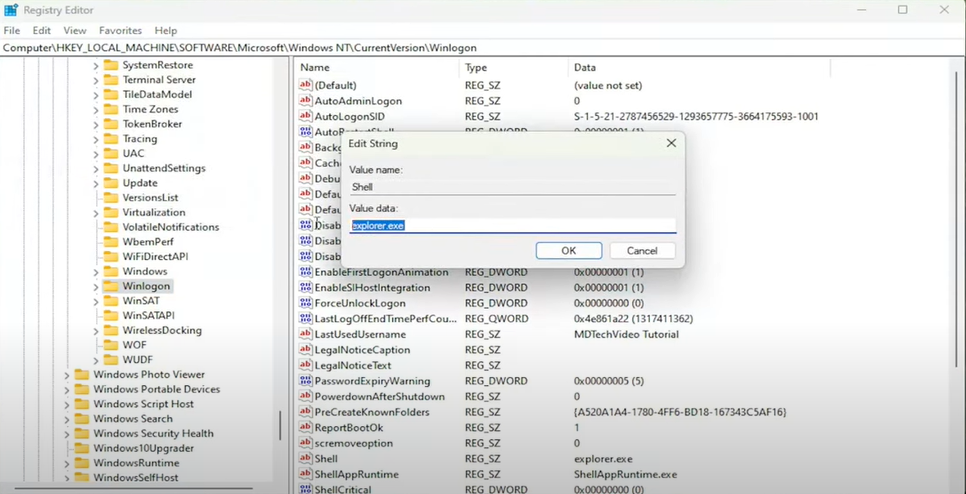
Step 3: Modify the Registry Key
Now that the backup is complete, it’s time to modify the registry to fix the issue.
- Navigate to the Correct Key:
- Double-click on the HKEY_LOCAL_MACHINE folder to expand it.
- Expand Software > Microsoft > Windows NT > CurrentVersion.
- Scroll down and double-click on the Winlogon folder.
- Locate the Shell Entry:
- On the right-hand side, find the Shell entry.
- Double-click on Shell to open it.
- Modify the Value Data:
- Ensure the Value data is set to
explorer.exe(make sure there are no typos or additional characters). - Click OK.
- Ensure the Value data is set to
- Close the Registry Editor:
- Once done, close the Registry Editor by clicking the X in the top-right corner.
Step 4: Run System File Checker (SFC)
Now that the registry has been adjusted, running a System File Checker (SFC) scan will help ensure there are no corrupt system files causing the issue.
- Open Command Prompt:
- Open the search menu and type
CMD. - Right-click on Command Prompt (best match result).
- Select Run as administrator.
- If prompted by User Account Control, click Yes.
- Open the search menu and type
- Run the SFC Scan:
- In the Command Prompt window, type the following command:
sfc /scannow - Press Enter.
- In the Command Prompt window, type the following command:
- Wait for the Scan to Complete:
- The scan will take some time, so please be patient. It will automatically fix any issues found during the scan.
Step 5: Restart Your Computer
Once the SFC scan is complete:
- Restart your computer:
- Click the Start button.
- Select the Power icon and choose Restart.
After restarting, check if the Windows File Explorer issue has been resolved.
Conclusion
By following these steps, you should be able to fix the problem of Windows File Explorer not opening or starting on startup. Remember to always back up the registry before making changes and use tools like the SFC scan to ensure no corrupt system files are causing the issue.
If this guide helped you solve the issue, consider subscribing to receive more troubleshooting tips in the future!
#Windows10 #FileExplorerFix #SFCScan #WindowsTroubleshooting #RegistryEditor #PCRepair