Windows, although highly functional, can run into various problems. From bugs to malware issues, users often find themselves needing repairs. Fortunately, the Windows Repair Toolbox is a comprehensive and free tool that helps fix a wide range of issues on both Windows 10 and Windows 11 systems. This post will guide you through how to use this portable, customizable software.
Step 1: Download Windows Repair Toolbox
First, download the Windows Repair Toolbox. It’s completely portable, meaning you can run it directly from a USB flash drive. This tool supports all versions of Windows (Windows 7 and up), making it highly versatile.
- Visit the official Windows Repair Toolbox website.
- Download the portable version to your system.
- Extract the contents to a folder on your desktop or a USB drive.
Step 2: Launching the Toolbox
Once extracted, launch the application by right-clicking the executable file and selecting Run as Administrator. Note that Windows may flag the app with a security warning as an unknown publisher—click Yes to proceed. Accept the terms and conditions, and you’ll be ready to explore the toolbox.
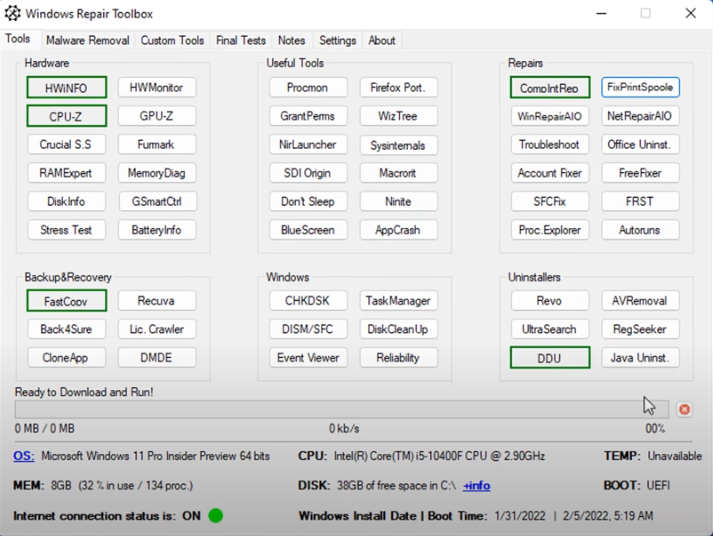
Step 3: Overview of the Windows Repair Toolbox Interface
The interface provides a range of tools organized into different sections for system repairs, hardware diagnostics, and software management. Let’s take a closer look:
- System Info: Shows your operating system, CPU, memory, and other vital details. You’ll also see whether your system is using UEFI or legacy BIOS.
- CPU-Z: Helps identify your CPU, motherboard, and memory. It also performs benchmarks to check your system’s performance.
Step 4: Download Essential Tools
The Windows Repair Toolbox contains several useful tools that can be downloaded as needed. For example:
- Hardware Tools: Tools like CPU-Z help you check your PC’s hardware configuration.
- Backup and Recovery: This section includes file backup options, and you can add custom backup tools.
To download, simply click on the tool name, and the application will automatically download and run the tool for you.
Step 5: Repair Internet and Network Issues
One of the most powerful aspects of the toolbox is the Internet Repair section. If your network connection has issues, especially after a malware attack, this can help:
- Use tools to reset internet protocols.
- Flush DNS or reset Winsock if you’re experiencing connectivity issues.
These tools can restore broken internet connections in many scenarios.
Step 6: Perform System and File Repairs
The toolbox also includes a Repairs section with built-in fixes for common Windows problems. You can:
- Fix the Print Spooler if you’re having printing issues.
- Use Net Repair for resolving network-related problems.
- Run system utilities like FRST and Process Explorer to dig deep into system issues.
For more advanced users, AutoRuns and Process Explorer allow for malware detection and removal by inspecting startup programs and processes.
Step 7: Malware Removal Tools
Windows Repair Toolbox also features a wide range of malware removal tools, including:


- Kaspersky and TDSS Killer for rootkits.
- Malwarebytes and Hitman Pro for standard malware removal.
These tools can be downloaded and run unattended, making it easier to handle infected systems.
Step 8: Uninstall Corrupt Drivers and Software
If you need to remove corrupt software or drivers, head to the Uninstallers section. Tools like DDU (Display Driver Uninstaller) are perfect for removing graphics drivers entirely before a fresh installation.
Step 9: Custom Tools and Automation
One of the standout features of this toolbox is its ability to add custom tools. If the toolbox doesn’t include a program you frequently use, you can add your own tools:
- Go to the Custom Tools section.
- Add your tool by providing a download link or file path.
- Run these tools directly from the Windows Repair Toolbox interface.
This flexibility allows you to build a truly personalized repair toolkit.
Step 10: System Maintenance and Final Cleanup
The toolbox also provides tools for system maintenance:
- Use CCleaner to clean up unnecessary files.
- Defragment your hard drive using Disk Defrag.
- Run Patch My PC to keep your Windows system and software updated.
Once you’re finished, clean up by removing all downloaded tools and logs. The toolbox lets you clear these files quickly to ensure your USB drive or system remains clutter-free.
Step 11: Branding and Customization
For IT professionals, the toolbox includes branding options where you can add your own logo. This is useful for businesses that offer PC repair services.
- Click on the branding option.
- Upload your logo in ICO format, and it will display in the toolbox’s interface.
Conclusion
The Windows Repair Toolbox is an indispensable tool for both casual users and IT professionals. From fixing internet issues to running comprehensive malware scans, this tool provides everything you need to repair a broken Windows system.
Make sure to try out the various tools and add your own favorites to the custom section for even more flexibility. If you liked this guide, don’t forget to visit again for more tech tips and tutorials!
#WindowsRepair #PCFix #MalwareRemoval #SystemTools #FreeTools #ITSupport #Windows10 #Windows11 #TechTips #PCRepair


