Experiencing the Critical Process Died blue screen error on your Windows 10 or 11 PC can be frustrating. This error indicates that a critical system process has failed, causing your system to crash. But don’t worry! Whether you’re able to access your desktop or you’re stuck with a blue screen, this guide will walk you through the steps to resolve the issue.

Scenario 1: If You Can Access the Desktop
If you’re able to get to the desktop after the blue screen error, follow these steps:
- Open Reset This PC:
- Click the Search Box (located in the taskbar).
- Type “reset” and select Reset this PC from the list of suggestions.
- Choose Advanced Startup:
- Under the Recovery tab, look for Advanced Startup.
- Click on Restart Now.
- Access Advanced Options:
- Your PC will restart and take you to the Advanced Options screen.
Scenario 2: If You Can’t Access the Desktop
If you can’t get past the blue screen and access your desktop, follow these steps:
- Force Shutdown:
- Press and hold the Power Button on your PC or laptop until it shuts down completely.
- Restart the PC:
- Press the Power Button to turn the computer back on.
- As soon as you see the Windows Logo, press and hold the Power Button again to force a shutdown.
- Repeat the Shutdown Process:
- Repeat the force shutdown process three times.
- On the fourth restart, your PC will boot into the Advanced Options screen automatically.
Step 3: Troubleshoot and Fix the Error
Once you’re in the Advanced Options menu, follow these steps:
- Select Troubleshoot:
- On the main menu, click Troubleshoot.
- Choose Advanced Options:
- From the next screen, click on Advanced Options.
- Try Startup Repair:
- First, select Startup Repair to allow Windows to try fixing the issue automatically.
- If this doesn’t work, proceed to the next step.
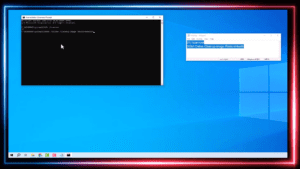
Step 4: Run Command Prompt Commands
If Startup Repair didn’t fix the issue, it’s time to use the Command Prompt for manual repairs.
- Open Command Prompt:
- From the Advanced Options menu, select Command Prompt.
- Run Boot Repair Commands:
- In the Command Prompt window, type the following commands one by one, pressing Enter after each command:
bootrec /fixmbr bootrec /fixboot bootrec /scanos bootrec /rebuildbcd
- In the Command Prompt window, type the following commands one by one, pressing Enter after each command:
- Run System File Checker:
- Next, type the following command and press Enter:
sfc /scannow - This process will take some time as Windows scans and repairs system files.
- Next, type the following command and press Enter:
- Run Check Disk Command:
- After the system file check, type this final command and press Enter:
chkdsk C: /f - This will scan your hard drive for errors and attempt to fix them.
- After the system file check, type this final command and press Enter:
Step 5: Restart Your Computer
Once all the commands have been executed:
- Close Command Prompt:
- Type exit and press Enter to close Command Prompt.
- Restart Your PC:
- Click Continue and restart your PC.
Conclusion
If everything goes smoothly, your PC should boot without the blue screen error, and you’ll be back to your desktop. These steps should fix the Critical Process Died blue screen error by addressing bootloader, system file, or hard drive issues.
Stay safe, and happy computing!
#Windows10 #Windows11 #CriticalProcessDied #BSODFix #CommandPromptFix #PCRepair #AdvancedOptions #TroubleshootingWindows