SpiderFoot is a powerful open-source OSINT (Open Source Intelligence) tool used to automate the process of gathering information about IP addresses, domains, emails, and more. It’s perfect for penetration testers, cybersecurity professionals, and ethical hackers who want to identify and assess vulnerabilities across targets.
⚠️ This tutorial is for educational purposes only. Do not use SpiderFoot or any similar tool on public networks without proper authorization.
Step-by-Step Guide to Setting Up SpiderFoot with GUI
SpiderFoot can be used in two modes: CLI (Command Line Interface) and GUI (Graphical User Interface). In this tutorial, we’ll focus on using the GUI version, which is user-friendly and perfect for beginners.
Step 1: Install SpiderFoot on Your Linux System
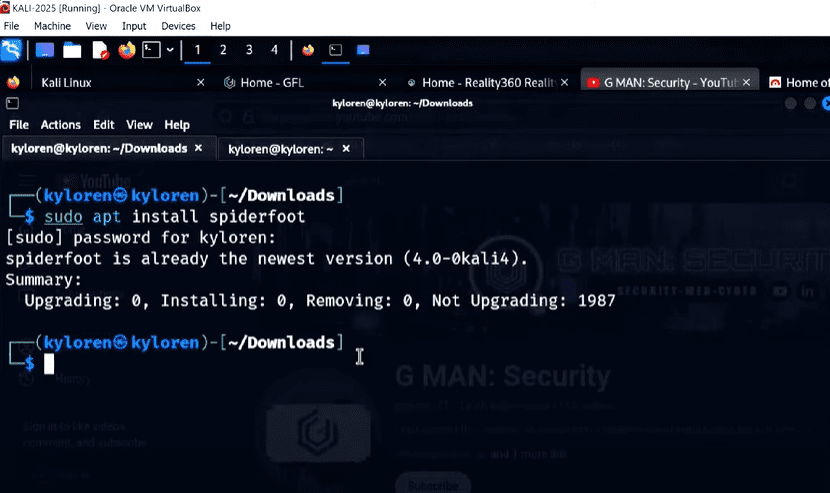
First, install SpiderFoot using the following command:
sudo apt install spiderfoot
Once installed, you can verify it by simply typing:
spiderfoot
If SpiderFoot prompts for additional parameters, it’s because it must be run with root privileges. Let’s switch to root user and proceed.
Step 2: Launch the SpiderFoot GUI Server
To run SpiderFoot in GUI mode, enter the following command in the terminal as root:
spiderfoot -l 127.0.0.1:5001
This tells SpiderFoot to run the web interface locally on port 5001.
Once it’s up and running, open your browser and visit:
http://127.0.0.1:5001
You’ll now see the SpiderFoot GUI, which offers an intuitive interface for launching and managing scans.
Step 3: Start a New Scan
You’re now ready to scan a target. Let’s walk through scanning a vulnerable machine and a test website.


Example 1: Scanning a Virtual Machine (Metasploitable)
- Use
ifconfigto retrieve the IP address of your target VM. - In the SpiderFoot GUI, click “New Scan”.
- Enter a Scan Name (e.g.,
metat2) and paste the IP address in the Scan Target field. - Choose the scan type (leave it set to “All” for a comprehensive scan).
- Scroll down and click “Run Scan Now”.
SpiderFoot will start collecting information like open ports, software versions, and HTTP headers. The scan might take some time.
Example 2: Scanning a Vulnerable Website (e.g., testphp.vulnweb.com)
- Start a new scan.
- Use a name like
aartand enter the URLtestphp.vulnweb.com(omithttp://). - Click “Run Scan Now” and let it process.
This target being a deliberately vulnerable site will produce detailed results.
Step 4: Viewing and Interpreting Scan Results
Once the scans are complete, go to the “Scans” tab to see a list of your past and current scans. You can click on any scan to review its results.
Key Information You’ll Find:
- HTTP Headers: Apache/Nginx version, PHP version, OS info (like Ubuntu).
- Open TCP Ports: Crucial to know what services are publicly accessible.
- Banner Grabbing: Shows SSH, SFTP versions, and certificates in use.
- Web Content: HTML and script info (such as Dreamweaver tags suggesting older code).
- Hosting Info: Sometimes includes physical addresses and hosting providers.
You can filter and sort results by category or use the “Summary” tab for a high-level overview.
Step 5: Manage Scans
From the Scans tab, you can:
- Re-run scans to compare historical data.
- Delete scans you no longer need.
- Export results for reporting.
This is especially helpful for red team exercises or internal audits over time.
Final Thoughts
SpiderFoot is an outstanding tool for security assessments, and its GUI makes it accessible even to those new to ethical hacking. Created by Steve Micallef, it continues to evolve as a go-to OSINT tool. Whether you’re scanning internal systems or practicing in a lab, SpiderFoot can uncover a vast amount of intelligence automatically.
Tags
spiderfoot, ethical hacking, cybersecurity tools, open source intelligence, osint, vulnerability scanning, linux tools, penetration testing, spiderfoot gui, install spiderfoot
Hashtags
#spiderfoot #ethicalhacking #cybersecurity #osint #linux #pentesting #vulnerabilityscanner #cybertools #infosec #linuxadmin


