As we step into 2025, it’s the perfect time to shift from Windows 10 to Windows 11! If you’re wondering how to make the switch without losing any data, this guide will walk you through the complete process. Whether you’re upgrading your personal computer or your work laptop, you can follow these simple steps to transition smoothly and securely.
Let’s get started!
Step 1: Download Windows 11 ISO File from Microsoft
- Open your browser and in the search bar, type “WS1 download” (referring to Windows 11).
- Look for the official Microsoft website link that says Download Windows 11.
- Click to open the official page.
- Scroll down a bit and find the option that says Download Windows 11 Disk Image (ISO) for x64 devices.
- Select Windows 11 from the dropdown menu and click Download.
- Choose your Product Language — for most, English International works well.
- Click Confirm, and then click 64-bit Download.
- The Windows 11 ISO file (around 5 GB) will start downloading.
Step 2: Open the Windows 11 ISO File
Once your download is complete:
- Double-click on the downloaded ISO file.
- A new window will pop up, showing the files inside the ISO.
- Look for the setup.exe file and double-click to launch it.
Step 3: Start the Windows 11 Installation Process
- After opening the setup file, a Windows 11 installation window will appear.
- Click on Next to proceed.
- Accept the license terms by clicking on Accept.
- You will now see the installation options.
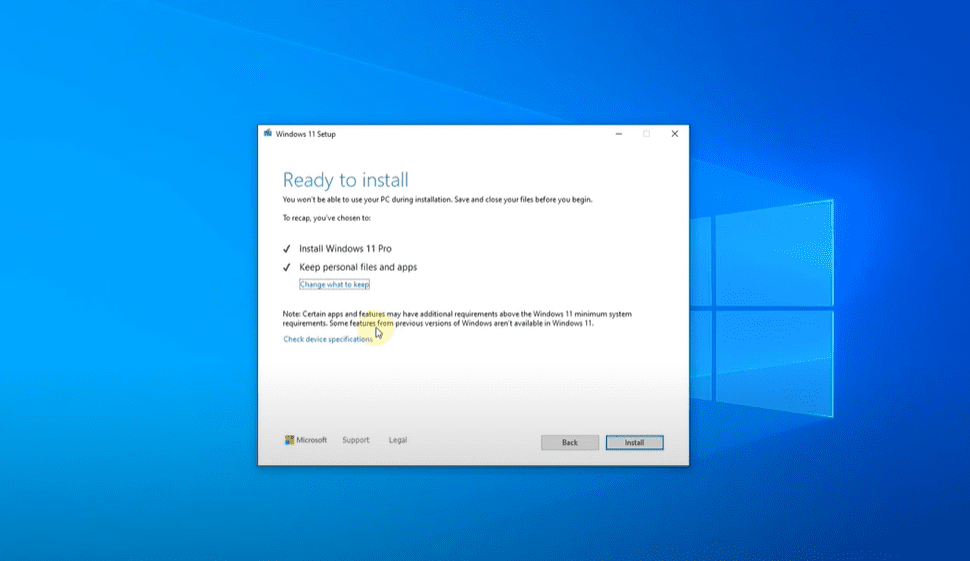
Step 4: Choose What to Keep
Here’s the most important part — making sure you don’t lose any data:
- You will see an option that says Keep personal files and apps.
- Make sure this is selected.
- If you want to check or change it, click on Change what to keep:
- Keep personal files and apps (Recommended) – no data will be lost.
- Keep personal files only – apps and settings will be reset.
- Nothing – everything will be wiped.
To avoid data loss, keep the first option selected (Keep personal files and apps).
Step 5: Begin the Installation
- After confirming the settings, click on Install.
- Windows 11 installation will begin. This process might take some time depending on your device’s speed.
- Make sure your computer stays connected to a power source and internet during the installation.
Step 6: Final Steps
Once the installation is complete:
- Your PC will reboot a few times.
- Windows 11 will load with all your previous files, apps, and settings intact.
- You can verify that none of your drives like **C:*, **D:*, or *E:* have lost any files.
Congratulations! You’ve successfully upgraded from Windows 10 to Windows 11 without any data loss.
Final Thoughts
This method provides a clean, simple, and reliable way to upgrade without worrying about losing important data. Always ensure you download the ISO file from the official Microsoft website to avoid any issues.
If you follow these steps carefully, you’ll enjoy the new features of Windows 11 with your data safe and sound!
Tags:
windows10, windows11, windowsupgrade, microsoft, windows11installation, windows11ISO, upgradeguide, nodataloss, windowsupgrade2025
Hashtags:
#Windows10 #Windows11 #UpgradeToWindows11 #Microsoft #WindowsUpgrade #Windows11ISO #TechGuide #NoDataLoss