Switching back to a local account after setting up your machine with a Microsoft account can be beneficial for privacy and personal preferences. While Microsoft strongly encourages users to utilize Microsoft accounts for login, local accounts still have their place, offering a more offline-centric experience.
In this post, we’ll explore two approaches for switching back to a local account. The first method is straightforward but requires a few steps. The second is simple but requires more effort, including reinstalling Windows. Let’s dive into the details.
Step-by-Step Guide to Switching to a Local Account
Step 1: Accessing Settings
First, confirm that you’re currently logged into a Microsoft account. To do this:
- Open Settings on your Windows 11 device.
- Navigate to the Accounts section.
- You will see your Microsoft account information, such as your email address associated with the account (e.g., yourname@hotmail.com).
Step 2: Creating a New Local User Account
To switch to a local account, you’ll need to create a new local account. Follow these steps:
- In the Accounts section, scroll down and click on Other Users.
- Select Add account.
- When prompted, choose I don’t have this person’s sign-in information.
- Click on Add a user without a Microsoft account.
Now you can create a traditional local user account. Keep in mind that Microsoft will require you to fill out three security questions for account recovery. While this might seem tedious, it’s essential to ensure your account can be recovered if you forget your password. Fill out the questions carefully with answers that make sense to you.
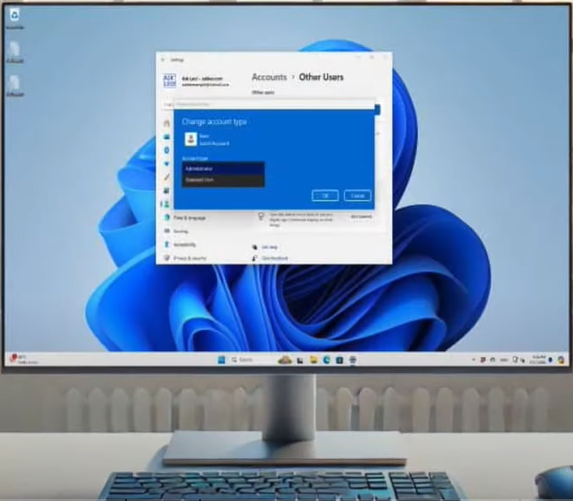
Step 3: Adjusting Account Privileges
Once you’ve created the local account, you might want to make it an administrator-capable account to give it more control:
- Click on the new local account you just created.
- Select Change account type.
- Choose Administrator.
Step 4: Using the Local Account
After creating and setting up the local account as an administrator, you can log into it. When you restart your computer, you’ll see the new local account as an option on the login screen.
You can now use this local account for all your tasks. However, remember that switching accounts may require you to transfer some data manually. For example, files, settings, and apps installed under your Microsoft account may not be automatically accessible from the local account. You may need to reinstall some apps or configure settings again.
Alternative Approach: Reinstall Windows 11
If you’re looking for a more direct but drastic approach, you can reinstall Windows 11 from scratch. This method allows you to set up Windows without ever linking a Microsoft account. However, Microsoft makes this process challenging by attempting to block methods for bypassing the Microsoft account setup.
Several workarounds exist for this, but they may not always work as Microsoft updates the setup process to enforce the use of Microsoft accounts. If you decide to reinstall Windows, make sure you back up all your data and files before proceeding.
Final Thoughts
While Microsoft nudges users toward using Microsoft accounts, it’s still possible to create and switch to a local account. The easier method involves creating an additional local user account, granting it administrator privileges, and transferring necessary data. The more complex method is reinstalling Windows entirely to avoid using a Microsoft account at all.


For most users, the first method will suffice, offering a balance between ease and maintaining access to all your applications and files.
#Windows11 #MicrosoftAccount #LocalAccount #TechTips #AskLeo #WindowsSettings #Privacy


