Distorting and skewing images in Adobe Illustrator can be a powerful technique to create unique designs and visual effects. Whether you want to give your images a dynamic perspective or make creative adjustments, Illustrator offers various tools and methods to achieve these effects. In this blog post, I’ll guide you through the steps to skew and distort an image using Adobe Illustrator.
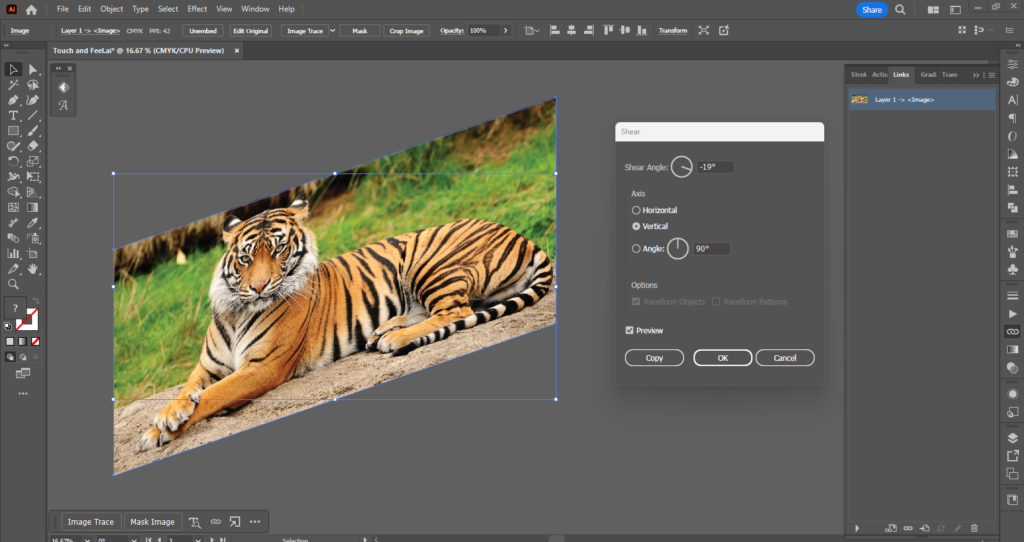
Step 1: Import Your Image
- Open Adobe Illustrator and create a new document (Ctrl+N or Cmd+N).
- Go to File > Place and select the image you want to distort.
- Click Place to insert the image into your document. You can move and resize the image as needed.
Step 2: Embed the Image
Before you can distort or skew the image, you need to embed it into your Illustrator document. Here’s how:
- Select the image by clicking on it.
- Go to the Properties panel or Control panel at the top.
- Click on the Embed button to embed the image.
Step 3: Convert the Image to an Object
Illustrator allows you to manipulate images like vector objects, but to use the distortion tools, you need to rasterize the image first:
- With the image selected, go to Object > Rasterize.
- Choose your preferred resolution (300 PPI is a good option for high-quality results).
- Click OK to convert the image to a raster object.
Step 4: Skew the Image
To skew the image, use the Free Transform tool:
- Select the rasterized image.
- Go to Object > Transform > Shear.
- In the Shear dialog box, set the Shear Angle and select the axis along which you want to skew the image (Vertical or Horizontal).
- Adjust the Angle value to skew the image as desired.
- Click OK to apply the skew effect.
Step 5: Distort the Image Using the Free Transform Tool
To create more complex distortions, use the Free Transform Tool:
- Select the rasterized image.
- Go to Edit > Free Transform or press
Eon your keyboard. - A bounding box with handles will appear around the image.
- To distort the image, click and drag the corner handles while holding down the Shift and Alt (Windows) or Option (Mac) keys. This will allow you to skew, stretch, and distort the image freely.
- Release the mouse button once you’re satisfied with the effect.
Step 6: Distort the Image Using the Envelope Distort Tool
The Envelope Distort tool allows for more advanced and creative distortion effects:
- Select the rasterized image.
- Go to Object > Envelope Distort > Make with Mesh.
- In the dialog box, choose the number of rows and columns for the mesh grid. A higher number of rows and columns will give you more control over the distortion.
- Click OK. A mesh grid will appear over your image.
- Use the Direct Selection Tool (A) to click and drag the mesh points to distort the image in various ways. You can also use the handles to create smooth curves.
Step 7: Apply the Distortion Effect
To finalize your distorted image:
- Adjust the mesh points and handles until you achieve the desired distortion effect.
- Use the Selection Tool (V) to move or scale the image if necessary.
- Go to Object > Expand Appearance to convert the mesh distortions into a permanent object.
Step 8: Save Your Document
Once you’re happy with the distortion effect, save your document:
- Go to File > Save As.
- Choose your preferred file format (AI, PDF, SVG, etc.) and save your work.
Tips for Skewing and Distorting Images in Illustrator
- Experiment with Different Tools: Try different methods such as Envelope Distort, Free Transform, and Shear to see which works best for your design.
- Use Layers: Always work on a duplicate of the original image in a new layer to keep the original intact.
- Practice with Gradients and Effects: Combine skew and distort effects with gradients and other design elements for more creative outcomes.
By following these steps, you’ll be able to skew and distort images in Adobe Illustrator effortlessly and add unique visual effects to your designs.
#AdobeIllustrator #GraphicDesign #ImageEditing #CreativeDesign #IllustratorTips #DesignTutorial #SkewImage #DistortImage #FreeTransform #EnvelopeDistort
