Introduction
When working on designs in Adobe InDesign, you may often need to scale or resize an image to fit your layout perfectly. Whether you want to resize proportionally or adjust specific dimensions, InDesign offers straightforward tools to accomplish this task.

This article will walk you through the steps to scale and resize an image in Adobe InDesign efficiently.
Step 1: Insert Your Image
- Create a New Document:
- Open Adobe InDesign and create a new document based on your project requirements.
- Place the Image:
- Go to the File menu and select Place.
- Choose your desired image from the file explorer and click Open.
- Click or drag within the document to position and place your image.
Step 2: Select the Image
- To begin resizing, first ensure your image is selected:
- Click on the image or use the Selection Tool (shortcut: V) to highlight the image frame.
Step 3: Use the Free Transform Tool
- Locate the Free Transform Tool:
- Find the Free Transform Tool in the toolbar on the left side of the screen.
- If other tools are grouped in the same spot, right-click on the tool icon and select Free Transform Tool.
- Alternatively, use the keyboard shortcut E to activate it.
- Resize Proportionally:
- To maintain the aspect ratio while resizing, click and drag any corner handle of the image while holding down the Shift key.
- Drag inward to scale down the image or outward to scale up.
- Resize Non-Proportionally:
- To adjust only the width or height without maintaining proportions, click and drag any side or corner handle without holding Shift.
Step 4: Additional Adjustments
- Once resized, ensure the image fits well within your design. If necessary:
- Move the image frame by clicking and dragging.
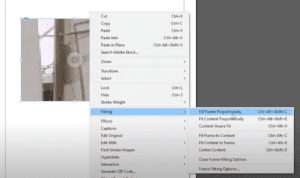
- Adjust the content using the Content Grabber (a circular icon in the center of the frame) to reposition the image inside its frame.
Step 5: Finalize and Save
- Review Your Changes:
- Check the resized image in the context of your layout to ensure it meets your design requirements.
- Save Your Work:
- Save your document to retain the changes. Use File > Save As to avoid overwriting the original file if needed.
Conclusion
Scaling and resizing images in Adobe InDesign is a simple yet essential skill for creating professional layouts. By using the Free Transform Tool and understanding how to resize proportionally or non-proportionally, you can achieve the perfect look for your designs.
Practice these steps to enhance your workflow and make your layouts more dynamic and visually appealing.
Hashtags: #AdobeInDesign #InDesignTips #GraphicDesign #ResizeImage #InDesignTutorial
