Introduction
Saving your InDesign project as a PDF is one of the most common tasks, whether you’re preparing it for print, sharing with a client, or creating an interactive digital experience. This guide walks you through the step-by-step process to save your InDesign file as a PDF, with detailed explanations of the options available to tailor the export to your needs.
Step 1: Prepare Your InDesign File
- Final Review:
- Ensure your document is complete and error-free.
- Make any necessary adjustments before exporting.
Step 2: Open the Export Menu
- Access the Export Option:
- Go to the File menu in the top navigation bar.
- From the dropdown, select Export.
- Alternatively, use the shortcut Ctrl+E (Windows) or Cmd+E (Mac).
- Choose a Save Location:
- A file explorer window will open.
- Select the folder where you’d like to save your PDF.
- Name Your File:
- Enter a name for your PDF in the File Name field.
- Select PDF Type:
- Click the dropdown menu for the file type. You’ll see two options:
- Adobe PDF (Print): Ideal for print-ready documents.
- Adobe PDF (Interactive): Best for digital documents with interactive elements like hyperlinks or buttons.
- For this example, we’ll select Adobe PDF (Print).
- Click the dropdown menu for the file type. You’ll see two options:
- Proceed to Settings:
- Click Save to proceed to the Export Adobe PDF settings panel.
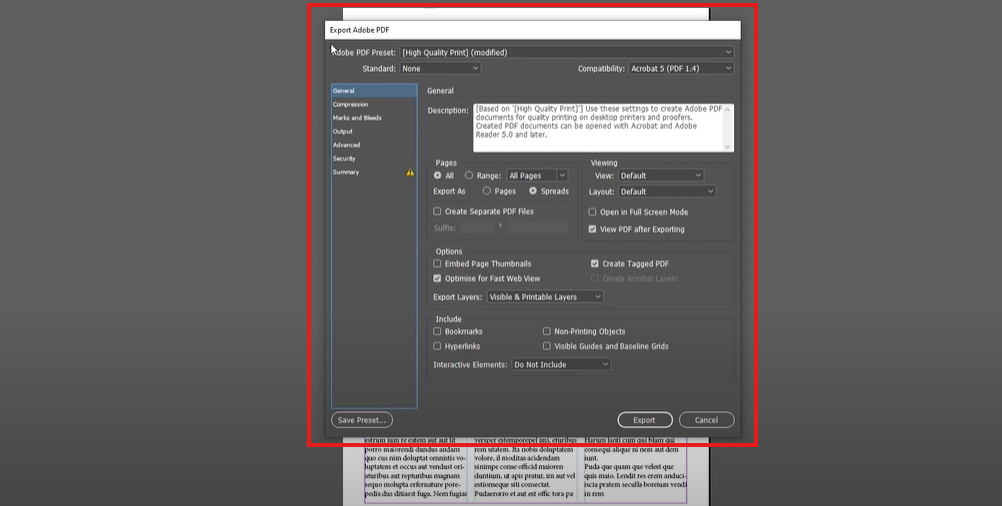
Step 3: Configure PDF Export Settings
- Adobe PDF Preset:
- Choose a preset that matches your needs:
- High-Quality Print: For professional printing with minimal compression.
- Smallest File Size: For quick sharing and digital use.
- Select High-Quality Print for this example.
- Choose a preset that matches your needs:
- Page Range:
- Decide which pages to include in the PDF:
- All: Export all pages in your document.
- Range: Specify the pages (e.g., 1-3, 5).
- If you have multiple pages, choose the appropriate range.
- Decide which pages to include in the PDF:
- Pages or Spreads:
- Choose whether to export:
- Pages: Exports individual pages.
- Spreads: Exports pages as joined spreads (useful for layouts like magazines).
- Choose whether to export:
Step 4: Explore Advanced Options
- Compression:
- Adjust the settings for images in your PDF:
- Reduce file size by compressing images.
- Leave at default for high-quality output.
- Adjust the settings for images in your PDF:
- Marks and Bleeds:
- Add crop marks, bleed marks, or other printer’s marks if required for professional printing.
- Output:
- Choose a color profile for your document:
- RGB for digital use.
- CMYK for print.
- Convert colors to the destination profile if needed.
- Choose a color profile for your document:
Step 5: Export and Verify
- Export the File:
- Once all settings are configured, click Export.
- The export process will begin, and a progress bar may appear.
- Check Your PDF:
- Navigate to the folder where you saved the PDF.
- Open the PDF with Adobe Acrobat or another PDF reader to verify the content.
Conclusion
Exporting your InDesign file as a PDF is straightforward when you follow these steps. Whether you’re creating a print-ready file or a lightweight PDF for digital use, Adobe InDesign offers comprehensive options to customize your export.
Tags: InDesign to PDF, export InDesign as PDF, save InDesign file, Adobe InDesign tips, InDesign export guide, PDF settings InDesign
Hashtags: #AdobeInDesign #PDFExport #InDesignTips #GraphicDesign #PrintDesign #InDesignTutorial