Introduction
Adobe InDesign is a go-to tool for creating layouts and designs, but exporting your work in different formats is essential for versatility. In this guide, we’ll walk you through the steps to save an InDesign file as a JPEG, a format widely used for sharing, web uploads, and presentations.
Step 1: Prepare Your InDesign File
- Review Your Document:
- Ensure your InDesign document is finalized and ready for export.
- Make any necessary edits or adjustments before proceeding.
Step 2: Access the Export Option
- Navigate to Export:
- Click on the File menu in the top navigation bar.
- From the dropdown, select Export.
- Alternatively, you can use the shortcut Ctrl+E (Windows) or Cmd+E (Mac).
- Choose a Save Location:
- A file explorer window will appear.
- Select the folder where you want to save your JPEG file.
- Name Your File:
- Enter a name for your JPEG in the File Name field.
- Select File Type:
- Click the dropdown menu next to the file type.
- Choose JPEG from the available options.
Step 3: Configure JPEG Export Settings
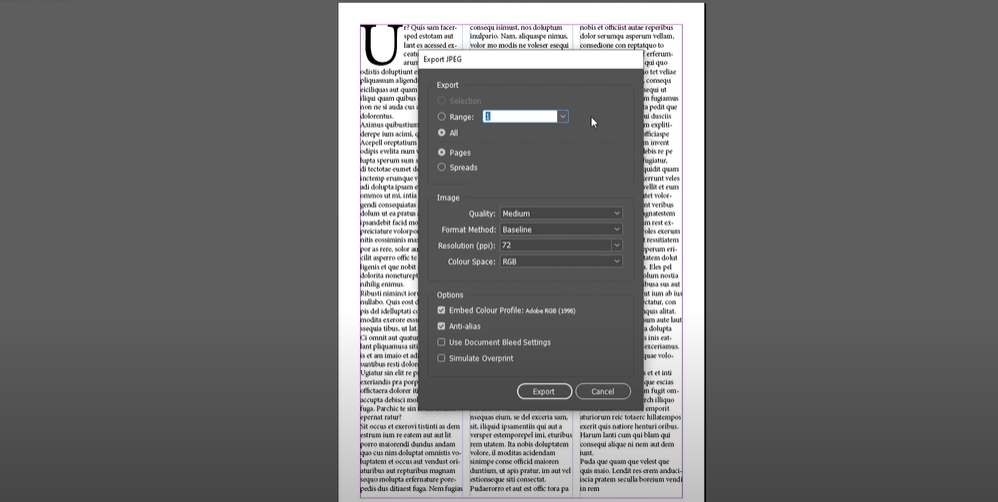
- Export Range:
- In the Export JPEG panel, choose the pages you want to export:
- All Pages: Export all pages in your document.
- Range: Specify a range of pages if you want to export specific ones.
- For single-page documents, select All, which will only include the current page.
- In the Export JPEG panel, choose the pages you want to export:
- Page or Spread:
- Decide whether to export the document as Pages (individual pages) or Spreads (joined pages).
- Image Quality:
- Adjust the Quality setting:
- Low: Small file size, reduced quality.
- Medium: Balanced size and quality.
- Maximum: Best quality and larger file size.
- Adjust the Quality setting:
- Compression Method:
- Leave the compression method as Baseline for standard JPEG encoding.
- Resolution (PPI):
- Select the resolution based on your intended use:
- 72 PPI for web or digital use.
- 150 PPI or 300 PPI for print purposes.
- Select the resolution based on your intended use:
- Color Space:
- Choose a color profile that matches your needs:
- RGB for digital outputs.
- CMYK for print.
- Gray for grayscale images.
- Choose a color profile that matches your needs:
- Color Profiles:
- Decide whether to embed a specific color profile or use the document’s default settings.
Step 4: Export the JPEG
- Finalize and Export:
- Review your settings to ensure they match your requirements.
- Click Export to begin the process.
- Verify Your JPEG File:
- Navigate to the folder where you saved the JPEG.
- Open the file to check its quality and content.
Conclusion
Exporting an InDesign file as a JPEG is a simple process that enhances the versatility of your design. By following these steps, you can ensure your file is exported with the desired quality and settings, ready for sharing or publishing.
Tags: export InDesign to JPEG, save InDesign as JPEG, InDesign file export guide, Adobe InDesign tutorial, JPEG settings InDesign, design file formats
Hashtags: #AdobeInDesign #DesignTips #InDesignToJPEG #GraphicDesign #ExportSettings #InDesignTutorial
