If you’re using a high-capacity SSD or NVMe M.2 drive, like a 1TB or 952GB model, it’s not ideal to keep your storage as a single large C: drive. Keeping all your data—documents, photos, music, and even desktop files—on the C: drive puts you at risk of losing everything if the operating system fails or if you need to reinstall Windows.
Creating a separate partition (like a D: drive) helps protect your personal data and makes future system recovery or reinstallations much safer and easier. In this article, we’ll show you two methods to partition your drive:
- Using Windows’ built-in Disk Management tool.
- Using EaseUS Partition Master, a powerful disk management tool with more features and a user-friendly interface.
Let’s get started.
📁 Why You Should Partition Your Drive
Partitioning helps by:
- Separating system files from personal files.
- Making data recovery easier in case of system failure.
- Allowing easier reinstallation of the OS without deleting your personal files.
- Organizing files for better data management.
🔧 Method 1: Partitioning Using Windows Built-in Tool
Step-by-Step Guide:
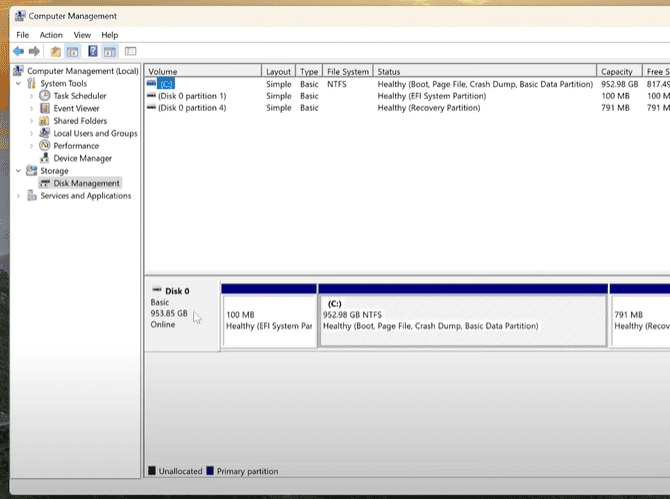
- Access Disk Management
- Right-click on This PC on your desktop. If it’s not visible, right-click on your desktop, go to Personalize > Themes > Desktop icon settings, and enable Computer.
- Click Manage, then select Disk Management.
- Select the Main Drive
- Find your primary disk (usually labeled Disk 0).
- You’ll see partitions such as:
- EFI System Partition (do not touch this).
- Recovery Partition (leave this alone).
- C: Drive – This is where you’ll create space for a new partition.
- Shrink the C: Drive
- Right-click the C: partition and select Shrink Volume.
- Enter the amount of space to shrink in MB (e.g., 83,000 MB = ~83GB).
- Click Shrink.
- Create the New Partition
- You’ll now see Unallocated Space.
- Right-click the unallocated space and select New Simple Volume.
- Assign a drive letter (like D:), choose NTFS as the file system, and label it (e.g., “Data”).
- Click Finish.
You now have a new partition ready to store your personal files safely.
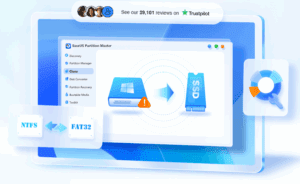
🧰 Method 2: Using EaseUS Partition Master for Advanced Options
If you want more control and flexibility over your partitions, we recommend using EaseUS Partition Master. This software offers a professional and easy-to-use interface for disk and partition management.
Benefits of EaseUS Partition Master:
- Clone your system to another drive.
- Migrate OS without reinstalling.
- Convert between MBR and GPT.
- Recover deleted partitions.
- Reset Windows passwords.
- Repair boot issues.
How to Use It:
- Install the Software
- Download EaseUS Partition Master from their official website.
- Install and open the program.
- Activate the Software
- If you have a license key, enter it under the activation section.
- Resize the C: Drive
- Right-click on your C: drive and choose Resize/Move.
- Drag the slider to reduce the size (e.g., leave 400GB for the C: drive).
- Click OK.
- Create a New Partition
- Right-click on the unallocated space and choose Create.
- Assign a letter (e.g., D:), name the partition, and leave the format as NTFS.
- Click Apply to execute the pending operations.
- Check the Results
- Open File Explorer—you should now see the newly created D: drive ready to use.
You might be intrested in these topics too!
- How to Boot Windows 11 into Safe Mode (2025 Guide): Step-by-Step for Beginners and Experts
- Fixyfier: The All-in-One Free Windows Repair Tool for Everyone
- The Ultimate Guide to Troubleshooting 30 Common Desktop PC Problems
- 5 Best Way to Automatic Repair Loop and “Startup Repair Couldn’t Repair Your PC” Error
- How to Debloat Windows 10 and 11 Without Any Third-Party Software
📝 Final Thoughts
Partitioning your drive is one of the best ways to protect your data and prepare for future system issues. Using the built-in Windows tool is quick and free, while third-party tools like EaseUS Partition Master offer powerful extra features and a more streamlined process.
Make sure to back up your data before performing any major changes to your partitions, and follow each step carefully.
Tags: disk partition, windows 11 tips, easeus partition master, windows storage, ssd partition, nvme m2, disk management, local storage, data safety, backup strategy
Hashtags:
#Windows11 #SSDTips #DiskPartition #EaseUS #TechTips #NVMeDrive #WindowsHelp #PCSetup #DataSafety #TipsToFix