Repairing Windows without completely reinstalling the OS can save you time, hassle, and prevent data loss. Many technicians opt for a full system reinstall when Windows starts acting up, but that’s often unnecessary. Windows provides tools to fix corrupted system files, but it’s important to know the right way to use them.
In this step-by-step guide, I’ll show you how to properly repair Windows system files using tools like the System File Checker (SFC) and Deployment Image Servicing and Management (DISM). If you’ve been frustrated by system errors or have been advised to “just reinstall Windows,” follow along to fix the issue without starting from scratch.
Understanding the Problem with ‘Nuke and Pave’ Technicians
One of the most common approaches inexperienced technicians take when fixing Windows issues is the “nuke and pave” method. This simply means wiping the system and reinstalling Windows. Although it seems like a quick fix, it often leads to unnecessary data loss or configuration issues. Worse yet, if your data isn’t backed up beforehand, you might lose it all.
But here’s the good news: Windows is incredibly repairable! Microsoft has provided a number of built-in tools that allow users to fix corrupted or malfunctioning system files—without reinstalling the entire operating system.
Let’s take a closer look at how to use these tools effectively.
Step 1: Use the System File Checker (SFC)
The System File Checker (SFC) is a built-in Windows tool designed to check the integrity of system files. If it finds corrupted files, it replaces them with the correct version. Here’s how to run it:
- Open Command Prompt as Administrator:
- Press
Start, typeCMD, and right-click on Command Prompt. - Select Run as administrator.
- Press
- Run the SFC Command:
- In the command prompt, type the following command:
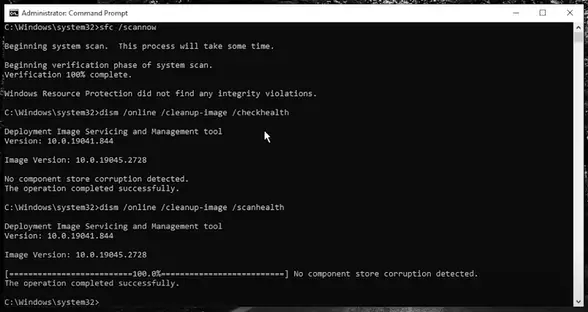
sfc /scannow
PressEnter.This process scans your system files and attempts to replace any corrupted files with clean versions from a cache stored on your computer.
However, SFC alone often fails to fix problems, especially if the cached files are outdated or corrupted themselves. You might get an error like:
Windows Resource Protection found corrupted files but was unable to fix some of them.

If you see this message, don’t worry—this is where DISM comes into play.
Step 2: Use DISM to Fix Corrupted System Image Files
The Deployment Image Servicing and Management (DISM) tool checks and repairs the system image that SFC relies on. If this image is corrupted, DISM can restore it, allowing SFC to work properly.
Here’s how to use DISM:
- Run DISM to Check Health:
- Open Command Prompt as Administrator (as explained in Step 1).
- Run the following command:bashCopy code
dism /online /cleanup-image /checkhealth - This command will check if the system image is corrupted. It’s a quick scan that reports any issues with the system files.
- Perform a Deeper Scan with DISM:
- If the
checkhealthscan reports corruption, run the following to perform a more thoroughdism /online /cleanup-image /scanhealth - This will take a little longer as it checks deeper for issues in the system image.
- If the
- Restore Health Using DISM:
- If the previous scan finds corruption, you can repair the system image by running this command:
dism /online /cleanup-image /restorehealth - This command not only checks for corruption but also fixes any issues it finds by using Windows Update or a local repair source.
- If the previous scan finds corruption, you can repair the system image by running this command:
Step 3: Running SFC Again
Once DISM has repaired the system image, SFC can now work correctly. Follow these steps:
- Open Command Prompt as Administrator.
- Run the SFC command again:
sfc /scannow
This time, SFC should be able to complete the process and fix any corrupted system files successfully.
Step 4: Using an External ISO Image (If Necessary)
If DISM is unable to fix the issues using the default system image, you may need to provide a clean version of the Windows system files by using an ISO file. Here’s how to do it:
- Download the Windows ISO Image:
- Visit the official Microsoft website and download the Media Creation Tool.
- Run the tool and select Create installation media.
- Choose ISO file as your format, and download it to your system.
- Mount the ISO Image:
- Once the ISO file is downloaded, locate it and double-click to mount it as a virtual drive.
- Note the drive letter (e.g., D:).
- Run DISM with the ISO as the Source:
- Open Command Prompt as Administrator.
- Run this command to repair the system image using the ISO file:
dism /online /cleanup-image /restorehealth /source:D:\sources\install.wim /limitaccess - Replace
D:with the drive letter where the ISO is mounted. This will use the clean image from the ISO to repair your system.
Troubleshooting Tips:
- Check File Formats: Depending on your ISO, you might see
install.wimorinstall.esd. Both work—just be sure to specify the correct file name in your DISM command. - Limit Access: If you want to ensure that DISM doesn’t try to pull files from Windows Update, you can add the
/limitaccessswitch as shown above.
Conclusion
By using SFC and DISM together, you can fix most system issues without needing to reinstall Windows. These tools work hand-in-hand to ensure your system has the correct, uncorrupted files, even if your system cache is out of date. This process can save you from the headaches of reinstalling software, drivers, and restoring data.
Next time you’re tempted to reinstall Windows, try these steps first! And stay tuned for more aarticles where I’ll dive into other ways to fix Windows without nuking your system.
#WindowsRepair #SFC #DISM #Windows10 #PCFix #Troubleshooting #TechGuide #FixCorruptFiles