Accidentally formatted your hard drive or deleted important files from your pen drive? Don’t worry! In this post, we will explore a great method of data recovery that allows you to recover files from any media storage device, completely free. Whether you’ve lost 10GB, 20GB, or even 30GB of data, this method can help you recover it all.
Introduction to Free Data Recovery
Mistakes happen, and data loss can be stressful. However, using a free data recovery tool called TestDisk along with its companion PhotoRec, you can retrieve your lost files effortlessly. TestDisk is a powerful open-source tool that is highly effective at recovering lost partitions and making non-bootable disks bootable again.
In this post, we’ll focus on recovering files using PhotoRec, the graphical user interface (GUI) version of the tool. This is a great alternative for those who may find the command-line version a bit challenging.
What is PhotoRec?
PhotoRec is a data recovery software designed to recover lost files including videos, documents, and archives from hard drives, CD-ROMs, and lost pictures from memory cards. It supports over 480 file extensions and is highly effective for all types of media.
Step-by-Step Guide to Recovering Your Data
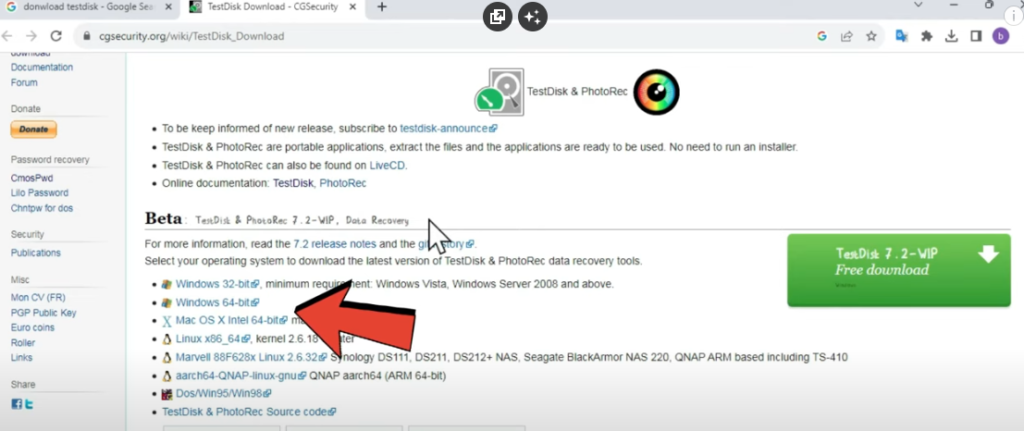
1. Download TestDisk & PhotoRec
To begin, you’ll need to download the latest version of TestDisk and PhotoRec from its official website: cgsecurity.org. Ensure you download the version compatible with your operating system—TestDisk is available for both 32-bit and 64-bit systems on Windows, macOS, and Linux.
2. Extract the ZIP File
Once downloaded, extract the ZIP file. This will create a folder containing both TestDisk and PhotoRec executable files.
3. Choose the GUI Version
Within the folder, you’ll find two executable files: one for the command-line interface (CLI) version (TestDisk) and the other for the graphical user interface (GUI) version (PhotoRec). For a simpler process, use PhotoRec.
4. Select the Media Device
Once you launch PhotoRec, the first step is to select the media device from which you want to recover data. This could be a pen drive, hard drive, or any other storage device connected to your computer. Simply choose the appropriate drive from the dropdown menu.
5. Select the Partition
After selecting the media device, PhotoRec will show you the partitions on that drive. You’ll need to select the partition from which the data was deleted. If the entire drive was formatted, select the primary partition.
6. Select the File System
PhotoRec automatically detects the file system of the partition. However, if necessary, you can manually select the file system—such as FAT, NTFS, or ext2/ext3—depending on how the storage device was formatted.
7. Specify the Data Recovery Mode
- Free Scan for Unallocated Space: If you want to recover files from unallocated space, choose this option.
- Whole Partition Recovery: For a complete scan of the entire partition, select this option.
8. Choose the Destination for Recovered Data
Next, specify where you want to save the recovered files. It’s best to save them to a different drive or partition to prevent overwriting the lost data.


9. Filter by File Format (Optional)
If you’re only looking to recover specific file types, you can narrow down the search. For instance, if only your videos were deleted, you can select just MP4 files. To do this:
- Uncheck all other file types.
- Select the specific file extensions you wish to recover, such as JPG for images, DOC for documents, etc.
10. Start the Recovery Process
Once everything is set up, start the recovery process. PhotoRec will scan the drive and begin retrieving lost files. Depending on the size of the drive and the amount of data, the recovery process might take some time.
Key Features of PhotoRec
- Cross-Platform: Available for Windows, macOS, and Linux.
- Support for Multiple File Types: Recovers over 480 file extensions including documents, images, and videos.
- Deep Recovery: Scans even unallocated space to retrieve lost files.
- User-Friendly: With the GUI version (PhotoRec), recovering files is a simple, step-by-step process.
Tips for Effective Data Recovery
- Stop Using the Device: Once you’ve realized data is lost, stop using the media storage device immediately to avoid overwriting the data.
- Use a Separate Drive for Recovery: Always save the recovered files to a different drive to prevent overwriting lost data.
Conclusion
With TestDisk and PhotoRec, recovering deleted or formatted data doesn’t have to be complicated or costly. By following the steps outlined above, you can recover your files easily and efficiently. Whether you’re a tech novice or an experienced user, this free method offers a powerful solution to your data recovery needs.
Start recovering your lost data today and bring back those important files with ease!
#DataRecovery #FreeSoftware #TestDisk #PhotoRec #RecoverFiles #TechTips #FileRecovery #StorageDevice #FormattedDrive #DeletedFiles


