If you’re looking for a powerful and free tool to record your computer screen or gameplay, OBS Studio is hands down one of the best options available. Whether you’re creating tutorials, recording games, or capturing any on-screen activity, OBS Studio offers a wide range of features at no cost.
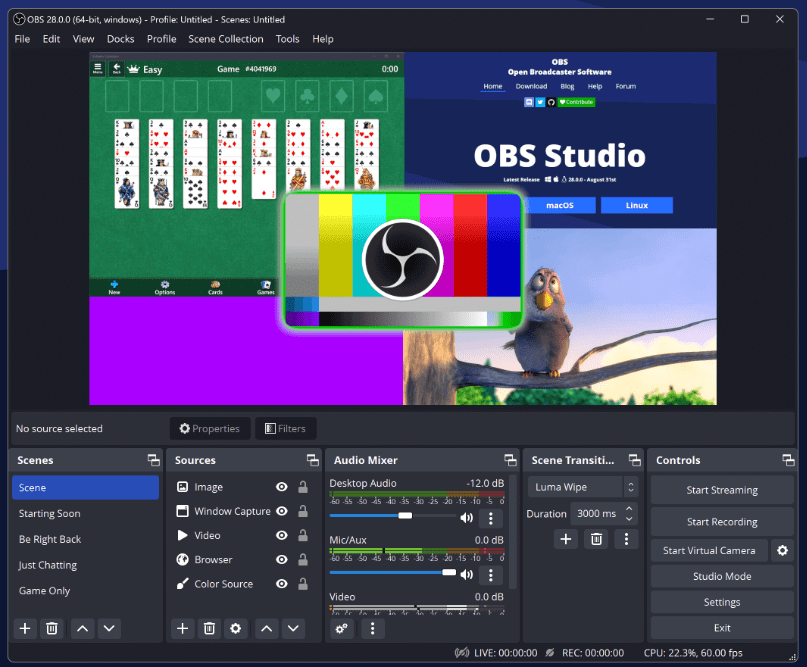
In this article, we’ll walk through how to set up OBS Studio to record your screen, capture microphone audio, and even record system audio (like songs or in-game sound effects). Let’s dive in!
Step 1: Setting Up Screen Recording
- Open OBS Studio on your PC or laptop.
- Inside the main window, look for the section labeled Sources.
- Click the “+” (plus) button under the Sources panel.
- To capture your entire display, select “Display Capture” from the list.
- Keep the option “Create New” selected and click OK.
- A new window will pop up. Click OK again without changing anything.
- Your entire screen will now appear within OBS Studio, ready to be recorded.
Tip: Keep the screen frame centered and avoid resizing it unnecessarily to maintain recording quality.
Step 2: Start Recording
Once you have added the display capture:
- Simply click on Start Recording from the control panel on the right.
- Your entire screen will now be recorded.
However, by default, only the video (screen) will be recorded — no microphone audio yet.
Step 3: Adding Microphone Audio Recording
If you want your voice to be recorded as well:
- Again, click on the “+” (plus) button under the Sources section.
- Select “Audio Input Capture”.
- Choose Create New and click OK.
- In the next window, under the device dropdown, select your connected microphone (e.g., “High Definition Audio Device” or your external mic).
- Click OK.
Now, your microphone audio will also be captured along with the screen.
Pro Tip: You can monitor if your microphone is recording by looking at the Audio Mixer in OBS. If the green bar under “Audio Input Capture” is moving, it means your voice is being recorded.
Step 4: Capturing System Audio (PC Sound)
Want to record the sound coming from your computer — like music, game sounds, or system alerts? Here’s how:
- Click the “+” (plus) button under Sources.
- Select “Audio Output Capture”.
- Click Create New and then OK.
- From the dropdown menu, select your system speakers (e.g., “Speakers (High Definition Audio Device)”).
- Click OK.
Now OBS Studio will record both the sounds coming from your computer and your microphone simultaneously.
Step 5: Recording Games (Game Capture)
If you specifically want to record a game:


- Under Sources, click the “+” button.
- Select “Game Capture”.
- Choose Create New and click OK twice.
- OBS Studio will automatically detect and record your game window when you launch a game.
Note: Game Capture is optimized for recording games and ensures better performance compared to Display Capture when gaming.
Step 6: Adjusting Recording Settings for Best Quality
For better quality and customization:
- Go to Settings (bottom-right corner).
- Navigate to the Output tab.
- Change Output Mode from “Simple” to Advanced.
- Under the Recording section:
- Change the recording path if you want (choose where the videos are saved).
- Select Recording Format (recommended: .mp4).
- If you experience any errors starting the recording:
- In the Output tab under Recording settings, change the Encoder from “Hardware” to “Software (x264)”.
- Apply the settings and retry.
Step 7: Optimizing Video Settings
To make sure your recorded video looks great:
- Go to the Video tab in Settings.
- Set both Base (Canvas) Resolution and Output (Scaled) Resolution to match your screen’s native resolution (e.g., 1920×1080 or 1366×768).
- Set Common FPS Values to 60 FPS for smooth recordings (especially useful for gaming).
Apply the changes and click OK.
Saving and Accessing Your Recordings
Once you click Stop Recording, OBS will automatically save the video to the folder you specified (or to the default location if unchanged). You can now access and edit your screen or game recordings!
Final Thoughts
OBS Studio is a fantastic free tool packed with professional features. Whether you are recording simple tutorials or high-end gameplay, setting it up properly ensures smooth and high-quality recordings. By following the above steps, you’ll be able to capture everything from your screen, microphone, and PC audio effortlessly.
Happy recording!
Tags: OBS Studio, screen recording, screen capture, game recording, Windows recording software, OBS setup, record PC screen, record gameplay, OBS Studio tutorial, best free screen recorder
Hashtags:
#OBSStudio #ScreenRecording #GameRecording #WindowsSoftware #PCRecording #FreeScreenRecorder #OBSTutorial #RecordScreen #GamingSetup #ContentCreation


