If you are a content creator, podcaster, voice-over artist, or someone who wants to clean up audio recordings professionally, Audacity is one of the best free tools available. In this detailed guide, we will show you how to record, edit, enhance, and export audio using Audacity, starting from scratch.
Let’s walk through each step in detail.
✅ Step 1: Download and Install Audacity
Before anything, download Audacity from its official website:
👉 https://www.audacityteam.org
Once downloaded, install it on your Windows or Mac system. After installation, launch Audacity and maximize the window to start working comfortably.
✅ Step 2: Configure Your Microphone Settings
- Check microphone input at the top of the interface.
- If you’re using an external microphone, make sure to select it from the list.
- Example: If your mic is named “Elgato Wave” or “Blue Yeti,” select it manually.
- Also, ensure your speakers or headphones are set correctly for monitoring audio.
✅ Step 3: Create and Save a New Project
Before recording:
- Go to
File > Save Project As. - Choose a name for your project like
AudioProject1and save it on your Desktop or preferred folder.
Saving your project before working is a good habit to prevent data loss due to crashes or power cuts.
✅ Step 4: Start Recording Audio
To begin recording:
- Press the red Record button.
- Speak your script, dialogue, or podcast content clearly.
- Once done, press the Stop button (the brown square icon).
You’ll see your recorded waveform appear on the timeline.
✅ Step 5: Playback and Basic Editing
- Press Spacebar or the Play button to listen to your recorded audio.
- If there’s an unwanted section (like a mistake or noise), select it using your mouse and press Delete to remove it.
You can repeat the recording process as many times as needed.
✅ Step 6: Apply Audio Effects
To improve the quality of your voice recording, apply the following effects:
1. Normalize Audio
- Select the full audio waveform (
Ctrl+A) - Go to
Effect > Normalize - Click OK without changing default values.
2. Apply Compressor
- Again, select the audio.
- Go to
Effect > Compressor - Use default settings and press OK.
This step helps balance volume across your recording.


3. Apply Filter Curve EQ
- Go to
Effect > Filter Curve EQ - Choose the default curve and click OK.
This enhances frequency response to make audio sound more natural.
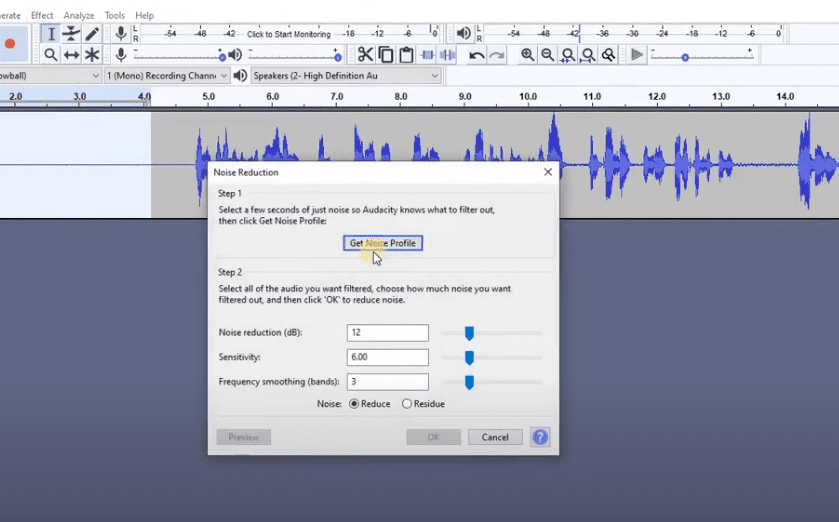
✅ Step 7: Remove Background Noise
If you hear fan noise, traffic, or other background sounds:
- Select a silent portion of your audio (with just background noise).
- Go to
Effect > Noise Reduction > Get Noise Profile. - Now select the entire track (
Ctrl+A). - Again, go to
Effect > Noise Reduction > OK.
Repeat this process once or twice for better results.
✅ Step 8: Remove Extra Gaps and Breaths
Sometimes, you may have unwanted silences or loud breaths:
- Select that portion and click on the Silence Audio button (or press
Ctrl+L). - For repetitive mistakes or pauses, simply select and delete them.
This helps polish the final audio and gives it a professional flow.
✅ Step 9: Final Touches Before Export
- Listen to the final edited version.
- Ensure there are no unwanted parts.
- Use the
Cut,Silence, andDeletetools to finalize everything.
Once done, save the project again for backup.
✅ Step 10: Export the Audio
To save your edited audio in MP3 or WAV format:
- Go to
File > Export > Export as MP3(or WAV). - Choose your location (e.g., Desktop), name your file, and click Save.
- Audacity will process and generate the final audio file.
Now your clean, professional-quality audio is ready to be uploaded or used in your video projects, podcasts, voice-overs, or more.
✅ Bonus Tip: Import External Audio
If you already have an existing audio file in MP3/WAV format:
- Go to
File > Import > Audio, select your file, and begin editing using the same steps above.
Final Thoughts
Audacity is a powerful, lightweight tool for anyone looking to do professional audio editing without spending money on premium software. With just a few steps, you can record, edit, clean, and enhance your audio easily.
🔗 Useful Link
📌 Tags:
audacity tutorial, audio recording, podcast editing, voice over editing, how to use audacity, record audio, noise removal, audio cleanup, export mp3 audacity
📣 Hashtags:
#audacity #audiotutorial #recordaudio #podcastediting #voiceover #freeaudiotools #noiseremoval #audiocleanup #contentcreation
⚠️ Disclaimer:
This article is for educational purposes only. Audacity is an open-source application, and while it is safe and widely used, always download it from the official website to avoid tampered versions.


