Upgrading to a faster or larger storage drive? Whether you’re moving from a traditional HDD to an SSD, or upgrading from a SATA SSD to an NVMe drive, migrating your Windows operating system doesn’t need to be a challenge—or cost you anything. In this guide, we’ll walk you through how to migrate Windows to a new drive for free using MiniTool Partition Wizard Free 10.1.
💡 This article shows you how to clone your operating system and data using a free version of MiniTool Partition Wizard. If you use other tools, feel free to adapt these steps.
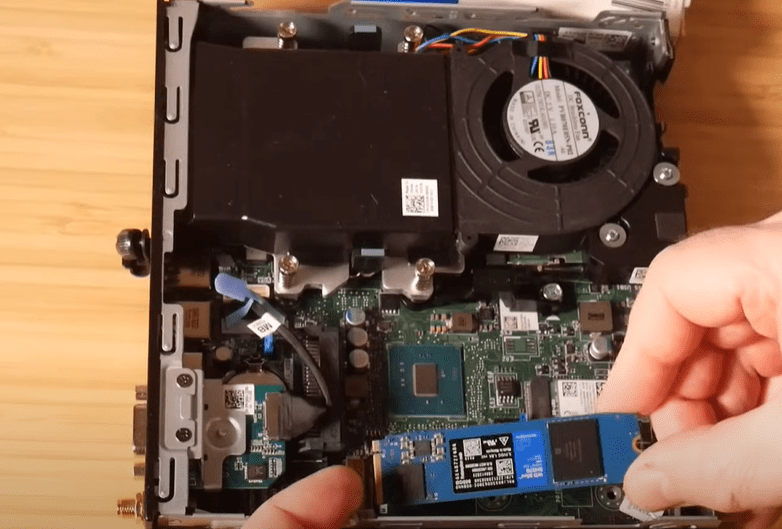
Step 1: Install the New Drive
Before migrating anything, install your new SSD or NVMe drive into your PC. This process depends on your system but typically involves:
- Powering off your computer.
- Opening the case and inserting the new drive into a compatible slot (e.g., M.2 slot for NVMe).
- Restarting the PC.
Once installed, boot back into Windows.
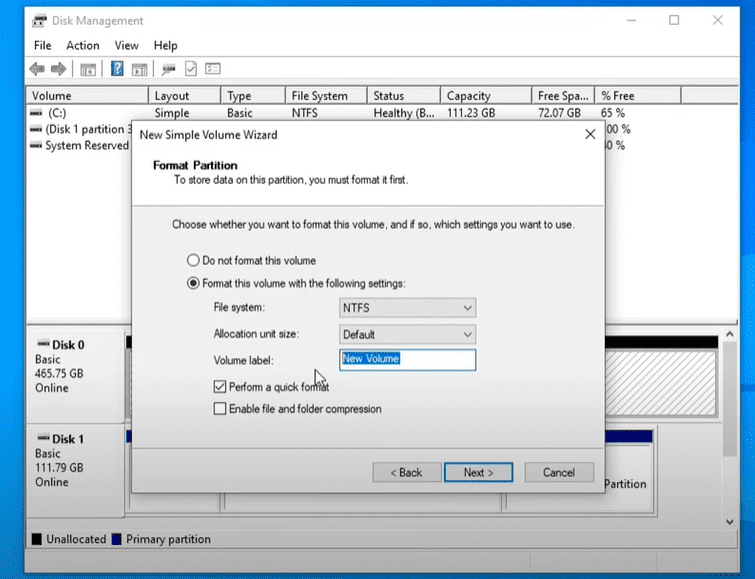
Step 2: Initialize the New Drive
Once in Windows:
- Press
Windows + Xand select Disk Management. - You’ll see your new drive listed as “Unknown” and “Not Initialized.”
- Right-click on the drive and select Initialize Disk.
- Choose GPT (recommended for most modern systems) or MBR, then click OK.
- Right-click on the unallocated space and choose New Simple Volume.
- Follow the prompts to assign a drive letter and label it (e.g., “NVMe”).
This prepares your new drive to receive data.
Step 3: Download and Install MiniTool Partition Wizard Free v10.1
Later versions of MiniTool Partition Wizard have paywalls for system migration. The last free version that supports OS migration is v10.1.
- Search online for:
MiniTool Partition Wizard v10.1 download. - Ensure it’s from a trusted source. The official website is: https://www.partitionwizard.com/
- Install the software and run it.
- Accept all user prompts and license agreements.
✅ Note: This version is free for home use only.
Step 4: Clean the Target Drive (Optional but Recommended)
Inside MiniTool Partition Wizard:
- Identify your new drive (e.g., Disk 1).
- If you created partitions earlier, right-click each and choose Delete.
- Click Apply in the top-left corner and confirm.
Now the new drive is unallocated and ready for cloning.
Step 5: Start OS Migration
- In the MiniTool interface, select Migrate OS to SSD/HD Wizard from the left panel.
- Choose:
- Option A: Replace your system disk with a new one.
- Option B: Move OS to new drive but keep old one installed.
- Select your new drive (e.g., Disk 1) as the destination.
- Choose Fit partitions to entire disk to use all available space.
- Confirm your choices and click Finish.
⚠️ Reminder: This process will erase data on the new drive.


Step 6: Apply the Migration
- After configuration, click Apply in the top-left.
- You may get a warning that the partition is in use.
- Choose the option to Restart Now.
Your system will reboot and MiniTool will finish the migration outside of Windows.
Step 7: Set the New Drive as Boot Drive
After the cloning is complete:
- Enter your BIOS/UEFI settings (usually by pressing
Del,F2, orF10at boot). - Set your new drive (NVMe/SSD) as the first boot device.
- Save and exit BIOS.
Windows should now boot from your new drive.
Step 8: Clean and Repurpose the Old Drive (Optional)
If you want to reuse your old drive as a backup:
- Open MiniTool Partition Wizard.
- Right-click your old system drive (now unused) and select Delete All Partitions.
- Click Apply.
- Right-click the unallocated space and select Create New Partition.
- Label it (e.g., “Backup”), assign a drive letter, and apply changes.
You now have a fresh backup drive ready for use.
Final Notes
- Always backup important data before doing any drive cloning.
- If you want to hide system-reserved partitions that are now visible:
- Use Disk Management or MiniTool to remove their drive letters.
Tags:
windows migration, clone windows to new drive, migrate os to ssd, ssd to nvme, free drive cloning software, MiniTool Partition Wizard, how to use MiniTool, boot from new drive, system upgrade guide
Hashtags:
#Windows #Migration #SSDUpgrade #MiniTool #CloneOS #DriveCloning #FreeSoftware #TechTips #PCUpgrade #NVMe


