Microsoft has introduced strict hardware requirements for Windows 11, leaving many users wondering why their seemingly powerful PCs are not eligible for the upgrade. If you’ve encountered the “This PC can’t run Windows 11” message even after enabling TPM and Secure Boot, this comprehensive guide is for you.
Let’s walk through each requirement and how to fix compatibility issues.
📌 Understanding the Windows 11 Requirements
There are four primary hardware requirements Microsoft mandates for Windows 11:
- TPM 2.0 (Trusted Platform Module)
- Secure Boot Enabled
- UEFI Boot Mode (not Legacy)
- Supported Processor
✅ Step 1: Check TPM Version
TPM is a small chip on your motherboard that ensures hardware-level security.
How to Check TPM Version:
- Press
Win + Rto open the Run dialog. - Type
tpm.mscand press Enter. - In the window that opens, look for Specification Version.
- If it says 1.2, your PC does not meet the TPM 2.0 requirement.
- If it says 2.0, you’re good to go.
If your TPM version is 1.2, you’ll need to upgrade it to 2.0 (more on that later).
✅ Step 2: Enable Secure Boot
Secure Boot helps ensure that your PC boots only trusted software.
How to Enable Secure Boot:
- Restart your PC and enter BIOS (commonly by pressing
Esc,F2,Del, orF10depending on your PC manufacturer). - Navigate to the Security tab.
- Locate Secure Boot and ensure it is set to Enabled.
- If Secure Boot is greyed out or not supported, it’s likely because your BIOS is in Legacy mode, which we’ll fix in the next step.
✅ Step 3: Switch from Legacy BIOS to UEFI
Windows 11 requires UEFI boot mode.
How to Check BIOS Mode:
- Open the System Information (search “System Information” from the Start menu).
- Look for BIOS Mode.
- If it says Legacy, you’ll need to convert your drive from MBR to GPT and switch to UEFI.
How to Convert MBR to GPT (Without Data Loss):
- Open Command Prompt as Administrator.
- Type the following command and press Enter:
mbr2gpt /convert /allowFullOS - If conversion is successful, restart your PC and enter BIOS.
- Change Boot Mode to UEFI.
- Save and exit.
⚠️ Warning: Make sure to back up important data, even though this process should not erase anything.
✅ Step 4: Upgrade TPM Firmware from 1.2 to 2.0
If your TPM chip is version 1.2, you’ll need to update its firmware (if supported).
How to Upgrade TPM:
- Visit your PC manufacturer’s support page (e.g., HP, Dell, Acer).
- Search for TPM firmware updates compatible with your system model.
- Download and install the firmware utility.
- Run the installer, and restart the PC when prompted.
- After restart, recheck TPM version using
tpm.msc.
Make sure the manufacturer version matches your chip’s version before installing any firmware.
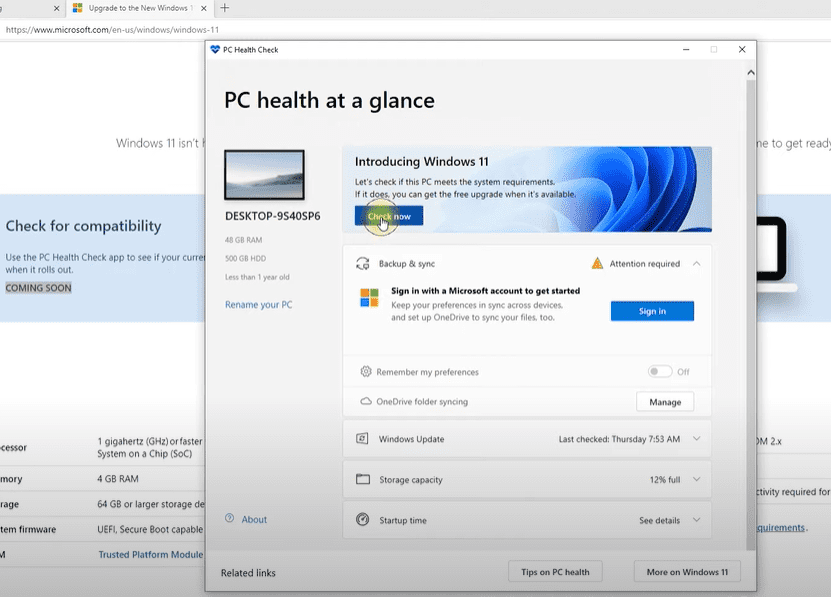
✅ Step 5: Use the PC Health Check Tool
Once all above configurations are set:


- Download the official PC Health Check Tool from Microsoft’s Windows 11 page.
- Run the tool and click Check now.
- It will tell you if your system can run Windows 11.
If everything else is correct and you’re still seeing an error, there’s one more thing to check.
✅ Step 6: Confirm Your Processor is Supported
Even after all tweaks, Windows 11 will not install if your processor is not on Microsoft’s compatibility list.
How to Check Processor Compatibility:
- Go to Microsoft’s official processor requirement list (select your CPU brand: Intel, AMD, or Qualcomm).
- Find your processor model.
- If it’s not listed, your PC won’t support Windows 11 natively.
- If it is listed, you should now be eligible for the upgrade.
💡 Final Thoughts
Upgrading to Windows 11 might seem like a daunting task, especially with all the security and hardware requirements. However, following these steps methodically ensures your system is configured correctly.
Summary:
- ✅ Enable TPM 2.0
- ✅ Enable Secure Boot
- ✅ Switch BIOS from Legacy to UEFI
- ✅ Convert MBR to GPT
- ✅ Upgrade TPM firmware (if needed)
- ✅ Use PC Health Check tool
- ✅ Ensure CPU compatibility
If your PC still doesn’t meet the requirements, you can continue to receive Windows 10 updates, or explore clean install workarounds (with caution).
📂 Tags and Hashtags
Tags: windows 11 compatibility, tpm 2.0, secure boot, uefi boot, mbr to gpt, windows 11 installation, system requirements, upgrade guide, tpm firmware update, unsupported processor, bios settings, pc health check
Hashtags: #Windows11 #TPM2 #UEFIBoot #SecureBoot #MBRtoGPT #WindowsUpgrade #SystemRequirements #BIOS #TechGuide #PCHealthCheck
If you need the PC Health Check tool or specific firmware updates, head over to tipstofix.com and download the required files from the article’s links.


