High CPU temperatures can significantly affect your PC’s performance, especially if you’re using a laptop or a system with limited cooling. If you’ve noticed your CPU running hot—often spiking into the 90s Celsius range—there’s a simple and effective method within Windows to bring those temperatures down without the need for external cooling solutions.
In this guide, we’ll explore how adjusting the Maximum Processor State in your Windows Power Plan settings can help reduce CPU temperatures with minimal performance loss. This method works well on both Windows 10 and Windows 11.
Why Does Your CPU Run So Hot?
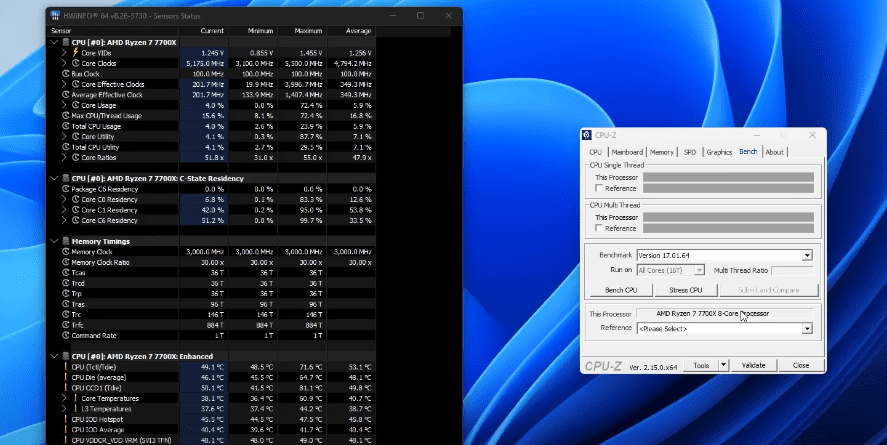
Modern processors, especially from AMD and Intel, are designed to push performance boundaries. However, this often leads to high thermal output. For example, during a stress test using software like CPU-Z and HWInfo, temperatures can reach as high as 91.5°C. While this is technically safe under load, sustained high temperatures can shorten your CPU’s lifespan and cause thermal throttling.
The Quick Fix: Reduce Maximum Processor State
You can reduce your CPU temperature by limiting the processor’s maximum performance through your system’s power plan. This method caps the CPU’s power output, preventing it from operating at full throttle, which lowers temperatures dramatically.
Step-by-Step Guide: Lower CPU Temps in Windows
🔧 Step 1: Access Power Options
- Press Start and type
power plan. - Click on Edit Power Plan.
⚙️ Step 2: Open Advanced Settings
- In the Edit Plan Settings window, click Change advanced power settings.
- This opens the Power Options dialog box.
🌡 Step 3: Adjust Processor Power Management
- Scroll down and expand the section labeled Processor power management.
- Expand Maximum processor state.
- You will see two options:
- On battery (for laptops)
- Plugged in
- Change both values from 100% to something lower, such as 99%, 97%, or even 90%, depending on how much temperature drop you need.
For example, setting it to 90% dropped CPU temperatures from over 91°C down to 49.6°C during stress testing—a major difference.
💾 Step 4: Apply and Save
- Click Apply and then OK to save your changes.
- Restart your computer to ensure the settings take effect.
Performance Impact: Is It Noticeable?
After benchmarking at various CPU power states, the differences in performance were surprisingly small:
| Power Setting | Temperature | Benchmark Score |
|---|---|---|
| 100% | 91.5°C | 36,857 |
| 99% | 54.2°C | 35,732 |
| 97% | 54.1°C | 34,813 |
| 90% | 49.6°C | Lower but stable |
The temperature reductions are significant, and the benchmark scores only saw minor drops (about 1,000–2,000 points). In real-world usage, the difference in FPS (frames per second) in games or rendering tasks was only around 5–10 frames.
So unless you’re an extreme performance enthusiast chasing every last frame, this tweak offers a great balance between cooler temperatures and solid performance.
When Should You Use This Method?
- 💻 Laptops that overheat easily
- 🖥️ Desktops with poor airflow or older cooling systems
- 🔇 PCs in quiet environments where fan noise needs to be minimized
- 🧊 Systems that frequently thermal throttle under load
Benchmark Tools Used
Both of these tools are free and widely used for hardware diagnostics.
Final Thoughts
Reducing the Maximum Processor State to 99% or slightly lower is a safe and effective way to lower your CPU temperatures without much impact on performance. It’s a quick software tweak that doesn’t require any new hardware or complex BIOS changes.
Whether you’re gaming, editing, or just browsing, your PC will run cooler and more reliably, especially over long sessions.


Tags:
CPU temperature fix, lower CPU temp Windows, processor power management, maximum processor state, reduce CPU heat, power plan settings, CPU performance tweak, Windows 10 temperature fix, Windows 11 power options, thermal management Windows
Hashtags:
#CPUTemperature #WindowsTips #PowerPlan #HWInfo #CPUZ #ReduceHeat #TechFixes #PCPerformance #LaptopCooling #Windows10 #Windows11
Disclaimer:
Disclaimer: Changing power plan settings is safe for most users but may slightly reduce performance in demanding applications. Always monitor your system temperatures and benchmark performance to ensure the settings meet your needs. This article is for informational purposes only. Use caution when modifying system settings.


