Installing WordPress locally on your computer using XAMPP is an excellent way to test themes, plugins, and site customizations before deploying them to a live server. This guide will walk you through the step-by-step process of setting up a local WordPress installation using XAMPP.
1. Download and Install XAMPP
XAMPP is a free and open-source cross-platform web server solution stack package developed by Apache Friends, consisting mainly of the Apache HTTP Server, MariaDB database, and interpreters for scripts written in the PHP and Perl programming languages.
Steps:
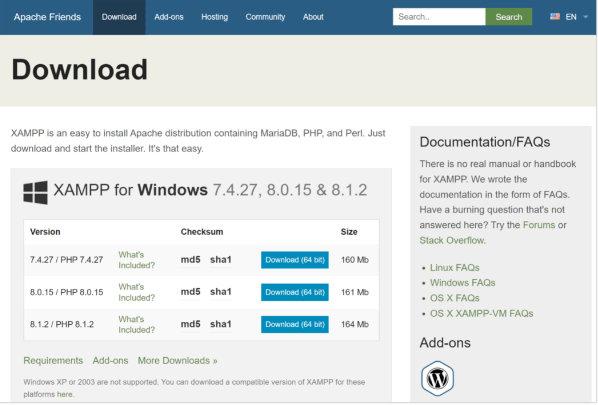
- Go to the XAMPP website and download the version suitable for your operating system.
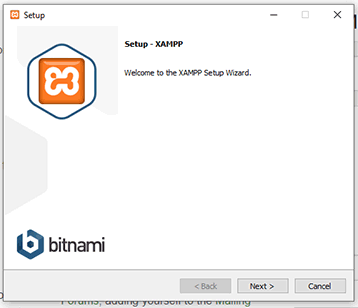
- Run the installer and follow the setup wizard to install XAMPP on your computer.
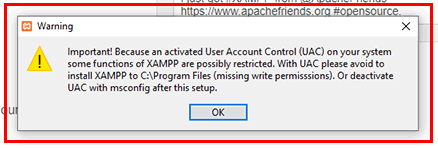
- You might get a UAC warning before installation. Click OK and continue.
- Launch the XAMPP Control Panel after installation.
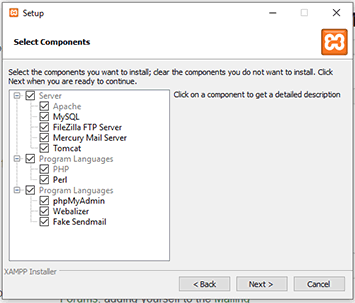
Example: Select the components you want to install. If you’re planning to install a WordPress site with XAMPP, you only need Apache, MySQL, PHP, and phpMyAdmin. I’ll check all the components as I’d like to experiment with them later.
Installation Note 1: Deactivate UAC under Windows Settings
You might be presented with a User Access Control (UAC) warning by Windows. Nothing to worry much. Just make sure that you don’t install XAMPP under your Program Files directory, as UAC can interfere with XAMPP’s writing permissions to this directory. The default installation directory is C:\XAMPP. So, if you don’t change it, you should be good.
If you want to learn how to deactivate UAC (not recommended unless absolutely necessary), Microsoft Windows support is a good place to start.
Installation Note 2: Deactivate Antivirus and/or Firewall Temporarily
Some antivirus or firewall programs can cause issues with your XAMPP installation. If that’s the case, it’s suggested that you deactivate them temporarily until XAMPP is installed successfully.
Read the XAMPP Windows FAQs page for more.
2. Start Apache and MySQL Modules
For WordPress to run locally, you need to start the Apache web server and MySQL database server using the XAMPP Control Panel.
Steps:
- Open the XAMPP Control Panel.
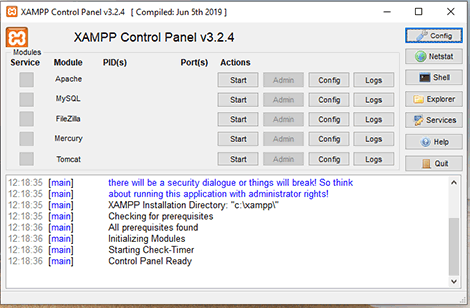
- Click the Start button next to Apache to start the web server.
- Click the Start button next to MySQL to start the database server.
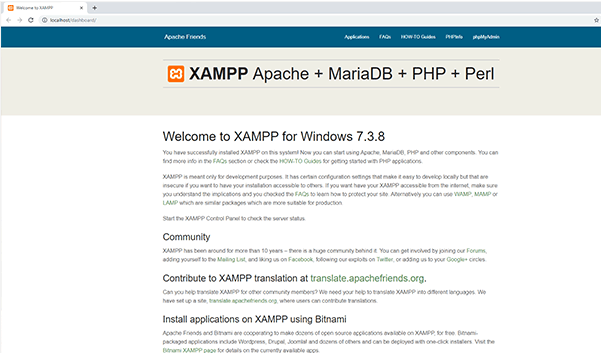
- You can access your Apache server’s dashboard by clicking the Admin button beside it. Alternatively, you can also reach it via http://localhost/dashboard/ URL in your browser.
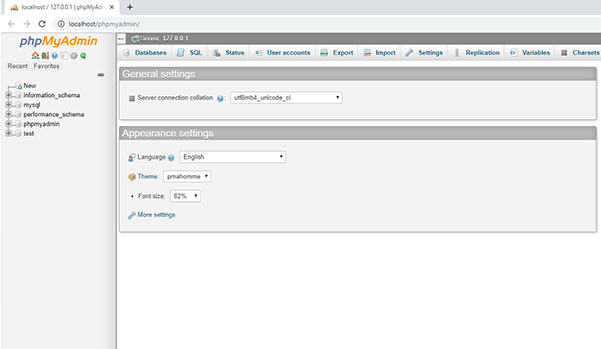
- You can access your phpMyAdmin dashboard by clicking the Admin button beside MySQL module. Or you can simply go to http://localhost/phpmyadmin/ in your browser. Here, you can manage the MariaDB (or MySQL) databases of your web projects.
Apart from the options discussed above, the XAMPP Control Panel also features other buttons on its right side:


-
- Config: to configure overall XAMPP settings
- Netstat: display all active TCP connections (and ports) on your computer
- Shell: starts XAMPP in a custom command line (CMD)
- Explorer: opens the XAMPP root folder in Windows Explorer
- Services: shows all Windows services under Microsoft Management Console
- Help: links to Apache Friends Support Forum
- Quit: quit XAMPP Control Panel (the server will continue to run in the background)
Example: Ensure both Apache and MySQL have green status indicators, indicating they are running successfully.
Testing Your XAMPP Installation
The best way to check whether your local server has been installed and configured correctly is to create a PHP test page, place it in XAMPP’s localhost folder, and then try accessing it via your browser.
Let’s do that now. Create a new folder called test in your C:\xampp\htdocs\ directory. This directory can also be accessed easily by clicking the Explorer button in XAMPP Control Panel and then going to htdocs folder.
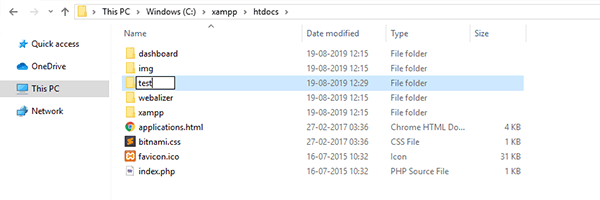
Create a file called test.php with the code below and place it in C:\xampp\htdocs\test folder.

 <html>
<head>
<title>PHP-Test</title>
</head>
<body>
<?php echo '<h1>Hello World!</h1><h3>Welcome to WPMU DEV</h3>'; ?>
</body>
</html>
<html>
<head>
<title>PHP-Test</title>
</head>
<body>
<?php echo '<h1>Hello World!</h1><h3>Welcome to WPMU DEV</h3>'; ?>
</body>
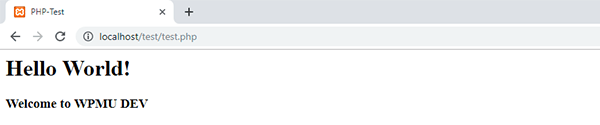
</html>Try visiting http://localhost/test/test.php in your browser. If it displays the words “Hello World! Welcome to WPMU DEV”, then XAMPP is successfully installed and configured on your system.
3. Download WordPress
Download the latest version of WordPress from the official WordPress website.
Steps:
- Go to the WordPress.org website and click the Get WordPress button.
- Download the WordPress ZIP file.
Example: Save the downloaded WordPress ZIP file to your computer’s Downloads folder.
4. Extract WordPress Files
Extract the contents of the WordPress ZIP file to the appropriate directory in XAMPP.
Steps:
- Go to your Downloads folder and extract the WordPress ZIP file.
- Move the extracted
wordpressfolder to thehtdocsdirectory in your XAMPP installation directory (e.g.,C:\xampp\htdocson Windows).
Example: Rename the wordpress folder to something more specific, like mywordpresssite, to easily identify your local site.
5. Create a Database for WordPress
WordPress requires a database to store its data. Use phpMyAdmin, which comes with XAMPP, to create a new database.
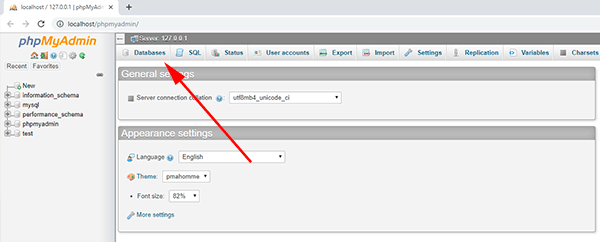
Steps:
- Open your web browser and go to
http://localhost/phpmyadmin. - Click the Databases tab at the top.
- In the Create database field, enter a name for your database (e.g.,
wordpress_db) and click the Create button.
Example: Create a database named wordpress_db to use for your local WordPress installation.
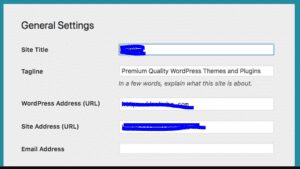
6. Configure WordPress
Configure WordPress to connect to the database you created.
Steps:
- Open your web browser and go to
http://localhost/mywordpresssite(replacemywordpresssitewith the name of your WordPress folder). - Click the Let’s go! button.
- Enter the following database details:
- Database Name:
wordpress_db - Username:
root - Password: (leave this field blank)
- Database Host:
localhost - Table Prefix:
wp_
- Database Name:
Example: Use the default MySQL root user (root) with no password to connect to your local database.
Now, go into your site’s WP folder, find the wp-config-sample.php file, and rename it wp-config.php.

Open the file and scroll down until you see the following lines:

These lines of code define the login details for your database. Update them as per the instructions below:
- Replace “database_name_here” with the name of your database.
- Replace “username_here” with “root” and edit “password_here” field to be empty.
- Save the file and close it
Open your web browser and go to http://localhost/mywordpresssite (replace mywordpresssite with the name of your WordPress folder).

7. Complete the WordPress Installation
Finish the WordPress installation by setting up your site details and admin account.
Steps:
- Enter your site title, username, password, and email address.
- Click the Install WordPress button.
- Once the installation is complete, click the Log In button to access your WordPress dashboard.
Example: Create an admin account with a username like admin and a strong password for security.
8. Accessing Your Local WordPress Site
You can now access your local WordPress site and start customizing it.
Steps:
- Open your web browser and go to
http://localhost/mywordpresssite/wp-adminto log in to your WordPress dashboard. - Use the username and password you created during the installation to log in.
Example: Navigate to http://localhost/mywordpresssite to view your local WordPress site and http://localhost/mywordpresssite/wp-admin to access the admin area.
9. Troubleshooting Common Issues
Here are some common issues you might encounter and their solutions:
- Apache or MySQL not starting: Check if other applications (e.g., Skype, another web server) are using the same ports (80 or 443 for Apache, 3306 for MySQL). You can change the ports in the XAMPP Control Panel settings.
- Error establishing a database connection: Ensure your database details (name, username, password) are correct in the
wp-config.phpfile located in your WordPress directory. - Blank or broken pages: Ensure all WordPress files are correctly extracted and placed in the
htdocsdirectory.
10. Summary
Setting up a local WordPress installation using XAMPP is a straightforward process that allows you to develop and test your site in a safe environment. By following these steps, you can create a local WordPress site and experiment with themes, plugins, and customizations before going live.
Enjoy building your WordPress site locally with XAMPP!
#WordPress #XAMPP #LocalInstallation #WebDevelopment #WordPressSetup