On October 5th, Microsoft officially released Windows 11, a much-anticipated operating system update boasting faster performance, better visuals, and plenty of new features. Unfortunately, many older machines don’t meet the requirements set by the Windows 11 compatibility checker. However, that doesn’t mean you can’t install it on unsupported devices. In this blog post, I will walk you through how I successfully installed Windows 11 on my 7-year-old Surface Pro using a few clever tricks and workarounds.
Requirements Before Starting the Installation:
- USB drive (8 to 16 GB) for creating a bootable installation.
- Access to the Windows 11 media creation tool.
- An active Windows account to register your installation key.
Even if your machine isn’t on the list of supported devices, it’s still possible to upgrade as long as you’re willing to tweak some files. Follow the steps below to bypass Windows 11’s compatibility checks and get it running smoothly on your old machine.
Step 1: Download the Media Creation Tool
Head over to the Windows 11 download page and grab the media creation tool. This tool is essential as it creates a custom version of the operating system based on your hardware. Make sure you’re logged into your Windows account before moving ahead to ensure that your Windows key is automatically registered during the installation.
Once downloaded, run the tool and plug in your USB drive to begin preparing the files for installation. Depending on your machine’s speed, this process may take some time. Grab a coffee or lunch while the tool completes the preparation.
Step 2: Initiate the Installation
With the USB drive ready, open File Explorer, and locate your newly created installation files. Find the setup.exe file and start the installation. Initially, Windows will check for updates and system compatibility, but don’t worry if your system doesn’t pass the check—we’ll bypass that next.
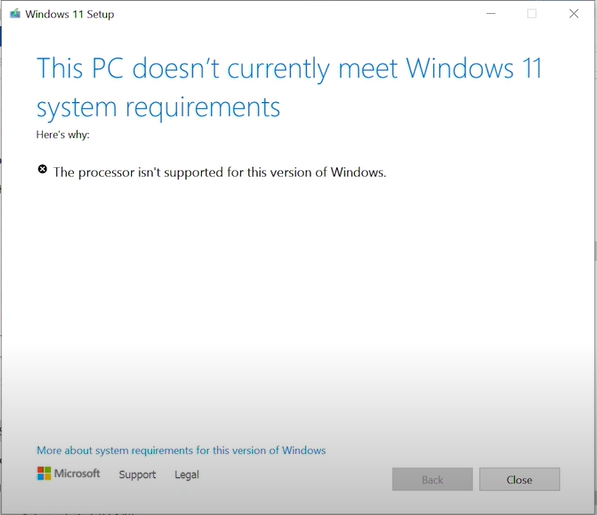
Step 3: Bypass the Compatibility Check
At this point, the setup might give you an error about your processor or TPM chip not being supported, but don’t be discouraged. Here’s how to bypass these checks:
- Open the USB drive in File Explorer and navigate to the Sources folder.
- Find the file named appraiserres.dll and make a copy of it for backup (rename it to
appraiserres.bak). - Open the original file in Notepad and search for any lines related to TPM.
- Delete or comment out these lines. This removes the TPM check, which is one of the most common reasons for installation failure on older devices.
If this process sounds a bit tedious, there’s a faster way. Tips to Fix, a well-known tech YouTube channel, provides a pre-modified version of this file that you can download from their blog. Be sure to scan any downloaded files with a virus scanner to ensure they’re safe.
Step 4: Run the Installation Again
Now that you’ve modified the compatibility check, go back to setup.exe and run it again. This time, the installer should breeze through without any errors. Once you reach the license terms, you’ll know the process is working as expected.
Step 5: Choose Your Installation Option
During the installation, you’ll be presented with three options:
- Keep personal files and apps: This is the fastest option and will preserve most of your data and apps. However, some programs like Adobe Creative Suite or Microsoft Office may need to be reinstalled.
- Keep personal files only: This option will remove all your apps but keep personal files like documents and photos.
- Keep nothing (Clean install): The “nuclear” option, this wipes everything and gives you a fresh install of Windows 11, which can help with performance issues on older machines.
For this guide, I chose the clean install option as it provides the best results for older hardware.
Step 6: Finalizing the Installation
After choosing your preferred installation method, hit Install and let the process run. Depending on your system specs, it might take some time, so this is a good opportunity to grab another cup of coffee or even dinner. Once complete, you’ll be greeted by the Windows 11 setup screen.


Step 7: Post-Installation Notes
After the installation finished, I was excited to see Windows 11 running smoothly on my Lenovo laptop (which was previously rejected by Microsoft’s compatibility tool). The new features, including the centered taskbar and redesigned interface, were all functioning perfectly.
One thing I noticed is that storage speed can significantly impact installation time. On machines with slower storage (like older hard drives), the installation might take much longer. However, once installed, the operating system performed admirably, even on older hardware.
Conclusion
If you’ve been blocked from upgrading to Windows 11 due to hardware limitations, don’t let that stop you. By tweaking a few files, you can bypass the compatibility checks and enjoy all the new features Windows 11 has to offer—even on older devices. The process may seem technical, but with careful attention to detail, it’s a relatively simple task.
If you have any questions or encounter any issues, feel free to leave a comment below. I’ll be happy to help. And if you found this guide useful, don’t forget to like and share!
#Windows11 #Microsoft #Upgrade #TechGuide #UnsupportedDevices #SurfacePro #Lenovo #InstallationGuide #TechTutorial


