Windows 11 has been around for a while, and with continuous updates rolling out, it’s time to revisit the installation process in 2025. Whether you’re installing Windows 11 on a brand-new PC or performing a fresh installation to enhance performance, this guide will walk you through every step.
This tutorial covers clean installation, meaning all existing data on your drive will be erased. Make sure to back up your important files before proceeding.
Prerequisites for Installing Windows 11
Before beginning the installation, ensure you have the following:
- Windows 11 Installation Media
- A USB flash drive (minimum 8GB, preferably 16GB)
- A stable internet connection (at least 6GB of data required)
- A PC that meets Windows 11 system requirements
- Backup Your Data
- Since a clean installation erases everything, save your important files on an external hard drive or cloud storage.
Step 1: Create a Windows 11 Installation USB
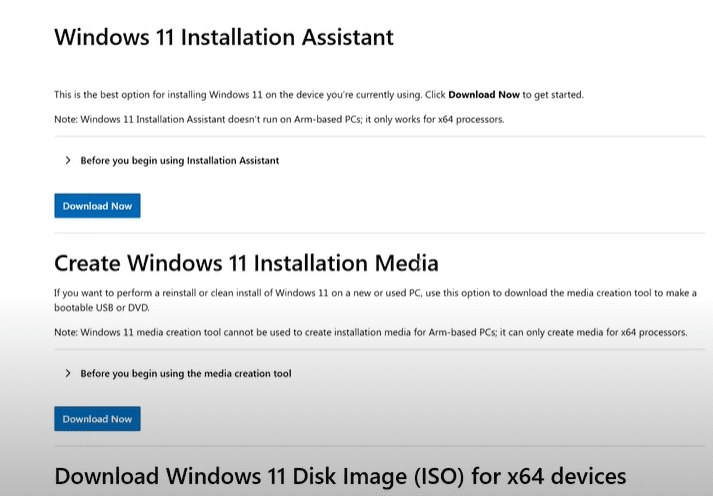
- Download the Media Creation Tool
- Open your browser and search for Windows 11 Installation Media on Microsoft’s official website.
- Download the Media Creation Tool (around 10MB).
- Prepare Your USB Drive
- Insert a USB flash drive (minimum 8GB).
- Note that all data on this USB will be erased.
- Run the Media Creation Tool
- Open the downloaded file and accept the license agreement.
- Select “Create installation media for another PC” and click Next.
- Choose Language, Edition, and Architecture
- Select Windows 11 and choose the appropriate language and version.
- If unsure, go with Windows 11 Pro for all features.
- Create a Bootable USB Drive
- Select “USB flash drive” as the media type.
- Choose your USB from the list and click Next.
- The tool will now download Windows 11 (approximately 6GB) and create a bootable USB drive.
- Once done, you will see “Your USB flash drive is ready”.
Step 2: Boot from USB and Install Windows 11
- Insert the USB into the PC where you want to install Windows 11.
- Restart the PC and enter the BIOS/Boot Menu:
- Press F12, Delete, or F2 (depending on your motherboard) during startup.
- In the Boot menu, set USB drive as the first boot device.
- Save changes and exit.
- Windows 11 Installation Process Begins
- Your PC will boot from the USB and show the Windows 11 setup screen.
- Select Language, Time, and Keyboard layout and click Next.
- Click “Install Now”.
Step 3: Windows 11 Setup & Customization
- Enter Product Key (Optional)
- If you have a Windows 11 license key, enter it here.
- If not, select “I don’t have a product key”, and Windows will activate later.
- Select Installation Type
- Choose “Custom: Install Windows only (Advanced)” to perform a clean installation.
- Select the Drive for Installation
- If you have multiple drives, choose the correct one.
- Click “Delete” and “Next” to proceed.
- Wait for Windows 11 to Install
- The installation process takes 5 to 15 minutes, depending on your SSD/HDD speed.
- Your PC will restart automatically.
Step 4: First Boot & Initial Setup
- Select Your Country and Keyboard Layout
- Choose your region (e.g., India, United States) and keyboard layout.
- Connect to the Internet
- Ensure your WiFi or LAN connection is active.
- Sign in with a Microsoft Account
- Enter your Microsoft account credentials or create a new one.
- Create a PC Name & PIN
- Choose a PC name and create a PIN for secure login.
- Customize Privacy Settings
- Adjust settings for location, diagnostic data, and ad personalization.
- Wait for Updates & Final Setup
- Windows 11 will check for updates and finalize the setup.
Step 5: Windows 11 is Installed – What Next?
- Activate Windows
- If Windows is not activated, go to Settings > Activation and enter your product key.
- Install Essential Drivers
- Windows usually installs drivers automatically, but check for missing ones in Device Manager.
- Update Windows
- Go to Settings > Windows Update and install any pending updates.
- Install Your Essential Software
- Web browser, office tools, and security software.
- Personalize Your System
- Change your wallpaper, taskbar settings, and themes.
Final Thoughts
Congratulations! You have successfully installed Windows 11 on your PC. Whether you’re setting up a new device or refreshing an old one, this clean installation method ensures a smooth and efficient system performance.
Enjoy exploring Windows 11 and customize it to your preference!
Tags & Hashtags
Tags: Windows 11 installation, clean install Windows 11, Windows 11 bootable USB, install Windows 11 from USB, Windows 11 setup guide, Windows 11 2025, Windows 11 update, how to install Windows 11, install Windows 11 without product key, Windows 11 activation
Hashtags: #Windows11 #WindowsInstallation #CleanInstall #MicrosoftWindows #Windows11Setup #TechGuide #BootableUSB #PCSetup #SoftwareInstallation