Microsoft has officially released Windows 11 24H2, the 2024 update packed with performance enhancements and fresh features. While many users with compatible systems can upgrade seamlessly, those on unsupported PCs—typically due to older processors or missing TPM 2.0 support—may face restrictions. If you’re one of those users still on Windows 10 or running an older Windows 11 version like 23H2, this article will walk you through the process to upgrade to Windows 11 24H2, even if your device is considered unsupported.
⚙️ Step 1: Check If Your PC Is Supported by Microsoft
Before you begin, it’s important to confirm if your PC is officially supported:
- Go to Settings > System > About to view your system version.
- If you’re on Windows 10 22H2 or Windows 11 23H2, you may not receive the update due to compatibility restrictions.
- Download and install the PC Health Check Tool from Microsoft’s official site to check support status.
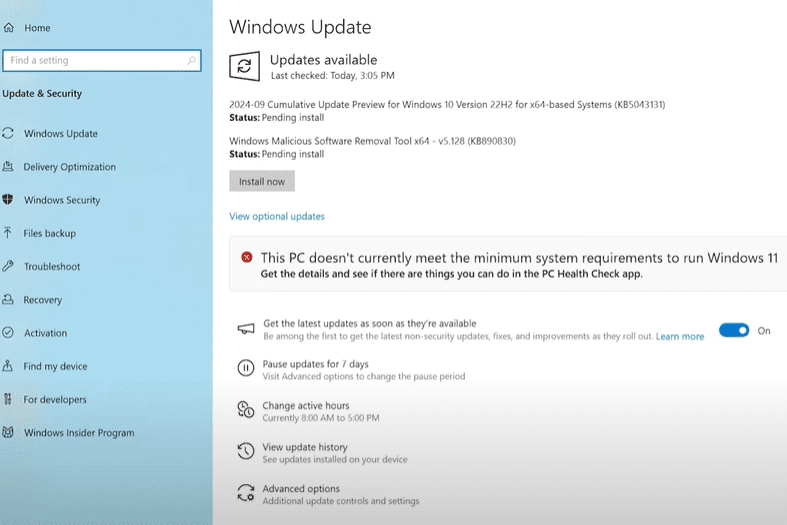
- If your system is unsupported, you’ll likely see a message about your processor or TPM.
🖱️ Step 2: Download the Official Windows 11 24H2 ISO
To proceed, we’ll use the official ISO file to bypass restrictions:
- Visit the official Microsoft download page.
- Scroll to the “Download Windows 11 Disk Image (ISO)” section.
- Select Windows 11 (multi-edition ISO) from the dropdown.
- Choose your language. For best compatibility, select English (United States)—matching your current system’s default language.
- Click Download, then save the ISO file to your desktop.
💡 You can find your system’s default language by opening Command Prompt and typing:
dism /online /get-intl
🧰 Step 3: Extract the ISO File
Mounting the ISO directly can sometimes lead to installation issues. Instead, follow this safer method:
- Download and install a free tool like 7-Zip or WinRAR.
- Right-click on the ISO file and choose Extract to “Windows11_24H2”.
- Once extracted, you’ll find a folder containing setup files.
🔧 Step 4: Launch Setup with Bypass Command
This method uses a Microsoft-allowed workaround to bypass system checks:
- Open Command Prompt as Administrator:
- Press Start, type CMD, right-click on it, and choose Run as administrator.
- Navigate to the extracted folder:
cd "C:\Users\YourUsername\Desktop\Windows11_24H2\sources"ReplaceYourUsernamewith your actual username. - Type the following command:
setup.exe /product server
This command triggers the installer in a special mode that bypasses the standard checks for CPU and TPM.
🪛 Step 5: Install Windows 11 24H2
- The Windows Setup will launch.
- Choose Not right now when asked about downloading updates (you can do that later).
- Accept the license agreement.
- Select Keep personal files and apps (if the option is grayed out, ensure your ISO language matches your current OS language).
- Click Install.
📝 This method does not delete your files or apps, assuming you selected the correct settings.
🖥️ Step 6: Post-Installation Tasks
After installation:
- Go to Settings > Windows Update and check for updates.
- Install any cumulative or driver updates available for your system.
- Confirm the version by right-clicking This PC > Properties — you should now see Windows 11 24H2.
🔄 Optional: Rollback or Optimize Performance
If you’re not satisfied with the performance or want to revert:
- You can roll back to Windows 10 from the Settings > Recovery menu within 10 days of upgrade.
- If you want to boost performance on older hardware, explore our article on how to optimize Windows 11 for best performance.
You might be intrested in these too!
- Windows 11 24H2 Introduces ‘Quick Machine Recovery’: A New Automatic Repair Feature to Prevent Boot Failures
- Ultimate Manual Optimization Guide for Windows 11 24H2 (No Tools Required)
- Fix Windows 11 24H2 Update Failure Caused by Voicemeeter Driver Error
- How to Install Windows 11 24H2 on Unsupported Hardware (2024 Guide)
- Windows 11 24H2 Update KB5044384: Bug Fixes & How to Install
✅ Conclusion
Upgrading to Windows 11 24H2 on unsupported PCs is now easier than ever, thanks to Microsoft’s more lenient setup engine. By following the steps above, you can enjoy the latest features without losing your personal data or installed apps.


Make sure to check your system language before downloading the ISO to avoid compatibility issues during setup. With a few careful steps, even an older computer can run the newest version of Windows 11 smoothly.
Tags: windows 11 24h2 installation, install windows 11 unsupported pc, windows 11 iso download, windows 11 upgrade tutorial, windows 11 setup bypass, windows 11 24h2 unsupported hardware, how to install windows 11 iso, setup prep method windows
Hashtags: #Windows11 #Windows1124H2 #UnsupportedPC #UpgradeWindows #WindowsTips #TechGuide #MicrosoftWindows #ISOInstall #PCUpgrade #TechTutorials
Would you like a downloadable PDF version of this blog post or an infographic summary?


Hi there! 👋 I just followed your walkthrough on upgrading from Windows 10 to Windows 11 and found it super clear and helpful. I especially liked how you addressed the end-of-support timing and gave step-by-step tips. – it’s a solid guide. Thanks for sharing!