Are you trying to upgrade to Windows 11 24H2 but your computer doesn’t meet Microsoft’s official requirements? Don’t worry—you’re not alone. Many users with older processors or unsupported devices are searching for effective and safe methods to install Windows 11 without compromising their systems.
In this article, we’ll walk you through the easiest method to install Windows 11 24H2 on unsupported computers in 2025, without using complex command lines or registry edits. This method skips the TPM 2.0, Secure Boot, and CPU requirement checks, and it’s surprisingly simple to execute.
Step-by-Step Guide to Install Windows 11 on Unsupported PCs
Step 1: Check Your System Compatibility
Before anything else, verify if your computer meets the basic system requirements:
- Processor: 1GHz or faster with at least two cores (64-bit only)
- RAM: Minimum 4GB
- Storage: At least 64GB
- TPM 2.0 and Secure Boot: Optional with this method
How to Check:
- Right-click on “This PC” > Click Properties to view your processor model and system type.
- Make sure you’re running a 64-bit version of Windows 10. Windows 11 does not support 32-bit operating systems.
To further evaluate your system:
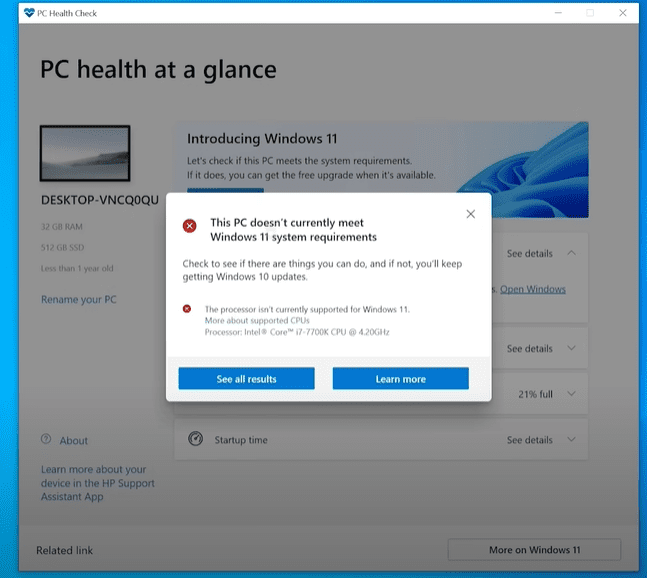
- Download and run the official PC Health Check Tool from Microsoft.
- Check TPM status and Secure Boot from your BIOS settings.
- For deeper inspection, download CPU-Z to verify if your CPU supports SSE4.2 and POPCNT (critical for Windows 11 24H2).
Step 2: Choose the Right Version of Windows 11
For older CPUs like Core 2 Duo or AMD Athlon 64, do not install Windows 11 24H2. Instead, go with Windows 11 23H2 to avoid crashes or performance issues.
However, if your processor is from Intel 5th, 6th, or 7th generation, you’re safe to upgrade to 24H2 using this method.
Step 3: Download Windows 11 ISO
- Visit Microsoft’s official Windows 11 download page.
- Select Windows 11 Multi-edition ISO.
- Make sure your PC’s date and time are synced correctly, or the download may fail.
- Choose the same language version as your current Windows 10. To find your language:
- Open Command Prompt as Administrator
- Run:
dism /online /get-intl - Match the ISO language accordingly (e.g., English – United States).
Step 4: Extract the ISO File
Do not mount the ISO directly—this can cause issues during the installation.
- Use tools like WinRAR or 7-Zip to extract the ISO to a folder on your desktop.
- Right-click on the ISO > Choose “Extract Here”.
Step 5: Create a Bypass Setup File
Now, create a simple script to bypass the checks.
- In the extracted folder, right-click > New > Text Document.
- Name it
setup. - Open it and type the following:
setup /product server /server - Save the file.
- Now, rename
setup.txttosetup.bat. If file extensions are hidden:- Go to View > Folder Options > View Tab
- Uncheck “Hide extensions for known file types”
- Apply and rename accordingly.
Step 6: Run the Setup
- Double-click the
setup.batfile you just created. - You’ll be prompted to allow the installer to make changes—click Yes.
- The installation will begin just like a normal upgrade, but it will bypass TPM, Secure Boot, and CPU restrictions.
💡 Note: This method uses the Windows Server installer trick to skip the checks while still installing Windows 11 normally.
Step 7: Choose Upgrade Options
- Select “Keep personal files and apps” (make sure the language matches to avoid greyed-out options).
- Proceed with the upgrade.
Before upgrading, always backup your important files, preferably to a separate drive (D:). If needed, learn how to create a new partition for backups.
Step 8: Installation and Restart
- The installation may take 20–60 minutes depending on your system specs.
- Your PC will restart multiple times.
- SSDs and M.2 drives will finish this process much faster than traditional hard drives.
📌 If your PC gets stuck during the update process (e.g., 40% or 50%), clear temporary files:
- Type
tempin the search bar > Delete all files.- Go to Settings > Storage > Temporary Files > Clean:
- Windows update cleanup
- Previous installation files
- Temporary Windows installation files


Also, delete the Windows.old folder if needed.
Post-Installation: What to Expect
- After the upgrade, your Windows 11 will be activated using your Windows 10 digital license.
- If you were on Windows 10 Pro, you’ll get Windows 11 Pro. Same for Home edition.
- Check for updates to install the latest security and cumulative patches.
Final Notes
- Windows 10 support ends on October 14, 2025. It’s wise to prepare for the transition now.
- If your PC can’t handle Windows 11 24H2, stick with 23H2 for better stability.
- Upgrading is free if your current Windows is activated.
This method is by far one of the safest and easiest ways to upgrade unsupported PCs to Windows 11 24H2 in 2025. No command-line hassles, no registry hacks—just a clever workaround using official setup files.
For any additional support, revisit this article. Share this guide with anyone trying to upgrade their older systems smoothly.
Tags:
Windows 11, Windows 11 unsupported PC, Windows 11 24H2, install Windows 11, upgrade to Windows 11, bypass TPM, unsupported processor, Windows 11 ISO, setup script, Windows installation tips, upgrade Windows 10, install Windows without TPM, safe Windows upgrade
Hashtags:
#Windows11 #UpgradeGuide #UnsupportedPC #Windows11Tips #Windows11Installation #BypassTPM #TechHelp #WindowsUpgrade2025 #InstallGuide #PCUpgrade


