If you’re looking to switch from Windows or simply want to explore Linux, Ubuntu is one of the best choices for beginners. Ubuntu 25.04 (the latest version as of this guide) offers improved performance, better hardware support, and a user-friendly interface.
In this article, we’ll walk you through:
✅ Preparing for installation (backups, creating bootable media)
✅ Testing Ubuntu in Live Mode (ensuring hardware compatibility)
✅ Step-by-step installation process
✅ Post-installation setup (updates, drivers, and software installation)
By the end, you’ll have a fully functional Ubuntu system ready for daily use.
What You’ll Need Before Installing Ubuntu
Before diving in, ensure you have:
1. A Backup of Your Data
Installing Ubuntu will erase your hard drive, so back up all important files to an external drive or cloud storage.
2. A USB Flash Drive (8GB or larger)
You’ll use this to create bootable installation media.
3. A Stable Internet Connection (Recommended)
Needed for downloading updates and additional drivers during installation.
🔗 Download Ubuntu 25.04: https://ubuntu.com/download
Step 1: Create a Bootable Ubuntu USB
To install Ubuntu, you need a bootable USB drive. Here’s how:
Option 1: Using Balena Etcher (Recommended)
- Download Etcher (Windows/macOS/Linux): https://www.balena.io/etcher/
- Insert your USB drive (ensure no important data is on it).
- Open Etcher, select the Ubuntu ISO file.
- Choose your USB drive and click Flash!
Option 2: Using Rufus (Windows Alternative)
- Download Rufus: https://rufus.ie/
- Select the Ubuntu ISO and your USB drive.
- Click Start and wait for completion.
Note: The flashing process will erase all data on the USB drive.
Step 2: Boot into Ubuntu Live Mode
Before installing, test Ubuntu in Live Mode to ensure hardware compatibility.


- Insert the USB drive and restart your PC.
- Access the Boot Menu (usually by pressing F12, F2, ESC, or DEL during startup).
- Select the USB drive from the boot options.
- Choose “Try Ubuntu” (not “Install Ubuntu” yet).
What to Check in Live Mode:
✔ Wi-Fi/Network connectivity
✔ Audio & Display (external monitors if used)
✔ Touchpad/Keyboard functionality
✔ Graphics performance (especially for gaming)
If everything works, proceed to installation.
Step 3: Installing Ubuntu 25.04
1. Launch the Installer
- Double-click “Install Ubuntu” from the Live desktop.
2. Choose Language & Keyboard Layout
- Select your preferred language.
- Confirm keyboard layout (test typing if unsure).
3. Select Installation Type
- Normal Installation (Recommended) – Includes essential apps like LibreOffice, Firefox, and media codecs.
- Minimal Installation – Only basic utilities (for advanced users).
4. Disk Partitioning (Important!)
- Erase Disk & Install Ubuntu (best for beginners, wipes everything).
- Manual Partitioning (for advanced users who want custom setups).
⚠ Warning: This will delete all existing data on the selected drive.
5. Set Up User Account
- Enter your name, computer name, username, and password.
- Choose “Require password to log in” for security (recommended).
6. Enable Encryption (Optional but Recommended)
- Full-disk encryption protects your data if the device is stolen.
- Adds a small performance overhead but is worth it for security.
7. Select Time Zone & Region
- Click on the map to set your location.
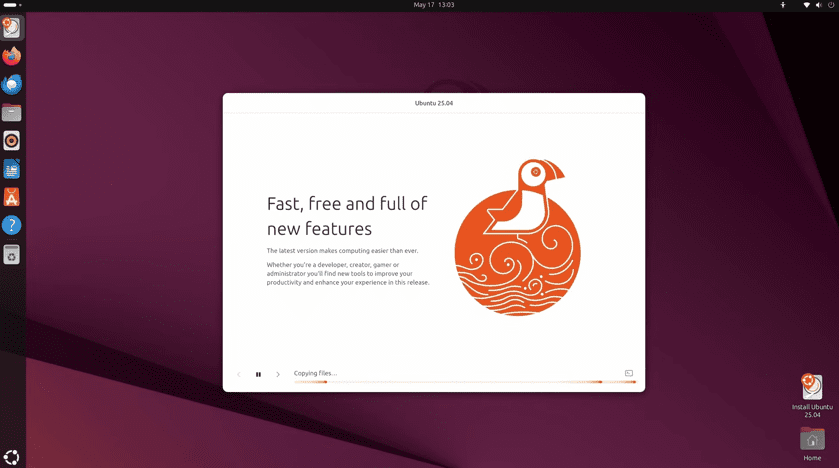
8. Begin Installation
- Click “Install Now” and wait (~10-30 minutes depending on hardware).
9. Restart & Remove USB
- Once done, click “Restart Now” and remove the USB drive.
Step 4: Post-Installation Setup
1. First Boot & Welcome Screen
- Log in with your credentials.
- Ubuntu will guide you through initial setup (privacy settings, updates).
2. Install Additional Drivers
- Open “Additional Drivers” from the app menu.
- Install proprietary drivers (especially for NVIDIA/AMD GPUs).
3. Update Your System
- Open Terminal (
Ctrl + Alt + T) and run:
sudo apt update && sudo apt upgrade -y4. Install Essential Software
- Use Ubuntu Software Center to install:
- Steam (for gaming)
- LibreOffice (Microsoft Office alternative)
- GIMP (image editing)
- VLC (media player)
Frequently Asked Questions (FAQ)
Q1: Can I dual-boot Ubuntu with Windows?
✅ Yes! During installation, choose “Install Ubuntu alongside Windows” instead of erasing the disk.
Q2: My Wi-Fi/Graphics don’t work—what now?
- Try “Additional Drivers” or search for your hardware model + “Ubuntu driver” online.
- Some Wi-Fi cards need firmware updates (
sudo apt install firmware-linux).
Q3: How do I uninstall Ubuntu if I don’t like it?
- Boot into Windows, open Disk Management, and delete Ubuntu partitions.
- Use Windows Recovery to repair the bootloader.
Final Thoughts
Ubuntu 25.04 is a great choice for beginners and experienced users alike. With this guide, you should now have a fully functional Linux system ready for work, gaming, or development.
🔹 Ready to try Ubuntu? Download it today and follow these steps!
Tags:
Ubuntu , Linux , Ubuntu2504 , Linux Installation , Open Source , TechGuide
Hashtags:
#UbuntuGuide #LinuxForBeginners #SwitchToLinux #OpenSourceOS
Disclaimer:
This guide is for educational purposes. Always back up your data before installation. Learn Linux TV is not responsible for data loss or hardware issues.
🔗 Official Ubuntu Website: https://ubuntu.com