Run Android Apps Natively on Windows 11: Full Guide to Installing Google Play Store with WSA
Running Android apps natively on Windows 11 is no longer a distant dream. Thanks to Windows Subsystem for Android (WSA), you can now install the Google Play Store and enjoy Android apps like Instagram, TikTok, or even mobile games—right from your desktop. No need for clunky emulators like BlueStacks or Nox!
In this in-depth guide, we’ll walk through every essential step you need to follow. But before we begin, let’s understand the scope of what you’re about to do—and why this is revolutionary.
Imagine replying to Instagram DMs, watching Shorts on TikTok, or playing your favorite Android games—all with your mouse and keyboard, full multitasking, and native system support.

Let’s dive into the complete setup to get Android apps running natively on your Windows 11 PC.
✅ Minimum Requirements Before You Start
Before installing WSA and Google Play Store, make sure your system meets these requirements. Let’s start here to avoid frustration later.
🛠 System Requirements:
- Windows 11 — Build 22000.526 or later
- RAM — At least 8GB (16GB recommended)
- CPU — Intel, AMD, or ARM with virtualization support
- Virtualization — Must be enabled in BIOS
If you don’t know how to enable virtualization, check your BIOS by restarting your PC and pressing the required key (usually F2, F10, or DEL). Look for “Intel VT-x” or “AMD-V” and enable it.
Once you’re sure your machine is ready, we’ll move to enabling the necessary Windows features.
🔧 Step 1: Enable Windows Features
This step is crucial to prepare your system for running Android in a virtual environment via WSA.
Here’s what to do:
- Open Control Panel
- Navigate to:
Programs → Turn Windows features on or off - Check the following boxes:
- ✅ Windows Hypervisor Platform
- ✅ Virtual Machine Platform
- Click OK
- Restart your PC to apply the changes.
These components allow Windows to create a virtual environment where Android will run, similar to how Windows Subsystem for Linux (WSL) operates.
📦 Step 2: Download WSA with Google Play Store
Microsoft officially supports WSA, but it doesn’t come with Google Play Store out of the box. For that, we’ll use a pre-patched version available from a trusted source.


Follow these steps carefully:
- Visit the GitHub repository of WSABuilds
- Look for the latest release that includes “GApps” (Google Apps)
- Choose your CPU architecture:
- ✅ x86_64 for most Intel/AMD CPUs
- ✅ ARM64 for ARM-based processors (e.g., Surface Pro X)
- Download the ZIP package
- Extract the ZIP file
- Move the extracted folder to your C:\ drive for easy access
Ensure you select the GApps version—this includes Google Play Store and Services, essential for authentication and app support.
🧠 Step 3: Install WSA & Google Play Services
Let’s now install the subsystem and patch it with the Google Play components.
Step-by-step instructions:
- Open the extracted WSA folder
- Locate the file named
Run.bat - Right-click on it → Select Run as Administrator
- The setup process will begin—grant permissions for Camera, Microphone, and other requested access when prompted
- Wait for approximately 2–3 minutes while installation completes
Don’t interrupt this process. It will automatically set up WSA, apply Google services, and register it in your Start menu.
🔐 Step 4: Sign in to Google Play Store
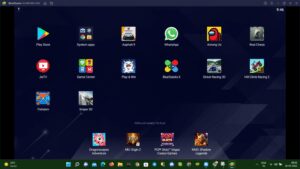
Once installed, you can now access the Android system UI and the Google Play Store just like on a phone.
Here’s how:
- Open Start Menu
- Search for Windows Subsystem for Android
- Click to launch it
- Scroll and find Google Play Store — click to open it
- Sign in using your Google account
- Browse, search, and install Android apps just like you would on a mobile device
Apps will show up in the Start Menu and can even be pinned to the Taskbar for easier access.
🚀 Performance Tips and Known Limitations
Now that you’re set up, here are a few pointers to enhance your experience and be aware of app limitations.
✅ Performance Benefits:
- Much faster and lighter than BlueStacks or Nox
- Supports multitasking (like Picture-in-Picture mode)
- Allows file sharing between Android and Windows seamlessly
- Native keyboard + mouse support
⚠ Limitations & Warnings:
- Some apps (e.g., banking or those using SafetyNet/DRM) may fail to run
- RAM usage can spike if multiple apps are open
- Google account sign-in occasionally shows errors (retry or restart WSA)
🔁 Useful Resources
- Boost Phone Performance Instantly with These Essential Google Play Store Settings
- How to Install Google Play Store on Windows 11 (No Emulator Needed)
- How to Install Windows 11 on Unsupported PCs: Bypass CPU, TPM, and Secure Boot Restrictions
- The Complete Guide to Installing Windows Without a USB Drive (Windows 10/11)
- Customizing Windows 11 with Windhawk: A Complete Guide
🎨 Optional: Customize and Manage Android Settings
WSA also gives you the ability to control how Android runs on your PC.
You can:
- Control resource usage (memory, CPU)
- Toggle network access and shared folders
- Enable or disable Graphics acceleration
- Set default launch modes for apps
To access these:
- Open Windows Subsystem for Android settings from Start Menu
- Explore tabs like Advanced, Developer Mode, and Subsystem Resources
🧩 Frequently Asked Questions (FAQs)
Q1: Is WSA safe to use with Google Play modifications?
A: It’s generally safe if downloaded from trusted sources like GitHub. But modified system files may void warranty. Proceed at your own risk.
Q2: Do Android games like PUBG or Free Fire run properly?
A: Lightweight games and social apps run well. Heavy games may require a high-end PC and might not work due to DRM.
Q3: Can I uninstall WSA if something goes wrong?
A: Yes. Simply go to Settings → Apps → Installed Apps → Windows Subsystem for Android and click Uninstall.
Q4: Is this method better than using emulators?
A: Yes—for productivity apps, browsing, and light gaming. Emulators still offer advanced customization like root access.
📝 Final Thoughts
Running Android apps natively on your Windows 11 PC is now more accessible than ever. Whether you want to use mobile social apps, test Android software, or just explore Play Store casually—WSA makes it simple, fast, and more integrated than traditional emulators.
You now know how to:
- Enable required Windows features
- Download and install Google Play-integrated WSA
- Sign in to Play Store and install Android apps
With a few tweaks and your system ready, you can start enjoying a seamless Android experience—right on your desktop.
📌 Tags
Windows 11, Google Play Store, Android Apps, WSA, No Emulator
📢 Hashtags
#Windows11 #GooglePlay #AndroidOnPC #WSA #TechGuide
⚠ Disclaimer:
Modifying system-level files may void your manufacturer’s warranty or lead to instability. Always create a backup or restore point before making major system changes. Proceed with caution.
All third-party tools, repositories, or sites mentioned are shared for educational purposes. Please use them responsibly.
Stay tuned for more technical tutorials like this—where we explain everything clearly, with no shortcuts and real working solutions.