If you’re looking to enjoy mobile games or apps on your PC, BlueStacks is one of the best Android emulators available. However, to get the best performance — whether you have a low-end or high-end PC — it’s important to install it properly and tweak a few critical settings.
In this article, we’ll walk you through the step-by-step process of installing BlueStacks and optimizing it for smooth and fast performance. We’ll also discuss how to fix common problems like lag, hanging, and slowdowns.
Let’s dive right in!
Step 1: Downloading and Installing BlueStacks
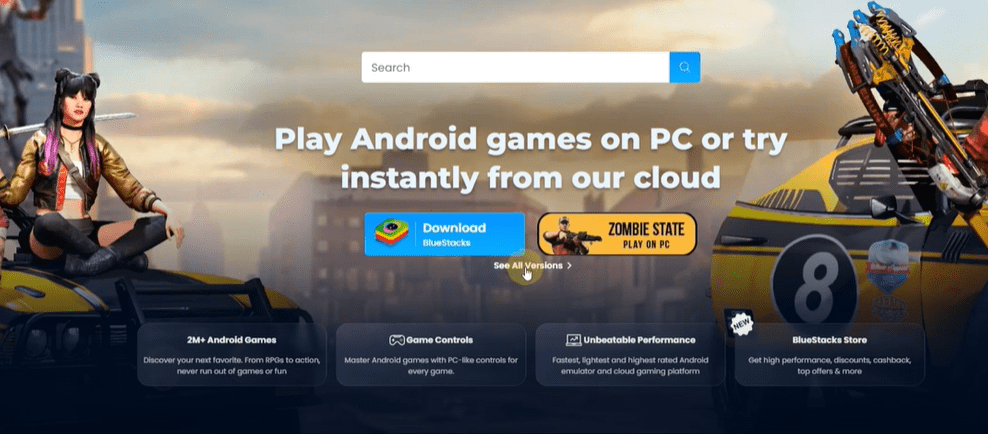
First, open your browser and search for “BlueStacks.” Make sure to visit the official website (www.bluestacks.com). Once you’re there, you’ll land on the homepage.
- Look for an option called “See All Versions”.
- Click it, and you will be taken to a page where you can download BlueStacks 5.
- Download the installer and run it to start the installation process.
- Simply follow the manual installation steps on-screen, and BlueStacks will be installed on your PC.
Step 2: Enable Virtualization Technology (VT)
After installing BlueStacks, it’s highly recommended to enable Virtualization Technology (VT) for better performance.
VT is a BIOS setting that helps your PC run emulators more efficiently by allowing better resource management.
How to enable VT:
- Restart your computer and enter BIOS mode (usually by pressing F2, Del, or Esc key at boot, depending on your PC).
- Find the Virtualization Technology option and enable it.
- Save changes and restart your PC.
Enabling VT will drastically reduce lag and make BlueStacks much faster.
Step 3: Configuring Best BlueStacks Settings
Now, let’s optimize the settings inside BlueStacks for the best experience.
1. Open BlueStacks Settings:
- Click the three lines (hamburger menu) on the top-right.
- Select Settings.
2. Performance Settings:
In the Settings menu, go to the Performance tab.
CPU Allocation:
You need to allocate CPU cores based on your system:


- Open Task Manager (Right-click on the Taskbar → Task Manager).
- Go to the Performance tab → CPU section.
- Check how many cores your CPU has.
Based on the number of cores:
- 2 cores → Set CPU Allocation to Low.
- 4 cores → Set CPU Allocation to Medium.
- 6 or more cores → Set CPU Allocation to High.
Memory Allocation:
Similarly, check your system’s memory (RAM) in the Task Manager under Performance → Memory.
Based on your RAM:
- 2GB or 3GB RAM → Set Memory Allocation to Low.
- 4GB RAM → Set Memory Allocation to Medium (2GB in BlueStacks).
- 6GB or 8GB RAM → Set Memory Allocation to Enhanced.
- 16GB RAM → Set Memory Allocation to High.
3. Set Frame Rate:
- Keep the frame rate at 60 FPS for smoother gameplay.
- Do not set it at 30 FPS, even if your system is older.
Step 4: Display Settings Based on Monitor Refresh Rate
If your monitor supports a higher refresh rate (above 60Hz), you can further enhance performance.
Check your monitor refresh rate:
- Right-click on the desktop → Go to Display Settings → Advanced Display Settings.
- Check under Choose a Refresh Rate.
If your monitor shows more than 60Hz (like 120Hz or 144Hz):
- Go back to BlueStacks settings.
- Enable High Frame Rate Mode.
- Set the frame rate to match your monitor’s maximum refresh rate.
If your monitor is 60Hz or lower, you can skip this step.
Step 5: Graphics Settings
Depending on whether your PC has a dedicated graphics card or uses integrated graphics, adjust the display settings accordingly:
- If your PC has a dedicated GPU (NVIDIA, AMD), you can set the display to 1080p or higher.
- If your PC uses integrated graphics, set it to 720p for better performance.
In the Graphics tab:
- If your PC is low-end, choose Performance Mode.
- If you have a decent PC, Compatibility Mode is fine.
For decoding:
- If your PC lacks a strong GPU, select Software Decoding.
- If you have a GPU, you can use Hardware Decoding.
Also, make sure Prefer Dedicated GPU is enabled to ensure BlueStacks uses the powerful graphics card if available.
Conclusion
By following these steps, you can maximize your BlueStacks performance regardless of whether you have a low-end or high-end PC. Proper settings ensure smooth gameplay, reduced lag, and a much better overall experience.
If you have any questions or face any issues, feel free to ask in the comment section below. Happy gaming!
Tags:
bluestacks installation, bluestacks best settings, optimize bluestacks, fix bluestacks lag, bluestacks slow fix, bluestacks setup guide, low-end pc settings, high-end pc settings, best emulator settings, bluestacks gaming performance, virtualization technology, enable vt for bluestacks
Hashtags:
#BlueStacks #BlueStacksSetup #GamingPC #Emulator #AndroidEmulator #LowEndPC #HighEndPC #OptimizePerformance #FixLag #TechGuide #PCGaming #BlueStacksSettings


