If you’re stepping into the world of Android app development, the first and most important step is setting up your development environment. Whether you’re a complete beginner or looking for a fresh setup, this guide will walk you through installing Android Studio on Windows 11, enabling virtualization, configuring your emulator, and running your first mobile app.
Let’s get started with a fresh mindset — and by the end of this guide, you’ll have a fully functional Android development setup!
🔧 What You’ll Learn
- How to enable Hyper-V (virtualization) on Windows
- Download and install Android Studio from the official source
- Configure the Android SDK and create a virtual device
- Create your first Android project and run it in an emulator
💻 System Requirements
Before we begin, let’s make sure your PC meets the necessary requirements:
- Windows 10/11 (64-bit)
- 8 GB RAM or more (recommended)
- Virtualization enabled in BIOS
- Stable internet connection
✅ Step 1: Enable Hyper-V in Windows
Before you can use the Android Emulator, Hyper-V must be enabled on your system. Let’s walk through it together.
Here’s how to enable Hyper-V:
- Click on the Windows Search Bar and type:
Turn Windows features on or off - In the window that opens, scroll down and look for Hyper-V.
- Check the box next to it.
- Click OK to apply the changes.
- Wait while Windows configures the required files.
- Restart your PC when prompted.
Once your PC restarts, Hyper-V will be enabled, allowing the Android emulator to run smoothly.
📥 Step 2: Download Android Studio
Let’s now download Android Studio — the official IDE for Android development from Google.
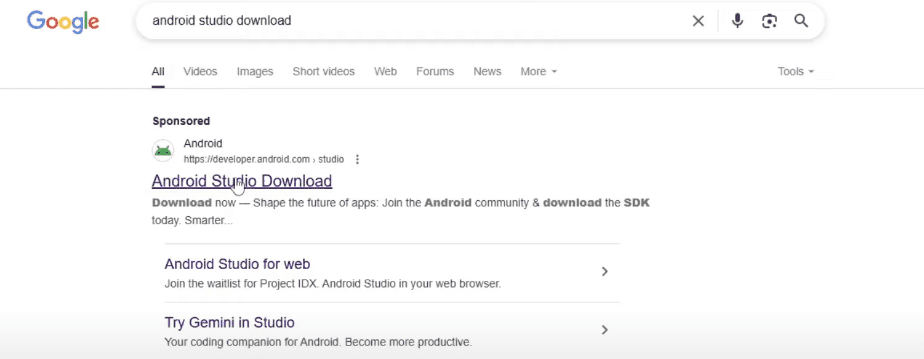
Steps to download:
- Open your browser and search for
Android Studio download. - Click on the official link:
🔗 https://developer.android.com/studio - Click on Download Android Studio.
- Accept the terms and conditions by checking the box, then click Download.
- The
.exeinstaller will now begin downloading.
💿 Step 3: Install Android Studio on Windows 11
Once the installer finishes downloading, it’s time to begin installation.
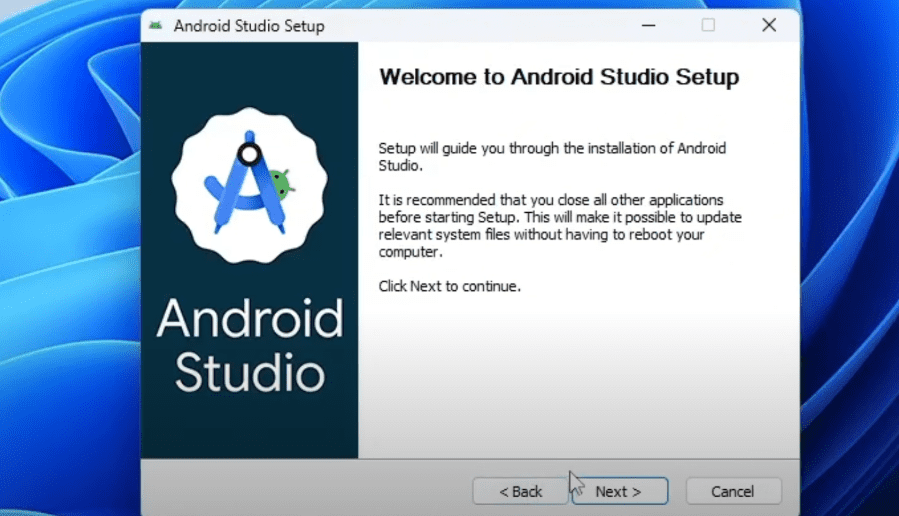
Let’s move forward with the installation:
- Right-click on the
.exefile and select Open. - If prompted, click Yes to allow changes to your device.
- The Android Studio Setup Wizard will launch. Click Next.
- On the components screen, ensure both:
- Android Studio
- Android Virtual Device
are checked, then click Next.
- Leave the installation path as default and click Next again.
- Finally, click Install.
Wait a few minutes while Android Studio is installed on your system. Once completed:
- Click Next, then Finish to launch Android Studio.
- On the prompt to share usage data, you can choose Don’t Send.
🧙 Step 4: Complete Initial Setup Wizard
Once Android Studio launches, a setup wizard will appear to help you configure key components.

Follow these steps:
- Click Next on the welcome screen.
- Choose Standard installation type (recommended for most users).
- Click Next again.
- Review the list of components that will be downloaded:
- Android SDK
- Emulator
- Intel HAXM
- Android Build Tools, etc.
- Accept the license agreement and click Finish to begin downloading.
This may take several minutes depending on your internet speed. You can click Show Details to track progress.
🎨 Step 5: Customize Android Studio (Optional)

Once setup is complete, you can customize Android Studio:


- Theme: Dark (default), Light, or High Contrast
- Language & Region: English is default. Region changes may unlock more languages.
Feel free to explore, or keep everything as default and move ahead.
📱 Step 6: Create a New Android Project
Now that we’ve installed Android Studio, let’s create our first app!
Steps to create your project:
- Click on Projects → New Project.
- Under Phone and Tablet, select Empty Activity → Click Next.
- Enter:
- App name: MyFirstApplication
- Save location: Leave default
- Minimum SDK: Use the one selected by default (usually covers 97%+ of devices)
- Click Finish to generate the project.
Android Studio will now build and open your new project. You’ll see:
MainActivity.kt– where your logic goes- The project structure in the left panel
🤖 Step 7: Set Up Android Virtual Device (Emulator)
Now that we have our project, we need a virtual device (AVD) to run it.
Let’s create a virtual phone:
- Open Device Manager from the sidebar or Tools > Device Manager.
- Click on Create Virtual Device or the plus (+) icon.
- From the list, choose a device (e.g., Pixel 9 Pro) → Click Next.
- On the System Image screen, select a recommended Android version with Google Play.
- Click Download (about 1.8 GB) → Click Finish.
Once downloaded, your virtual device will appear in the list.
🚀 Step 8: Run Your App on the Emulator
Now for the moment of truth — let’s run your app!
Follow these steps:
- Go back to Android Studio.
- Click the Run ▶️ button at the top.
- Select your virtual device.
- Wait for the emulator to launch and the app to install.
After a few seconds, you’ll see your app with the default text “Hello Android” displayed on the virtual phone screen.
Success! 🎉 You’ve now completed a full Android Studio setup and run your very first app.
❓ Frequently Asked Questions
Q: Is Android Studio free to use?
A: Yes, Android Studio is 100% free and open-source, provided by Google.
Q: Do I need a physical Android phone?
A: No, the Android Emulator lets you test your apps virtually. But real device testing is also recommended for performance tuning.
Q: What if the emulator runs slowly?
A: Ensure virtualization is enabled in BIOS, use hardware acceleration, and close background apps for better performance.
⚠ Disclaimer
This article is for educational purposes. Always download software from the official website to avoid malware or corrupted files. Performance may vary depending on your system specs.
🔗 Download Android Studio
👉 https://developer.android.com/studio
📌 Tags:
android studio installation, android emulator setup, android app development, run android app windows, android sdk setup, android studio windows 11
📢 Hashtags:
#AndroidStudio #AppDevelopment #Windows11 #AndroidEmulator #Java #Kotlin #AndroidSDK #DeveloperTools
Got stuck during the installation or want help with your first real app? Feel free to drop your question in the comment section below. Until then, happy coding and welcome to the world of Android development! 💻📱🚀


