Running Android apps on Windows 11 is now easier than ever, thanks to the built-in support for Windows Subsystem for Android (WSA). Microsoft has made it possible to install Android applications officially through the Amazon Appstore, enabling users to run mobile apps seamlessly on a PC.
If you’re looking to get started, follow this step-by-step guide to learn how to install Android apps on Windows 11 — the official, Microsoft-recommended way.
✅ System Requirements
Before proceeding, ensure your system meets the following requirements:
- Minimum RAM: 8 GB (16 GB recommended)
- Storage: Solid State Drive (SSD) for better performance
- Processor: 64-bit architecture
- Virtualization: Must be enabled in BIOS
🔧 Step 1: Enable Virtualization on Your System
Check if Virtualization is Enabled
- Open Task Manager (
Ctrl + Shift + Esc) - Go to the Performance tab
- Click CPU and check the “Virtualization” status
If virtualization is disabled, follow the steps below to enable it in BIOS.
Enable Virtualization in BIOS
- Restart your computer
- During boot, press the BIOS key (commonly Esc, F2, Delete, or F10) — this depends on your device’s manufacturer
- Navigate to the Security tab or Advanced Settings
- Enable Virtualization Technology (VT-x or AMD-V)
- Save changes and restart your PC
🔄 Step 2: Update Windows 11
Ensure your system is running the latest stable or preview version of Windows 11.
- Go to Settings > Windows Update
- Click Check for updates
- Download and install all pending updates
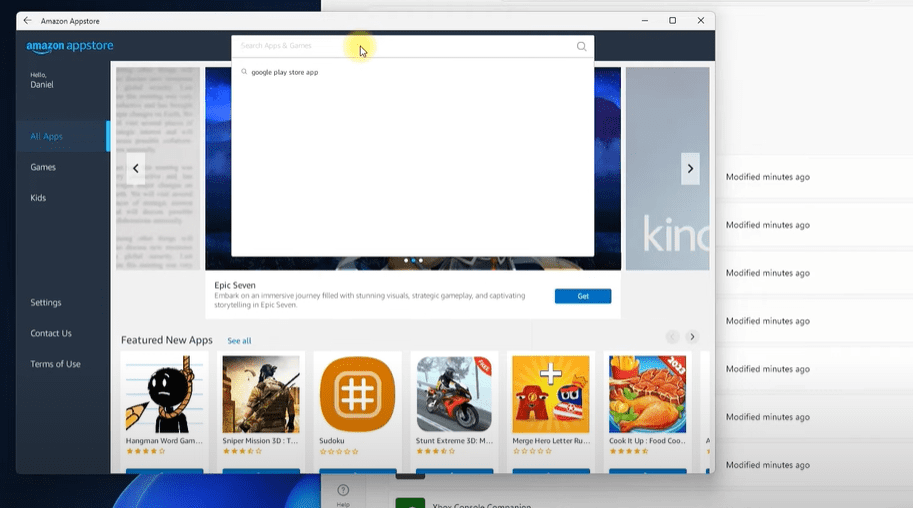
🛒 Step 3: Install the Amazon Appstore
Through Microsoft Store
- Open Microsoft Store
- Search for Amazon Appstore
- If it’s not available, ensure:
- You’ve updated the Microsoft Store
- You’ve enabled virtualization and installed required features like Virtual Machine Platform and Hyper-V
Tip: Go to Start > “Turn Windows features on or off” and make sure Virtual Machine Platform and Hyper-V are checked.
⚙️ Step 4: Install Windows Subsystem for Android (WSA)
If the Amazon Appstore fails to install or shows “this app will not work on your device,” you may need to manually install WSA:
Manual WSA Installation:
- Visit a trusted source or use Microsoft’s link to download Windows Subsystem for Android
- Install the
.msixbundlefile by double-clicking it - Once installed, open Microsoft Store > Library
- Click Get Updates to ensure WSA is up to date
After installation, the Amazon Appstore should now be functional.
🔓 Step 5: Log in and Browse Android Apps
- Open the Amazon Appstore
- Log in with your Amazon account
- Browse and install Android apps directly to your Windows 11 system
🚀 Bonus: Install APK Files (Advanced)
If you’d like to go beyond Amazon’s limited selection, you can install APK files manually.
Here’s how:
- Enable Developer Mode in the WSA settings
- Install an APK installer from the Microsoft Store (e.g., “APK Installer”)
- Use it to browse and select
.apkfiles from your system - Click Install and follow the prompts
You can now sideload Android apps like Messenger, WhatsApp, or custom tools directly onto Windows.
Note: Be cautious when installing APK files. Always download from trusted sources.


Conclusion
With virtualization enabled and WSA installed, Windows 11 allows you to run Android apps natively — no emulators needed. This seamless integration is fast, reliable, and backed by Microsoft through official channels.
If you’re comfortable tweaking a few settings, the Android app experience on Windows 11 can be powerful and productive.
Tags:
android apps on windows 11, install amazon appstore, run android on pc, windows subsystem for android, windows 11 virtualization, sideload apk windows, apk installer windows, run mobile apps on pc, android on desktop, windows 11 tips
Hashtags:
#Windows11 #AndroidOnWindows #AmazonAppstore #APKInstaller #WindowsTips #WSA #Microsoft #PCApps #AndroidOnPC #TechGuide


