Inserting an image into multiple frames in Adobe InDesign is a fantastic way to create visually engaging layouts, such as collages or grid designs. This article provides a detailed guide on how to seamlessly insert a single image across multiple frames, ensuring a professional and creative output.
Step 1: Create the Frames
- Select the Rectangle Frame Tool
- In the Tools Panel, choose the Rectangle Frame Tool (shortcut F).
- Design the Layout
- To ensure all frames are of the same size, consider creating a grid first.
- Go to Layout > Create Guides, and configure the number of rows and columns. This step helps you evenly distribute your frames.
- If you prefer, you can manually drag and create each frame.
- Duplicate Frames (Optional)
- After creating one frame, you can duplicate it:
- Hold Alt and Shift while dragging the frame to create a copy aligned with the original.
- Repeat this process to build your desired layout.
- After creating one frame, you can duplicate it:
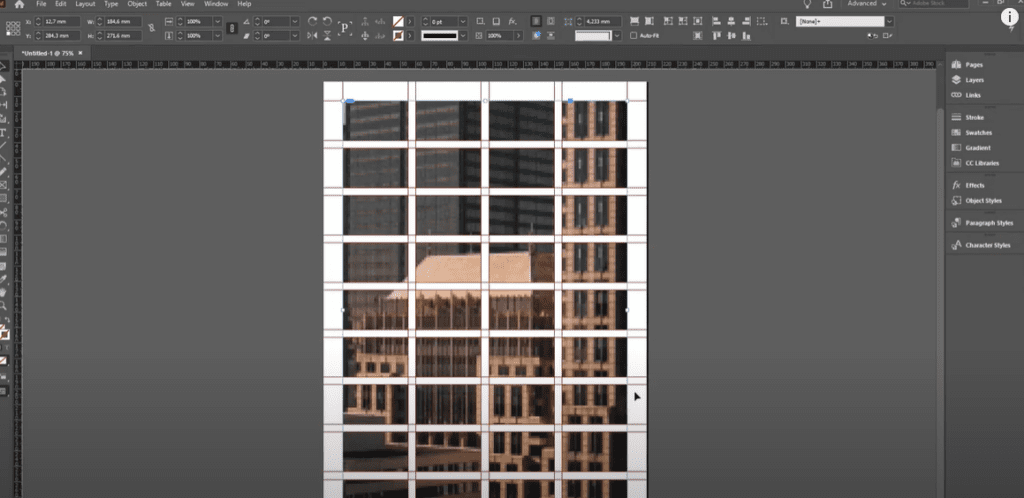
Step 2: Combine Frames into a Compound Path
- Select All Frames
- Use the Selection Tool (shortcut V) and click on each frame while holding Shift to select multiple frames.
- Alternatively, drag a selection box around all the frames.
- Create a Compound Path
- With all frames selected, go to Object > Paths > Make Compound Path.
- This action combines the selected frames into one, enabling you to insert a single image across them.
Step 3: Place the Image
- Insert the Image
- Press Ctrl+D to open the Place dialog box.
- Locate the image file on your computer, select it, and click Open.
- The image will now fill all the frames that were combined in the previous step.
- Adjust Image Placement
- To ensure the image fits well within the frames, right-click on the image and choose Fitting > Fill Frame Proportionally.
- Alternatively, use the shortcut Ctrl+Alt+Shift+C to quickly fit the image proportionally to the frames.
Step 4: Fine-Tune the Layout
- Resize the Frames
- If needed, resize the entire compound path by selecting it and dragging the corners.
- The image will adjust within the resized frames.
- Reposition the Image
- To adjust the placement of the image within the frames, double-click inside the frames to select the image.
- Use the arrow keys or drag the image to reposition it.
Tips for Better Results
- Experiment with Grids: Using grids for frame alignment ensures a clean and professional design.
- High-Resolution Images: Use high-quality images to maintain clarity, especially for larger frames.
- Creative Shapes: You can create compound paths with irregular shapes, such as circles or polygons, for unique designs.
Conclusion
Inserting an image across multiple frames in Adobe InDesign is a simple yet powerful technique that adds creativity to your projects. Whether you’re working on brochures, posters, or magazine layouts, this method provides a polished and dynamic result. Follow the steps outlined in this article to create stunning multi-frame image designs.
If you have any questions or additional tips, feel free to share them below!
#InDesign #AdobeInDesign #MultiFrameDesign #GraphicDesign #InDesignTutorial #LayoutDesign #DesignTips #CreativeFrames #InDesignBasics #ImageEditing