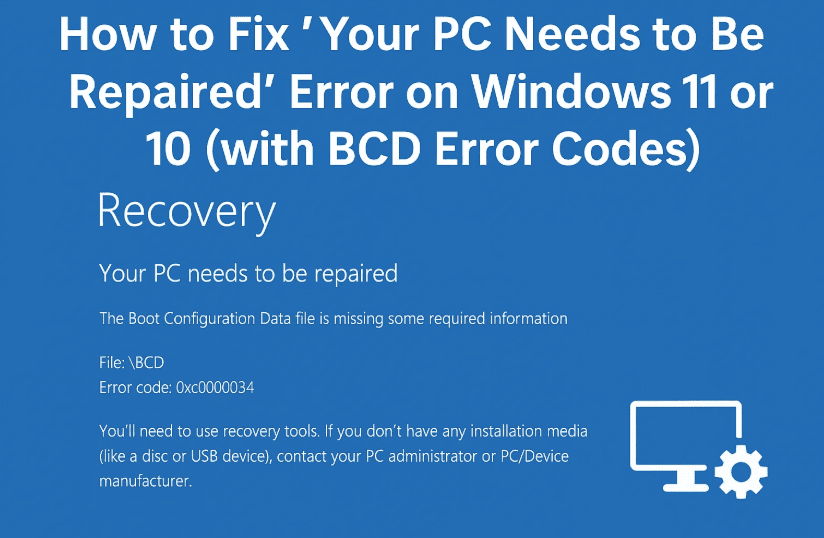
Encountering a blue screen error that says “Your PC or Device Needs to Be Repaired” is quite scary—especially when you’re unsure what caused it or how to fix it. Usually, this issue is related to corrupted or missing BCD (Boot Configuration Data) files, and the error may include codes like:
0xc000000f0xc00000980xc00000940xc000060f- Or similar
The good news? You can fix it. In this guide, I’ll walk you through step-by-step methods to repair the boot files and get your system back up and running.
🔧 Understanding the Problem
This error means Windows cannot locate or load your system boot files correctly. The reasons could include:
- Sudden power loss or forced shutdown
- Corrupted BCD or boot files
- Failed Windows updates
- Faulty SSD/HDD sectors
- Malware or third-party software conflicts
Let’s now move on to the solutions. I’ll guide you through two solid methods to fix it.
🛠️ Method 1: Use Automatic Repair via Forced Shutdown (No Bootable USB Needed)
Let’s try the simpler fix first—using Windows’ built-in Automatic Repair tool by force-triggering it.
🔁 Here’s what to do:
- Turn ON your system.
- As soon as the Windows logo appears, press and hold the Power button to shut down your PC.
- Repeat this process 2–3 times.
⚠️ This tricks Windows into thinking something is wrong, so it initiates its built-in recovery system.
After the third forced shutdown:
- You should see the message: “Preparing Automatic Repair”
- Let it load.
- Then you’ll be taken to a screen with Advanced Repair Options.
Great! Now let’s move to the next steps.
🔧 Method 2: Boot with a Windows USB and Use Command Prompt to Fix Boot Files
If method 1 didn’t work, or you’re still stuck, it’s time to use a Windows installation media (bootable USB).
🪛 Here’s how to proceed:
- Create a bootable USB using the Windows Media Creation Tool.
- Plug it into your PC and boot from USB (use Boot Menu, usually by pressing
F12,ESC, orF9depending on your brand). - On the Windows Setup screen, choose your language and click Next.
- Click on Repair your computer (bottom left).
Once you’re on the Advanced Options screen:
- Click Troubleshoot
- Click Advanced Options
- Choose Command Prompt
🖥 Step-by-Step to Rebuild BCD:
In Command Prompt:

- First, check which drive contains your Windows installation:
bcdeditLook for the OS device entry. For example, it may showpartition=G:orpartition=C:. - Type the command below, replacing G with your actual Windows drive letter:
bcdboot G:\Windows🧠 This command copies boot files from the Windows folder to the boot partition. - You’ll see a message:
“Boot files successfully created.” - Close the Command Prompt.
- Remove your USB drive and click Continue to boot into Windows.
💡 Still Seeing the Error? Try System Restore
If boot repair didn’t work or you’re stuck in a loop, try restoring your system to a previous working state.
🕒 Steps to Restore:
- Boot into the Advanced Options screen using a bootable USB or automatic repair.
- Select Troubleshoot > Advanced Options > System Restore.
- Choose the most recent Restore Point (before the error started).
- Follow the on-screen steps to complete the restore.
This will reset Windows system files without deleting your personal data.
❓ Frequently Asked Questions (FAQs)
Q1: What is the BCD file?
A: The BCD (Boot Configuration Data) file tells Windows how to start. If it’s missing or corrupted, Windows can’t boot, and you’ll get errors like 0xc000000f.
Q2: Is BCD repair safe?
A: Yes, running bcdboot is safe. It only rebuilds boot data. But ensure you use the correct drive letter to avoid applying it to the wrong partition.
Q3: What if even BCD boot fails?
A: Try checking your hard drive for failure using tools like CHKDSK or replace the hard drive if it’s physically damaged. A clean install of Windows may be necessary in worst cases.
📌 Tags & Hashtags
Tags: fix bcd boot error, windows 11 boot repair, your pc needs to be repaired, fix 0xc000000f, fix unbootable windows, bcdboot command, system restore windows, bootable usb recovery
Hashtags:
#Windows11 #BootErrorFix #BCDRepair #BlueScreenFix #WindowsRecovery #StartupError #WindowsTroubleshooting #TechSupport
⚠️ Disclaimer
This guide is intended for educational purposes. Always back up your data when possible. Modifying boot files can cause additional issues if done incorrectly—follow each command carefully and consult a technician if you are unsure.
That’s it! By following these methods, you should be able to recover your PC from the “Your device needs to be repaired” screen and rebuild the boot system without reinstalling Windows.
For more helpful repair guides and tech tutorials, don’t forget to check out dtptips.com – where fixing Windows problems is made simple. 🔧💻


