You’re happily working away on your Windows PC, and suddenly—bam!—your screen flashes blue, and your system crashes. Welcome to the infamous Blue Screen of Death (BSOD). It’s one of the most dreaded errors a Windows user can face, but with the right approach, it’s often fixable.

This article will walk you through how to identify the cause of a BSOD, how to collect data from your system, and what tools you can use to resolve it. Whether you’re a home user or an IT professional, this guide will help you troubleshoot BSODs like a pro.
🔍 What is the Blue Screen of Death?
The BSOD is Windows’ way of saying, “Something has gone terribly wrong, and I can’t continue.” It typically points to one of the following issues:
- Faulty or incompatible device drivers
- Buggy software or Windows updates
- Failing hardware (RAM, GPU, storage, etc.)
- Corrupted system files or filesystem
- Overclocked or undervolted hardware
Since the cause can vary widely, troubleshooting must be specific to your system and the actual stop code provided.
Step 1: Rule Out Easy Fixes
Before diving deep, eliminate the common culprits:
- Reset overclocked or undervolted settings to stock.
- Unplug non-essential USB devices.
- Uninstall any software installed just before the crash.
- Update Windows and all device drivers from your manufacturer’s official site.
⚠️ Important: Never update your BIOS unless you are absolutely certain it is the cause. A failed BIOS update can render your system unusable.
Step 2: Read the Stop Code
When a BSOD appears, it usually shows a stop code (e.g., 0x0000003B) and sometimes the name of the file that triggered it. If you miss it:
- Right-click the Start Menu → Event Viewer
- Go to: Windows Logs → System
- Look for events with:
- Source: BugCheck
- Event ID: 1001
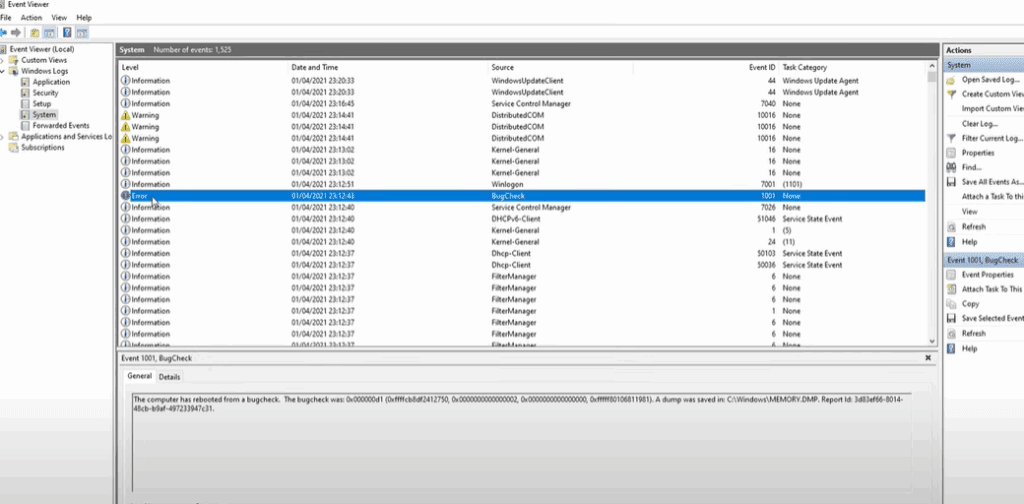
Make note of the hex code shown (e.g., 0x0000001A). Google it or refer to Microsoft’s Stop Code Reference.
Step 3: Enable and Find Memory Dumps
If not already enabled:
- Right-click Start → System
- Go to Advanced System Settings
- Under Startup and Recovery, click Settings
- Set “Write debugging information” to Automatic memory dump
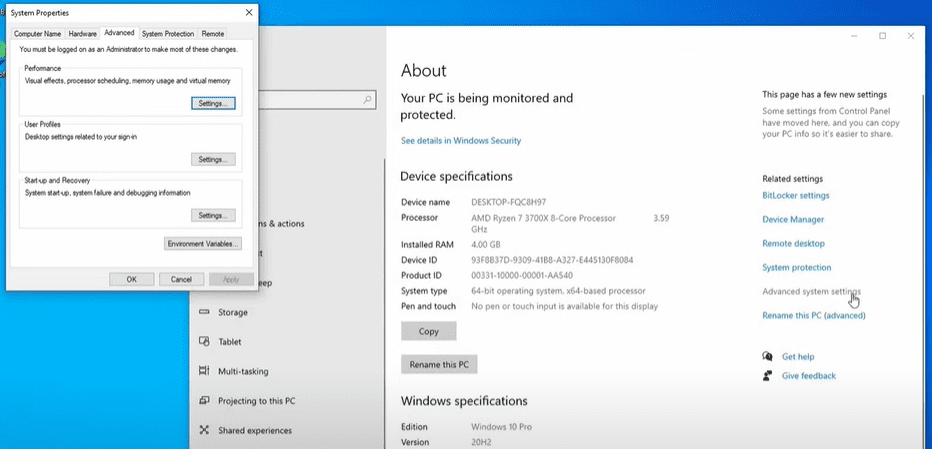
Crash dumps will be located in:
C:\Windows\MEMORY.DMP(Full dump)C:\Windows\Minidump(Mini dump)
Step 4: Analyze the Crash Dump
Option A: Using WhoCrashed
- Easy-to-use GUI tool (Free for home users)
- Download and install
- Click Analyze – it will interpret dump files and identify faulty drivers
❗ Note: WhoCrashed is not free for commercial use.


Option B: Using WinDbg (Preview)
- Free, official Microsoft debugging tool
- Install from Microsoft Store
- Run as Administrator
- Open your dump file (
File → Open dump file) - Click on
!analyze -vand wait for analysis
Look for:
MODULE_NAMEandIMAGE_NAME– this tells you the faulty driverPROCESS_NAME– what was running at the time- “Probably caused by” – a useful hint
Step 5: Fix the Driver or Hardware Issue
Now that you know the faulty driver:
- Visit the device manufacturer’s website
- Download and install the latest version of the driver
- If that doesn’t help:
- Uninstall the device or software if possible
- Try a rollback to a previous driver
- Search online using the driver name + “crash” to see if others reported issues
🧠 Tip: Drivers often crash due to bad hardware too. For example, a GPU driver crash could mean a dying graphics card—or a weak power supply.
Step 6: What If Windows Won’t Boot?
If you can’t get into Windows:
1. Try Safe Mode
- Force shutdown your PC during boot twice
- Windows should offer Recovery Options
- Go to Startup Settings → Press F4 (Safe Mode) or F5 (with Networking)
2. Use a Windows Recovery USB
- Use Windows Media Creation Tool on another PC
- Boot into the USB drive
- Select Repair your computer → Troubleshoot
- Run Command Prompt → type:
chkdsk /fandsfc /scannow
These tools can help fix filesystem corruption or missing system files preventing boot.
Final Notes
Troubleshooting BSODs can be time-consuming, but methodical analysis using tools like WhoCrashed and WinDbg can save you hours of guesswork. If it’s a driver problem, an update or uninstall usually fixes it. If it’s hardware, the crash dumps often give you enough hints to isolate the faulty part.
✅ Always keep backups of important data—especially when dealing with potential hardware failure.
Tags:
blue screen, BSOD, Windows crash, fix blue screen, troubleshoot Windows, memory dump, driver crash, system error, how to fix BSOD, WinDbg, WhoCrashed, debug dump file
Hashtags:
#BSOD #BlueScreen #WindowsCrash #Troubleshooting #MemoryDump #WhoCrashed #WinDbg #Windows10 #Windows11 #SystemError #DriverIssue #TechGuide
Disclaimer:
This article is for educational and informational purposes only. Use the diagnostic tools and techniques described at your own risk. Modifying system settings, updating firmware, or analyzing memory dumps should be done carefully, and only if you are confident in your technical ability. Always back up your data before making significant changes.


