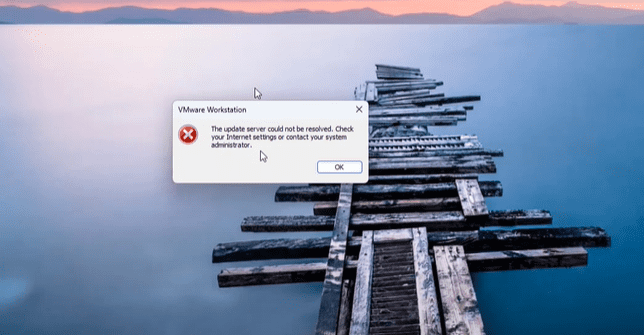
If you’ve encountered the “The update server could not be resolved” error while trying to install VMware Tools in VMware Workstation, you’re not alone. This error prevents essential features like full-screen display, file sharing, and smooth system performance in your virtual machine (VM).
Fortunately, there’s a simple workaround that allows you to manually install VMware Tools even if the built-in update server fails to respond. This article walks you through how to resolve the issue step-by-step.
Why You Need VMware Tools
Before diving into the solution, let’s understand why VMware Tools is crucial:
- Enables full-screen resolution in your VM
- Allows drag-and-drop and copy-paste between host and guest OS
- Supports shared folders
- Reduces mouse lag and system stuttering
- Improves overall system performance inside the virtual environment
Without VMware Tools installed, you’re essentially working with a limited and sluggish virtual machine.
The Problem: Update Server Could Not Be Resolved
This error typically appears when you try to install VMware Tools through the VMware Workstation interface, but the system can’t connect to the update server. This often happens due to:
- Network configuration issues
- DNS resolution failures
- The server being down or deprecated
Rather than waiting or troubleshooting network settings, you can bypass this problem by manually downloading the tools.
How to Manually Download and Install VMware Tools
Follow these steps to fix the error and install VMware Tools manually:
✅ Step 1: Search for VMware Tools Download Page
Open a browser and search for “VMware Tools download”.
You’ll likely see two top results:
- One from Broadcom
- One from VMware.com
Avoid the Broadcom link unless you already have an account there, as it requires sign-in to access downloads.
✅ Step 2: Go to the Official VMware Download Page
Instead, head to the official VMware Tools packages page:


From there, you’ll find different formats available, including:
- ARM
- x64
- x86
Look for the x64 .exe file (for 64-bit systems), which is the most commonly used version for Windows VMs.
✅ Step 3: Download and Run the Installer
- Download the
.exefile suited for your virtual machine architecture. - Double-click the file to launch the VMware Tools installer.
- Choose the “Complete” installation option when prompted.
- Click Install and let it finish the process.
It may take a few minutes depending on your VM’s speed, so be patient.
✅ Step 4: Restart the Virtual Machine
Once installation is complete:
- Click Finish
- Restart your virtual machine
After rebooting, you’ll notice that:
- The screen resolution automatically adjusts
- You can drag and drop files
- You can enable shared folders
- The system feels much smoother and responsive
Testing Your Setup
To confirm the installation:
- Try copying a file from your host to the VM
- Maximize the window to check if it goes full screen
- Access shared folders if previously configured
If these features work, the VMware Tools installation was successful.
Conclusion
If you’re facing the “update server could not be resolved” error during VMware Tools installation, don’t worry. By manually downloading and installing the tools from VMware’s official source, you can bypass the issue completely and restore full functionality to your virtual machine.
Remember, installing VMware Tools is essential for an optimized virtual machine experience.
Tags:
VMware Workstation error, VMware Tools installation, update server error fix, manual VMware Tools download, virtual machine setup, VMware Workstation troubleshooting, fix update server could not be resolved, Windows VM tools, VMware toolkit
Hashtags:
#VMwareTools #VMwareWorkstation #VirtualMachineFix #VMwareErrorFix #FullScreenVM #FixVMware #TechTips #VMwareSupport


