Experiencing lag and slow performance on your Windows 11 device—even if it’s brand new—is more common than you think. Whether you’re a gamer, a professional, or a casual user, these issues can significantly hinder productivity. Fortunately, with a few effective optimizations, you can restore your system’s speed and efficiency.

In this guide, we walk you through every step needed to fix performance issues on Windows 11. Follow these practical solutions to resolve high CPU usage, memory overload, and other background processes slowing your system down.
🔍 Step 1: Check System Resource Usage
- Right-click on the Taskbar and open Task Manager.
- Click on the Performance tab on the left.
- Monitor your CPU, Memory, and Disk usage.
- If any of these show high usage, proceed with optimization steps below.
- If usage seems normal but performance is still slow, move on to Step 2.
🧼 Step 2: Perform a Clean Boot
- Press
Windows + S, search formsconfig, and open System Configuration. - Go to the Services tab.
- Check Hide all Microsoft services.
- Click Disable All.
- Go to the Startup tab and click Open Task Manager.
- In Task Manager, go to Startup Apps and disable all third-party applications (like Discord, Steam, Skype, etc.).
- Click Apply and restart your PC.
If your system runs smoothly after rebooting, one or more startup programs were likely causing the slowdown. You can then uninstall or disable the problematic applications permanently.
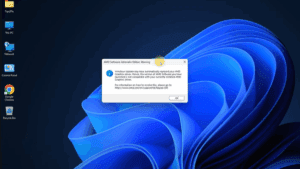
🔐 Step 3: Disable Memory Integrity in Windows Security
- Go to Settings > Privacy & Security > Windows Security > Device Security.
- Click Core Isolation details.
- Turn off Memory Integrity.
⚠️ Memory Integrity is a useful security feature, but it may consume additional resources and cause lower performance or FPS drops, especially in games.
🔧 Step 4: Disable Unnecessary Permissions & Background Services
Disable Windows Permissions:
Navigate to Settings > Privacy & Security, and disable the following:
- General
- Speech
- Inking & Typing Personalization
- Diagnostics & Feedback
Under App Permissions, disable access for apps you don’t use:
- Location
- Camera
- Microphone
- Contacts
- Calendar
- Phone Calls
- Messaging
- Radios
Disable Notifications:
- Go to Settings > System > Notifications.
- Turn off all unwanted notifications and enable Do Not Disturb.
🗑️ Step 5: Manage Storage & Clear Temporary Files
- Go to Settings > System > Storage.
- Turn Storage Sense off.
- Manually clean temporary files:
- Click on Temporary Files.
- Select unnecessary categories (like thumbnails, temp files, etc.).
- Click Remove Files.
🎨 Step 6: Disable Visual Effects
- Press
Windows + S, typesysdm.cpl, and press Enter. - Go to Advanced > Performance > Settings.
- Select Adjust for best performance.
- Enable the following three options for balance:
- Animate windows when minimizing/maximizing
- Show thumbnails instead of icons
- Smooth edges of screen fonts
- Click Apply > OK.
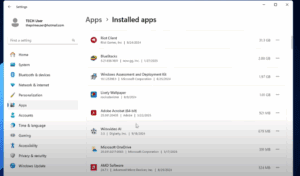
🧰 Step 7: Uninstall Bloatware & Unused Apps
Go to Settings > Apps > Installed Apps and uninstall applications you don’t use, such as:
- 3D Viewer
- Feedback Hub
- Maps
- Movies & TV
- Clipchamp
- Microsoft Teams
- Xbox Game Bar
- Any third-party apps not essential for your workflow
🚫 Step 8: Disable Startup Apps
Go to Settings > Apps > Startup and disable unnecessary applications that launch during boot time. This reduces boot delay and frees up resources.
🧩 Step 9: Disable Optional Windows Features
If you’re not using virtualization or enterprise-level features:
- Search for “Turn Windows Features On or Off”.
- Uncheck Hyper-V and any other feature you don’t need.
- Click OK, then restart if prompted.
🧽 Step 10: Delete Temporary Files
- Press
Windows + R, typetemp, press Enter, and delete all files. - Again, press
Windows + R, type%temp%, press Enter, and delete all files.- Use
Ctrl + Ato select all andShift + Deleteto permanently remove them.
- Use
🛠️ Step 11: Disable Unwanted Windows Services
Search for Services and disable services you don’t use:
- Background Intelligent Transfer Service
- BitLocker (if not using)
- Bluetooth Support Service (if Bluetooth is off)
- Connected User Experiences and Telemetry
💡 If you’re unsure which services to disable, use a batch script from a trusted source or consult your IT administrator.


🛡️ Step 12: Scan for Malware and Trojans
Use HitmanPro – a lightweight and reliable malware scanner:
- Visit: HitmanPro Website
- Download the 30-day free trial (no purchase needed).
- Run a one-time scan to check your computer.
- The tool will detect and remove:
- Trojans
- Malware
- Spyware
- Tracking cookies
Restart your computer after the scan completes.
✅ Conclusion
By following these comprehensive steps, you’ll likely see a noticeable boost in your Windows 11 system’s performance. Whether it’s disabling resource-heavy services or cleaning out temporary files, every small change contributes to a faster and smoother PC experience.
🧷 Tags:
Windows 11 optimization, fix Windows lag, speed up Windows PC, disable startup apps, clean boot Windows, disable Windows services, memory integrity Windows 11, uninstall bloatware, remove temp files, boost FPS Windows
🔖 Hashtags:
#Windows11 #PerformanceFix #SpeedUpPC #CleanBoot #TechTips #WindowsOptimization #BloatwareRemoval #HitmanPro #SlowPCFix #ComputerTips
📝 Disclaimer:
This article is for informational purposes only. While the steps provided are generally safe, modifying system settings can affect your computer’s performance and security. Please proceed with caution, and if you’re unsure, consult a qualified technician before applying the changes.


