If you’re a Windows user and everything is running smoothly, consider yourself lucky! But at some point, you might encounter the dreaded blue troubleshooting screen. Many people simply wait for the process to finish, hit “Restart,” and hope for the best. But what if your computer can’t repair itself? What do you do when you’re faced with a screen offering various troubleshooting options?
In this blog post, we’ll explore each of these troubleshooting steps, showing you what they do and how to use them effectively. By familiarizing yourself with these tools, you may be able to fix your computer without losing all your data. Ready to dive in? Let’s get started!
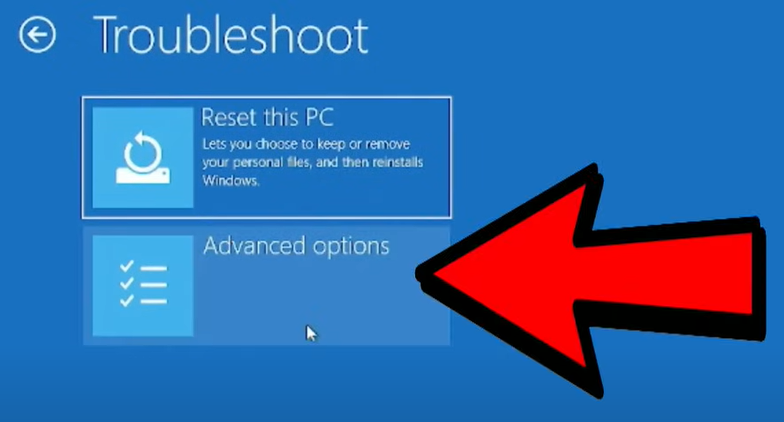
1. Understanding the Advanced Troubleshooting Screen
If your computer can’t fix itself, you’ll likely end up at a blue screen labeled Advanced Options. From here, click on Troubleshoot, and then Advanced Options. The options you choose will depend on the problem you’re facing.
2. Startup Settings and Safe Mode
If your computer suddenly stops working out of the blue, a good starting point is Safe Mode. This basic troubleshooting option allows you to boot your computer with minimal programs running. To access Safe Mode:
- Click on Startup Settings.
- Choose Safe Mode and restart your computer. If your computer works in Safe Mode, try restarting it normally to see if it runs smoothly. This simple step can solve many issues.
3. Dealing with Windows Updates
One of the biggest reasons for startup issues is an update gone wrong. Windows has two types of updates: Quality Updates (small updates, like drivers) and Feature Updates (major system updates). If you’re unsure which type caused the problem, try uninstalling Quality Updates first:
- Go to Uninstall Updates from the Advanced Options menu.
- If necessary, follow up by removing any Feature Updates as well. This process often resolves issues caused by problematic updates.
4. Navigating UEFI Firmware Settings
UEFI Firmware Settings allow you to access the BIOS (Basic Input/Output System) of your computer, where you can manage settings like Secure Boot or TPM. This option is mainly for advanced users who need to change boot sequences or other critical configurations. For most users, this option isn’t necessary, so unless you know what you’re doing, it’s best to skip it.
5. Using System Restore
Every time you make significant changes to your computer (or when you install new software), Windows may create a Restore Point. This allows you to revert your computer to an earlier state if something goes wrong. To use System Restore:
- Select System Restore from the menu.
- Follow the instructions to choose a previous restore point and return your system to that time. This step can often resolve software-related issues without affecting your personal files.
6. Exploring Advanced Recovery Options
Under Advanced Recovery Options, you can restore your computer from a Factory Image. This process, however, is not the same as resetting your computer to its original factory settings. You’ll only benefit from this option if you’ve previously created a system image, which most users haven’t. If you haven’t made one, don’t worry about this option.
7. Leveraging the Command Prompt
For tech-savvy users, the Command Prompt is a powerful tool. You can perform many advanced tasks, including checking the health of your hard drive and Windows file system. Two essential commands to know:
- System File Checker (SFC): Type
sfc /scannowto check and repair corrupt system files. - Check Disk (CHKDSK): Use
chkdsk /fto ensure the integrity of the Windows file system andchkdsk /rto check the physical health of your hard drive. These commands can solve many underlying issues that prevent Windows from booting properly.
8. Backing Up Files in Command Prompt
Even if your computer won’t start, you can still back up important files using the Command Prompt. Connect a USB flash drive, and then use the Command Prompt to manually copy critical files from your user directory to the USB drive. This method is invaluable if you haven’t set up regular backups and need to recover your data.
9. Windows Reset: Your Last Resort
If none of the above steps work, the last option is to perform a Windows Reset. This process reinstalls the operating system, but you’ll have the choice to keep or delete your personal files. It’s time-consuming and inconvenient, but it might be the only way to get your system up and running again.


10. Prevent Future Problems: Create a Windows Installer Disk
Even though Windows has built-in troubleshooting tools, it’s always a good idea to have a backup plan. Download a Windows installer disk onto a USB drive from the Microsoft website. This will allow you to reinstall Windows if things go seriously wrong. Keep it handy—you’ll be glad to have it if the need arises!
Conclusion
While facing startup issues on a Windows machine can be nerve-wracking, the steps outlined above offer a clear and actionable path to fixing your computer. Whether you’re using Safe Mode, System Restore, or the Command Prompt, each tool can help get your PC back to normal. Don’t wait until disaster strikes—familiarize yourself with these options now, and keep a Windows installer disk handy just in case!
#WindowsTroubleshooting #SystemRestore #BlueScreenFix #ComputerRepair #CommandPrompt #WindowsReset #CheckDisk #SFCSCAN #SafeMode #UEFISettings


