If you’re looking for a free, reliable way to extract audio from a video file—whether it’s MP4, MKV, or another format—Audacity is a powerful and efficient solution. This article explains, step-by-step, how to extract audio from a video file using Audacity, including how to enable support for MKV files through FFmpeg integration.
🎧 What is Audacity?
Audacity is a free, open-source, cross-platform audio editing software. It supports a wide range of features such as audio recording, editing, applying effects, and exporting in various formats. Though designed primarily for audio tasks, Audacity can also be used to extract audio from video files with the right configuration.
🧰 What You’ll Need
- Audacity Software
Download the latest version from:
https://www.audacityteam.org/download
Versions are available for: - FFmpeg Library
This is required to work with formats like MKV and MP4.
Download FFmpeg for Audacity here:
https://manual.audacityteam.org/man/installing_ffmpeg_for_windows.html
🖥 Step-by-Step Guide to Extract Audio from a Video File Using Audacity
Step 1: Install Audacity
- Go to the Audacity download page.
- Select the appropriate version for your operating system.
- Download and run the installer.
- Follow the setup instructions, accept the terms, and choose your preferred language.
- Once installed, launch Audacity.
Step 2: Add FFmpeg Support (For MKV and Other Formats)
By default, Audacity cannot open video files like MKV or MP4. To enable this:
- Open Audacity.
- Go to Edit > Preferences (or press
Ctrl + P). - In the Preferences window, go to the Libraries section.
- Click Download next to “FFmpeg Library”.
- This will redirect you to the FFmpeg download page for Audacity.
- Download the appropriate version of FFmpeg and install it.
- After installation, Audacity will automatically detect it.
⚠️ Note: Ensure you are using Audacity version 3.2.0 or higher. Older versions may not support FFmpeg properly, even after installation.
Step 3: Open the Video File in Audacity
- In Audacity, go to File > Open.
- Navigate to your video file (e.g.,
.mp4or.mkv) and select it. - If FFmpeg is correctly installed, Audacity will begin importing the audio stream from the video.
🛑 If you get an error trying to open MKV files, double-check that:
- FFmpeg is correctly installed.
- You’re using the latest version of Audacity (e.g., 3.3.2 or later).
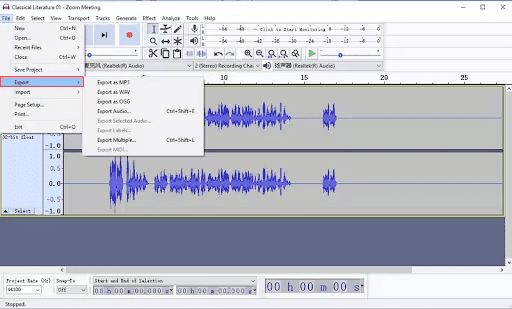
Step 4: Export the Audio
- Once the video’s audio is loaded into Audacity, go to File > Export > Export Audio.
- Choose your desired audio format:
- MP3
- WAV
- OGG
- FLAC
- Other supported formats
- Select the destination folder where you want to save the audio file.
- Modify file name if needed.
- Set additional options like bitrate, channels (mono/stereo), and sample rate.
- Click Export to complete the process.
📝 Final Notes
- Audacity with FFmpeg makes it easy to extract audio even from complex video containers like MKV (Matroska) without needing to convert to MP4 first.
- If FFmpeg is installed but MKV files still won’t load, update your Audacity to the latest version to ensure compatibility.
⚠️ Disclaimer
Always ensure that you have the legal rights to extract and use audio from video files, especially if they are copyrighted materials. This guide is intended for educational purposes and personal use only.
🔖 Tags
audacity, extract audio, audio from video, audacity mkv, ffmpeg, mkv to mp3, video audio extraction, free audio software, open source audio editor, audio editing guide
📢 Hashtags
#Audacity #FFmpeg #ExtractAudio #MKVtoMP3 #OpenSourceSoftware #AudioEditing #FreeAudioEditor #VideoToAudio #AudioTools #AudacityTutorial
With this guide, you can now easily extract audio tracks from video files in just a few minutes using Audacity. Enjoy editing and repurposing your audio content!