They say “dress to impress,” but we say “Photoshop to impress.” It’s not about making massive, unrealistic changes—it’s about enhancing your natural features to present the best version of yourself. In this guide, we’ll walk you through a classy, professional approach to editing your selfie in Photoshop, ensuring you remain the star of the show.
Step 1: Cropping for Better Composition
One of the first things to address is the cropping. A well-composed image makes a huge difference.
- Select the Crop Tool (C) – You can choose a preset ratio (square, 4×5, etc.) or freehand it.
- Adjust the framing – Ensure the subject is well-centered, removing unnecessary distractions.
Pro Tip: If you take mirror selfies often, clean the mirror beforehand—it’s easier than editing out smudges later!
Step 2: Cleaning Up Dust and Smudges
If your photo has dust, smudges, or unwanted marks, here’s how to clean it up:
- Create a new layer (Name it “Cleanup”).
- Use the Remove Tool – Make sure:
- Generative AI is turned off (for small fixes).
- “Sample All Layers” is checked.
- “Remove After Each Stroke” is enabled.
- Brush over imperfections – Take your time to clean up dust, spots, and smudges.
Before vs. After: The difference is subtle but impactful—your image looks cleaner and more polished.
Step 3: Removing Blemishes (Subtle Retouching)
We’re not going for heavy retouching—just removing minor imperfections to enhance your natural look.
- Create a new layer (Name it “Blemishes”).
- Use the Remove Tool to eliminate:
- Eye bags (reduce darkness under the eyes).
- Minor skin blemishes.
- Adjust opacity (around 70%) to keep it natural.
Step 4: Fixing Mirror Distortions
Mirrors can warp reflections, making lines appear bent. Here’s how to fix that:
- Create a merged layer (Ctrl+Alt+Shift+E).
- Convert it to a Smart Filter (Filter > Convert for Smart Filters).
- Apply Liquify (Filter > Liquify) – Use the Forward Warp Tool to straighten bent lines.
- Subtle adjustments – Fix any distortions in the background or subject (like uneven hair).
Step 5: Straightening the Image
If lines in your photo (like walls or mirrors) aren’t parallel, straighten them:
- Create a merged layer (Ctrl+Alt+Shift+E).
- Apply Camera Raw Filter (Filter > Camera Raw Filter).
- Go to Geometry and use the Straighten Tool to align lines properly.
Step 6: Making the Subject Stand Out (Highlights & Shadows)
To draw attention to yourself, we’ll brighten the subject and darken the background.
Adding Highlights
- Select the subject (Select > Subject).
- Add a Curves Adjustment Layer – Brighten the highlights slightly.
- Use a mask to refine where the brightness appears (avoid overexposed areas).
Adding Shadows
- Create another Curves Adjustment Layer – Darken the background.
- Invert the mask (Ctrl+I) to apply darkness only outside the subject.
- Refine with a second mask to preserve light sources (like lamps).
Step 7: Adding Special Effects (Optional)
Want to make a light source glow?
- Create a new layer and paint a white spot where the light is.
- Change blend mode to Color Dodge and reduce Fill Opacity (~46%).
- Add a radial gradient for a light glare effect.
Step 8: Enhancing Colors
Make specific colors pop (like a blazer or eyes):


- Add a Hue/Saturation Adjustment Layer – Target blues (or any dominant color).
- Increase saturation slightly (around +28).
- Apply a Color Lookup Table (e.g., “Crisp Warm”) at low opacity (~20%).
Step 9: Vignette for Focus
A subtle vignette keeps attention on you:
- Add a Curves Adjustment Layer – Brighten the center.
- Use a radial gradient mask to control the effect.
- Add another Curves layer to darken the edges slightly.
Step 10: Final Sharpening & Grain
If the image looks soft:
- Merge visible layers (Ctrl+Alt+Shift+E).
- Apply Camera Raw Filter – Increase sharpening and add grain for texture.
- Adjust grain settings (Size: ~42, Amount: ~60).
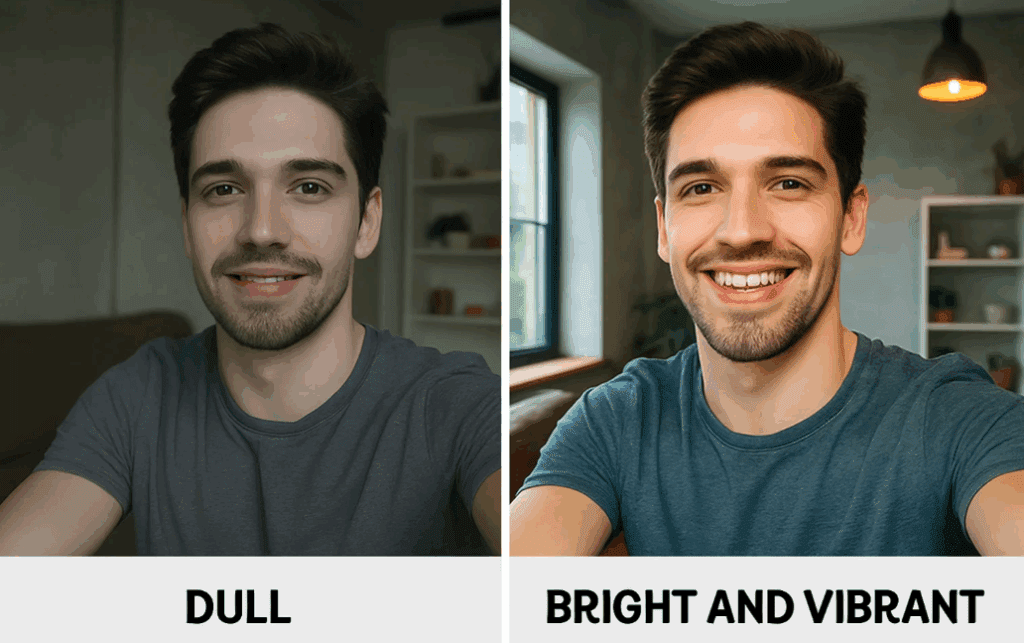
Before & After – The Transformation
Here’s the magic:
- Before: A decent selfie with minor flaws.
- After: A polished, professional-looking portrait with perfect lighting and focus.
Conclusion: The Photoshop Mindset
Editing isn’t about rigid steps—it’s about:
- Identifying problems (cropping, blemishes, lighting).
- Fixing them one by one.
- Enhancing what’s already great.
The goal? Make you stand out—naturally and impressively.
Ready to Try It Yourself?
Grab your selfie, open Adobe Photoshop, and start editing!
Tags: Photoshop Tutorial , Photo Editing , Selfie Edit , Retouching , Photoshop Tips , Portrait Editing , Photo Enhancement
Hashtags: #Photoshop #PhotoEdit #SelfieGoals #Retouch #DigitalArt #PhotoTips
Disclaimer: This guide is for educational purposes. Always aim for natural enhancements rather than unrealistic alterations.
Now, go ahead—edit to impress! 🚀