Are you facing issues with your PC or simply want a fresh start? Whether you’re troubleshooting problems, fixing errors, or preparing your laptop for a new user, resetting or formatting your Windows 11 system can make a big difference. In this detailed guide, I’ll walk you through the easiest and most effective way to reset or format your Windows 11 or Windows 10 PC—without needing any external drives, ISO files, or complex setup!
Follow along step-by-step and you’ll have your computer reset quickly and safely, while protecting your personal data if you choose.
Step-by-Step Guide to Reset Your PC
Step 1: Open Settings
First, head over to your computer’s Settings.
You can quickly do this by searching for “Settings” in the search bar and opening it.
Step 2: Go to System → Recovery
Once inside Settings, navigate to:
- System
- Recovery
Here, you will find the “Reset this PC” option.
Step 3: Click on “Reset this PC”
When you click Reset this PC, you’ll see two options:
- Keep my files: This will remove apps and settings but keep your personal files.
- Remove everything: This will completely wipe the device, including all your files, apps, and settings.
Choose the one that best suits your needs.
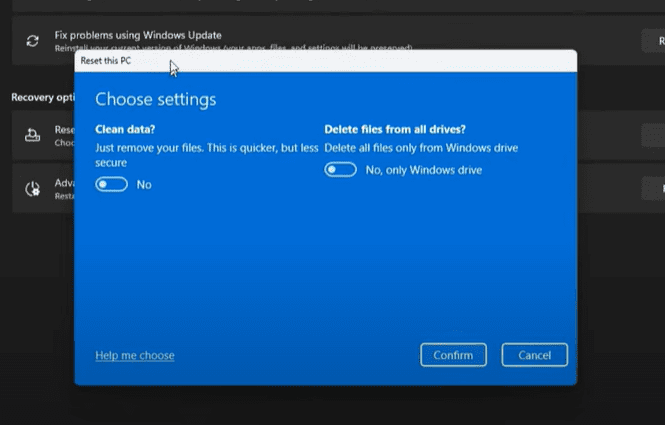
Step 4: Adjust Reset Settings
After choosing an option, you’ll get additional settings:
- Clean data?:
Turn this ON.
This ensures your data is securely erased, making it harder for anyone to recover deleted files. - Delete files from all drives?:
If you want to wipe only the main drive (usually C:), turn this OFF.
If you want to wipe all drives, turn this ON (useful if you’re giving away or selling the PC).
Tip:
If you have important files on other drives (like D:, E:), keep this setting OFF to avoid losing your personal data.
Step 5: Confirm Your Choices
Once you adjust these settings:
- Click on Confirm.
- Then click Next.
Windows will show you a summary of what’s going to happen.


Step 6: Disconnect from the Internet
Before starting the reset, disconnect your PC from the internet.
This will prevent Windows from downloading unnecessary updates during the reset, speeding up the process.
Step 7: Start Resetting
Click Reset when you’re ready.
Your PC will restart and begin the reset process.
Important:
Resetting may take anywhere between 30 minutes to 1 hour, depending on your hardware.
If you have an SSD, the process will be faster.
After the Reset: Initial Setup
After the reset is complete:
- Choose your country (e.g., India).
- Select the keyboard layout.
- Skip any unnecessary steps like secondary keyboard layouts.
- Accept the license agreement.
- Choose Set up for personal use.
- Either log into a Microsoft account or create a new local account.
- Set a PIN (mandatory for security).
- Complete the initial setup, skipping features you don’t need immediately.
Pro Tip:
If you only reset the C drive, your other drives (D:, E:, etc.) will remain intact with all your files safe!
Final Words
By following this method, you can reset or format your Windows 11 PC without needing any external tools like a bootable USB or ISO file.
Your PC will feel brand new again, and you’ll be ready to use it without the usual clutter or performance issues.
Remember:
- Always backup important data before proceeding.
- Choose the correct options based on whether you want to keep or remove your files.
Hope this article helped you! If you have any questions or face any issues, feel free to ask in the comments.
Tags:
Windows Reset, Windows 11 Reset Guide, Format Windows 11 PC, Factory Reset Laptop, How to Reset Windows, Windows 10 Reset, Computer Troubleshooting, PC Maintenance, Windows 11 Tutorial, System Recovery
Hashtags:
#Windows11 #WindowsReset #PCFormat #LaptopReset #FactoryReset #WindowsTutorial #TechGuide #PCTips #WindowsRecovery #PCMaintenance


