If you’re looking to start Java development or need Java 8 for a specific tool, you must first install the Java Development Kit (JDK) on your system. This article walks you through the entire process of downloading, installing, and setting up Java 8 (JDK 8) on a Windows laptop.

Step 1: Open Your Browser and Search for Java JDK 8
- Launch any web browser like Chrome or Edge.
- In the search bar, type “Download Java JDK 8”.
- Locate the official Oracle website link or go directly to Oracle JDK 8 Downloads.
- Open the link to access the JDK 8 download page.
Step 2: Choose the Right Installer for Your System
- Scroll down on the Oracle JDK 8 download page.
- You will see different download options for Windows:
- Windows x86 – for 32-bit systems.
- Windows x64 – for 64-bit systems.
- Choose the correct version based on your system type. Most modern systems are 64-bit.
- Click on the download link next to the version you need.
Step 3: Sign In or Create an Oracle Account
To download JDK from Oracle, you must sign in.
- If you already have an Oracle account, sign in.
- If you don’t, click on “Create Account”.
- Fill in the required information (name, email, password, etc.) and click Create Account.
- A confirmation email will be sent to your inbox.
- Open your email and confirm your registration.
- After confirmation, refresh the download page and sign in if prompted again.
Step 4: Download and Save the Installer
- Once signed in, the download will begin.
- Choose a folder to save the installer. It’s a good idea to create a separate folder like
Softwarein a drive (e.g., D:\Software) to keep all your installers organized. - Save the
.exeinstaller file in the selected folder.
Step 5: Run the Java JDK Installer
- Navigate to the folder where the installer was downloaded.
- Double-click the
.exefile to run the installer. - A setup wizard will appear. Click Next.
- Choose the default installation path or customize it if needed.
- Click Next again to begin the installation.
- Wait a few moments for the installation to complete.
Step 6: Set Java Environment Variables (JAVA_HOME)
Now that Java is installed, you need to configure environment variables.
Step 6.1: Find the Java Installation Path
- Go to
C:\Program Files\Java\and open the folder with the JDK version you installed (e.g.,jdk1.8.0_xx). - Copy the full path of this folder (e.g.,
C:\Program Files\Java\jdk1.8.0_281).
Step 6.2: Add JAVA_HOME
- Right-click on This PC or My Computer, then click Properties.
- Click Advanced system settings.
- In the System Properties window, click the Environment Variables button.
- Under System variables, click New:
- Variable name:
JAVA_HOME - Variable value: (paste the path you copied)
- Variable name:
- Click OK.
Step 6.3: Update the Path Variable
- In the same Environment Variables window, find the variable named Path under System variables.
- Click Edit.
- Click New and add the following line:
%JAVA_HOME%\bin - Click OK to close all windows.
Step 7: Verify Java Installation
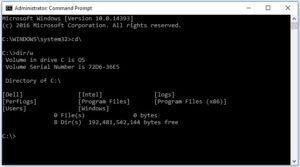
- Open Command Prompt (
cmd) by searching it from the Start menu. - Type the following command and press Enter:
java -version - You should see the installed Java version displayed.
- You can also test the compiler by typing:
javac -version
If both commands return version information, your Java installation and setup were successful.
Conclusion
You’ve now successfully downloaded, installed, and configured Java JDK 8 on your Windows laptop. This setup allows you to compile and run Java programs from the command line or any IDE. If you face any issues during the installation process, carefully re-check the steps listed in this article.
Tags:
java installation, java 8 setup, install jdk 8 windows, java environment variable, oracle jdk 8, java home path, setup java on windows, java jdk tutorial
Hashtags:
#Java #JDK8 #JavaInstallation #JavaSetup #OracleJDK #Windows10 #JavaTutorial #Programming