If you’re looking to install Tally Prime, the latest version of India’s most popular accounting software, you’re in the right place. This article will walk you through the safest, official, and error-free method to download and install Tally Prime on any Windows PC or laptop.
Whether you’re a student, small business owner, or running a registered company, this guide will help you choose the right version and get started in minutes.
Why You Should Avoid Older Versions Like Tally ERP 9
Many users unknowingly download Tally ERP 9, thinking it’s still the latest version. But that’s outdated!
The current and most recommended version is Tally Prime.
Tally Prime is more modern, intuitive, and better optimized for today’s business needs. It’s important to avoid unofficial or outdated versions that may lead to errors or compatibility issues.
Step-by-Step Guide to Install Tally Prime on Your PC
✅ Step 1: Open Your Browser
- Launch your preferred browser (Chrome, Edge, Firefox, etc.).
- In the search bar, type “Tally Prime Download”.
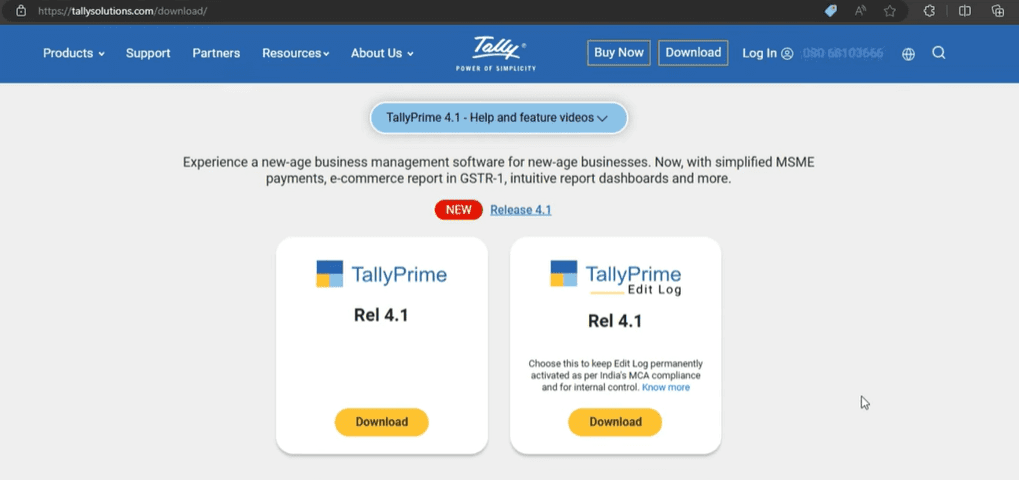
✅ Step 2: Visit the Official Tally Website
Avoid third-party sites or clone pages. Only download Tally Prime from its official website:
Be cautious—many fake websites appear in search results. Only the domain tallysolutions.com is trusted.
Step 3: Choose the Correct Version of Tally Prime
Once on the website, you’ll see two options:
- Tally Prime (Standard Version)
- Tally Prime Edit Log Version
Here’s how to decide:
✔️ Use Standard Tally Prime if:
- You’re learning or practicing Tally
- You want to use it for a local business or shop
- You’re a student or freelancer
✔️ Use Edit Log Version if:
- You’re using Tally for a registered company under the Companies Act
- You need audit trails and regulatory compliance
Both versions are safe to use, but choose based on your needs.


Step 4: Download the Setup File
- Click the Download button for your selected version
- The file size is approximately 42 MB
- Once downloaded, double-click the
.exefile to start installation
Step 5: Install Tally Prime
- Launch the setup file
- Click Yes if prompted by Windows
- The installer will auto-select installation paths (you don’t need to change them)
- Click Install
- Wait for installation to complete
- Click Start TallyPrime to launch
You can also launch it later from your desktop shortcut.
Step 6: Using Tally Prime
When Tally Prime opens for the first time, you’ll see options to:
- Try It for Free (Educational Mode) – for learning and practice
- Activate New License – if you’ve purchased Tally for professional use
Educational Mode:
Great for students or first-time users. You can explore features, create entries, and understand how Tally works—no license required.
Activate License:
Tally Prime is paid software, but if you’re using it in a business or for official purposes, you must purchase a license and activate it via the software.
Pro Tips
- Avoid Pirated Copies: These may contain malware or corrupt files.
- Only download from official site: https://tallysolutions.com
- Back up your work regularly, especially if you’re practicing in educational mode.
Summary
With Tally Prime, you can manage your business’s accounting, GST, inventory, and payroll with ease. This article helped you:
- Understand which version to use
- Find the correct website to download from
- Complete the installation without errors
- Start using it safely for learning or business
If you found this article helpful, consider sharing it with others who may benefit from a clean and safe installation of Tally Prime.
Tags: Tally Prime, accounting software, install Tally, Tally ERP 9, business tools, accounting tools, learn Tally, Tally educational mode, Tally for PC, Tally download guide
Hashtags:
#TallyPrime #AccountingSoftware #TallyInstallation #WindowsGuide #BusinessTools #TallyDownload #TallyLearning #TallyTips #PCSetup #TallyForStudents


